Showing posts sorted by relevance for query lego storage. Sort by date Show all posts

Friday, October 28, 2011

184 Organizing Legos: Part 3 - Creating Organized Lego Storage

Welcome back to Part 3 of my little Lego series.  So far I have blabbed about the build buckets and the build table, but I know what you really have been waiting for.  What in the world did we end up doing with all of those big bins of  Legos?

Well, be ready for a picture filled post to find out!

First, I have to mention, we have been accumulating Legos for YEARS.  In fact, my husband had a giant bin of them under our stairs for the longest time, just waiting for our boys to grow old enough to play with.  Not to mention, as you know we have three boys, so what is always the easiest gift choice at holidays and birthdays?  Legos. 

This project started out with four large Rubbermaid bins full of Legos, along with the craft drawers we attempted to use as storage as well.  {we only had one small cart and it just wasn't big enough for our growing collection}.


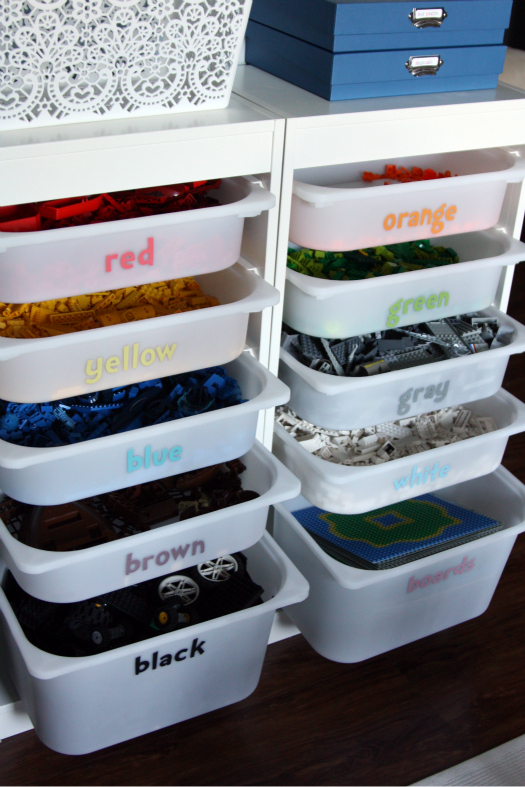
My initial reaction was to sort out the pieces by type.  Bricks, boards, wheels, etc... The boys disagreed.  They wanted things done by color.  They were so nicely reminded it was going to be their duty to maintain whatever new system we implement and that the whole point was to make building easier and more fun for them.  So I let it be their choice on how things were done, and sorting by color won.

The next step was to come up with the best way to containerize all of the pieces by color.  I instantly knew the IKEA Trofast system was the way I wanted to go, but I did try and think up other alternative solutions... Cricket cricket.  I had nothin', so Trofast it was!


Then came the REALLY fun part.  The sorting.  OK, not so much fun.  But we tried our hardest to enjoy it.  We all sat together, surrounded by bins, watched movie after movie for an entire day and a half until it was done.


I had the boys help me for 75% of the time.  I figured if they were part of the sorting process, they would appreciate it more and be more apt to help maintain all their hard work.  It's been a couple of weeks now and I am happy to report, so far SOOO good!

When it came to labeling the bins, I sat on this one for awhile.  I wanted to do vinyl with my Silhouette.  SO badly.  And I wanted the words on the front to be the same color as the blocks in the bins.  So when I looked online and in stores at vinyl prices, I about had a heart attack.  10 bins at $7 minimum a color... um no thanks.  Shucks.  I did some research and heard about adhesive backed cardstock.  Again, $5 per color and not every color I needed.  Strike two.  Then it hit me!  I could use regular colored cardstock, cut the words out with my Silhouette, and adhere them to the fronts of the bins myself, all while saving a TON of moolah over the alternative options!  Whew, almost struck out, that was close!

So that's what I did.  I started cutting out letters from each color of cardstock.  The best part of this was that I could use shades of the color that I liked vs. the harsh, primary color that Legos usually are.


I used Dr. Seuss shaped font, it is for a playroom after all! 

To adhere the letters, I wanted something that would last.  And look clean and resemble the look I would have gotten with the vinyl.  So I went with Mod Podge in a matte finish {which is the same finish of the Trofast bins}.


I used some painters tape to give myself a straight line to work with and to ensure the letters were placed in about the same location on each bin.


Then, I used a brush to "paint" on some Mod Podge, stick the letter on the bin, and then Mod Podge over the letter to really make it stick.


Don't worry as you are doing this... it gets worse before it gets AMAZING....

{while drying}


Once all of the Mod Podge dried, you wouldn't have even known it was there to begin with!  WIN!


Totally stinkin' adorable.

The only items we didn't do by color were the boards and little people.  The boards got a large Trofast bin, the people got a smaller storage box.


So did all the manuals.


Again, I hashed out manual storage options.  I originally was going to binder them into plastic page protectors.  But I know my boys.  I imagined that over time, they would take the manual out and it wouldn't easily find its way back.  So they now just get piled in a storage box and it's done.  I am very OK with that since I want it to be easiest for them to maintain.

When it comes to the "builds" they create, sometimes they like to keep them for a little while {however, they play with Legos because they love to create and build, so they don't seem to be too concerned about keeping their sets together for long periods of time}.  I wanted to give them a place in their new playroom to begin displaying their creations, so we installed some inexpensive shelves above the Lego storage bins.


Up until now, they have never really had a place to display their projects, which is why you don't see anything up there right now.  But now they have a place should they want it.  For the time being, I just shopped around the house for items to prop up on the shelves as placeholders, along with some free kid's printable art I found through the lovely world of Pinterest.


Ready to see the whole Lego wall in all it's organized glory?


We are so incredibly smitten with how the whole entire project turned out.  We now have a place that the boys can build and create and the storage is both functional, yet dressed up to blend in and become part of the decor. 

And that my friends, concludes my Lego mini-series!  Until next week that is, when I will host a Lego Link Up Party and we can all swoon over all of your other ideas and Lego storage solutions.  I know there are tons of Lego organizing options out there, many of you have already shared with me incredible ideas that are working well for you!  Next week we will have a chance to share those ideas with all the readers!

Wednesday, February 1, 2017

19 Lego Organization! A Follow-Up & Some New Tips!

I mentioned last week that I had some last minute travel come up. One of those trips was out to Texas to work with my girlfriend, Grace. While I was there, her little guys were asking my advice on Lego storage. They had a bit of a mess happening in their room and were overwhelmed by all of the pieces and builds and piles... And I have to say, I wasn't at all surprised. Lego organization is one of the most common topics I am asked about. Readers want to know, "Does the color system still work for you?" Parents want to know, "Is there anything I can do to prevent the middle-of-the-night Lego booby traps that attack my feet?" And the kids want to know, "Is this going to be easy to pick up? Because I ain't got time for anything complicated. I have worms to eat and my sister to color on and other toys that require my attention. Oh! And that leftover pepperoni and olive pizza to eat in the fridge. So let's keep this simple, OK?"

I never would have thought that Lego storage would be right up there with pantry cabinets, linen closets and paper piles, but if you think about it, they are quite the universal toy. It doesn't matter if you are a girl or boy, young or old, happy or sad; everyone loves playing with Lego pieces!

So today I thought I would do a little follow-up post about how our system is working, and what approach I took with Grace's cutie pie kids.


We shared our system quite a few years ago now, and it is still a very hot spot for our younger two boys. Even our oldest will get creative with the different sets from time to time. Right now we have half of our laundry room unloaded into the boy's hangout area, and they insisted we just move the Lego bins up to our son's bedroom temporarily. So we did.

To summarize, we used two Trofast towers paired with these bins, sorted everything by color, and created labels by cutting vinyl with my Silhouette.

I will be the first to admit I wasn't fully on board with the idea to organize our pieces by color. The first step in the process is always to interview the kids and get their ideas and input. My boys wanted color. I guess they figured it was the easiest way to identify pieces and find what they were looking for. Overall, it has worked out surprisingly well, with some very minor exceptions. In fact, the majority of their Lego pieces are still sorted by color today.


A few things that have helped the system succeed:

  • The boys have areas in their personal spaces to play with and display their Lego creations.
  • Each boy has a large, lidded bin for storing their "in-progress" work. The bins are clear, light weight, stackable and fit in a concealed cabinet when not in use.
  • Every 4-6 months we take an hour or so to sort their personal bins back down to the colored bins. Generally they are hurrying during pick-up time and then throw their current messes into their personal bins instead of sorting them down accordingly, which adds up over time. 
  • Sometimes I sit and sort with them (sorting is my therapy), but they are perfectly capable to do it on their own and the entire system is definitely easy enough for them to maintain.
  • I very recently picked up a couple of divided bins to further break down special pieces and people. That is a newer work-in-progress, but they boys seem to be digging the idea.


When it came to helping out Grace's youngsters, I took a slightly different approach. If I have learned anything over the years, it is that just because something works for us, doesn't mean it is going to work for everyone. So I sat down with her kids and asked a series of questions. Things like...
  • Where do you prefer to play with your Lego builds?
  • Do you build from the manuals or from your imagination? Or both?
  • What do you like to do with your completed projects? Do you ever take them back apart?
  • What is your favorite creation and why?
  • Show me what a typical Lego playing session looks like.
  • How are you currently organizing/sorting your pieces? What is working? What isn't?
  • What would make your Lego experience even better?


A few things the kids mentioned in response to these questions were:
  • They play with their Lego creations in their bedroom.
  • They like to build from manuals and from their imaginations.
  • They generally like to leave all of their builds together once finished.
  • They started to organize their pieces by color but they were not finding it to be super helpful. The remainder of their pieces were between an oversized canvas tote and a bin in their closet. 
  • They would take the large canvas tote out and sift through it, dumping piles of pieces on the floor to look for specific items.
  • They wanted more boards, they love to build on boards. 


Based on their responses, I suggested the following solutions:
  • Only store Lego pieces in clear bins so the kids can better see the pieces they are digging for (shallow bins work OK as well, as long as there are not too many pieces inside).
  • Set up a temporary or larger solid surface area for the kids to build and play on (vs. playing on their Lego eating rug on the floor). Something like our puzzle board that can be pulled out during play time and then tucked away between uses.
  • Simplify the sorting process. Based on how they use their pieces, I suggested they only sort down to the following four basic categories: People/Accessories, Solid Bricks, Specialty Pieces and Boards. The end goal is to make it easier to find things and to pick-up.
  • Grace already had purchased and added a tall adjustable shelf for the kids to display all of their creations in their bedroom (you can see the short version in their space here, she recently upgraded to a tall version for more display space).
  • Sort down the bulk of their current pieces and sets, and moving forward, begin storing the really important sets in their own stacking containers and bins. Or inside of labeled Ziploc type storage bags and then placed into a hard-sided bin. 
  • Select bins that are easily portable from the closet to the floor.
  • Create an easy place to organize current instruction manuals.

We started working on their new system while I was visiting, and Grace and her kids felt like they had a good start on things but still plan to take their final setup even further down the road.

To get them going, I taped a piece of paper to the front of each bin that clearly stated the bin's specific category, as well as a few descriptive words to offer some guidance during the sorting process. Because they were not sorting by color, there were a few gray areas and adding some specific terms to the sorting labels was quite helpful. Her kids took it from there.


These bins are awesome for stacking and tucking away in narrow closets and spaces. They are also clear which is a huge win for digging and searching.


The label holders are adhesive and clear, making it easy to update the contents down the road. They are also fairly heavy duty, and should stay on the bins even with a little wear and tear.

Bonus: They are so easy to use; just stick onto the face of the bin, fill out the included card, and done! No fancy equipement necessary.


These carrying cases are amazing for smaller pieces and people. Grace plans to add a couple more to their collection to further sort down some of the specialty pieces. I love that they are clear and the dividers are removable. I can also think of 101 other places I want to use these spiffy little cases.


And finally, a basic three ring binder paired with clear page sleeves (both found at Target) worked beautifully for organizing a stack of instruction manuals. Now they can easily flip through the binder to pick out their next creation or to find new ideas and inspiration.

__________

Hurray for a much overdue follow-up to our previous Lego post. Please feel free to chime in with additional questions, ideas and suggestions, this is a topic that will forever be popular!


Wednesday, January 13, 2010

639 IHeart My Home - Home Tour!

Welcome to our happy and humble abode!  Feel free to leave your shoes at the door, and make yourself at home!

Oh, and of course the disclaimer!  Our house is ALWAYS "under construction" as many would say.  And our "To Do" list never shrinks; it's just keeps growing and growing.  So please give my hubs a great big sympathy hug the next time you see him, because he is always seen toting around his tool box and tape measure and I always have a project for that "honey do list".


13 years ago was a very exciting time for my husband and I.  We were expecting our first child, we had just rushed to the altar and we were building our first home.  Oh!  And we were youngsters at the ages of 19 and 20.  So although our hearts were big, our budget was small.  We had never owned a home before, and didn't have the first clue about what all it entailed.  We purchased a sweet little lot in a small Midwestern town and never looked back.

Our home started out as a modular ranch, and the walls were delivered while I was in labor with our now oldest son.  I remember getting out of the hospital and heading straight to see our new home and feeling more joy than my fingers are able to type out.  With shallow pockets, we ended up selecting the most inexpensive "builder grade" finishes throughout the entire home.  But none of that mattered.  We had one another, we had our baby and we had a blank canvas.  


And that is how it all began!  My first favorite memory of our new home was laying on the berber carpet in the middle of our big empty living room, looking at Bryan and feeling excited to assemble our very first piece of furniture.  I have always loved to read home magazines and pour my heart into my surroundings, so having our own haven to work on has been a dream come true.  Everything you are about to see in this tour has been over thirteen years in the making (and all done while also adding two more boys and two furry friends into the family mix).  And what makes us most proud, is that we have done majority of the work on our home with our own two hands.  Aside from hiring out help for electrical, plumbing and heating, we have planted our yard, built a deck, installed a patio, painted our hearts out, updated bathrooms, installed tile, taken down and re-built walls, laid flooring, swapped out fixtures and DIY'd furniture galore.  

It hasn't always been easy.  We are essentially self taught, which means we have made many mistakes along the way.  But those mistakes have only fueled our fire.  Or have made us laugh.  

OK, enough chit chat.  Let's take a look at the house already!  But one last thing.  As much as we love our home and I love to organize, our home is NOT always picture perfect.  This blog is my place to share our stories and our home highs and lows, and if you click through to the projects you will notice that most of them will show our everyday messes.  You can also find my thoughts on perfection in this post here.  Before I took these photos of our home, I cleaned and scrubbed and cleaned some more.  Inviting the world wide web of strangers to tour your home is far more intimidating than having your neighbor over for coffee or even hosting a cocktail party with 20 of your closest friends.  

______________________________

The front of our home boasts a narrow porch, which for the longest time, the kiddos used as a garage for their bikes and scooters.  I decided it was time to reclaim the space, so I painted the ceiling, updated some outdoor planters, painted the front door and added some furniture.  Now it is the perfect spot for a cup of coffee or to read a magazine while watching the boys play out front.

Colors: Front Door - Behr's Harbor, Planters - Behr's Ozone
Projects: Front Porch Refresh One and Two
Sources: Planters (similar), Lights, Chairs, Pillows (similar), Mirror

I really wanted the front of our home to reflect the interior.  We consider ourselves fairly fun and youthful, and we try not to take ourselves or our decor too seriously.  In fact, we really love color and have made sure to splash it all over our walls and furnishings.  

Let's step inside.


I really love before and after pictures, so you get to see a few shots of our home shortly after we moved in.  This blog definitely shows us finding our way and our style over the years.  The above was a rag wall treatment gone wrong, and a layout that didn't maximize our home's potential.  Today it tells a different story.


As I mentioned above, when we initially approved the blueprints to our home we were a little clueless.  The entry is the first example of one of our biggest mistakes/regrets.  We made some alterations to the building plans and swapped the location of our stairs, which ultimately took away an entryway coat closet.  That required us to get creative with our furnishings in order to make the most of a really small space.  We added a narrow shoe cabinet as well as a credenza that our boys use as their school cubbies.  The goal was to keep everything super simple to access and put away, while concealing daily clutter.

Colors:  Walls - Glidden's Smooth Stone

Although our landing is small, the entryway flows into a much bigger space; our living room!  Which really is not that big, coming in at approximately 12 feet wide.


Majority of the changes in our living room have been simply cosmetic.  We installed a new floating laminate floor a year or two after we moved in.  The walls have been painted about five different colors, and the lighter we went, the bigger it felt.  

Colors: Walls - Glidden's Smooth Stone
Projects:  Built-In Bookcase Part 1 & Part 2, Craft Store Storage, Craft Cabinet Organization
Sources: Sunburst Mirror (similar), Lamps (similar), Blue Boxes, Floral Boxes, Lanterns (similar), Bookends, Blue Chair, Sectional, Coffee Table, Gallery Wall Frames (similar), White Tray, Blue Pillows, Coral Pillows, Black/White Pillow, Black White Stripe Throw

As our family grew, we slowly changed out our furnishings.  And the media cabinet was one of our favorite DIY projects to date, simply created out of off-the-shelf white bookcases.


Colors: Walls - Glidden's Smooth Stone
Projects: DIY Curtain Panels
Sources: Gold Vase, White End Table, Gold End Table, Gold Storage Box, White Lace Basket, Rug

A view that stops me in my tracks each day is looking from our living room back towards our dining room.  Hello beautiful blue storage hutch!


The dining area was another blank canvas I couldn't wait to personalize.  It is where we come together as a family each evening, and I really wanted the space to be special.


Stripes, curtains, a little Craigslist shopping and mixing and matching pieces for our new dining table and the space truly smiles for us now.


The hutch wasn't always the beauty she is today.  Purchased second hand from a stranger, I couldn't wait to liven it up with paint.  I know I shouldn't play favorites, but this piece tops my list.


Colors: Walls - Glidden's Smooth Stone & Martha Stewart's Picket Fence
Hutch - Sherwin William's Reflecting Pool
Projects: Painted Dining Room Hutch, DIY Curtain Panels
Sources: Chandelier, Antlers, Dining Table, White Chairs, Tufted Bench, Vase, Cake Stand

The dining room acts as a bit of a connector of the entryway/living room and the kitchen.  And why does everyone in the Midwest have a love affair with oak?  I think some oak can actually be quite lovely, but the oak that we put in our home - not so much and waaaay too much.  (I was initially outvoted on white cabinets, trim and doors.)


After living with the oak for a few years, I finally convinced my husband that everything would feel much lighter and brighter with the help of a few coats of paint.


We have giant plans for our kitchen, but the paint was a nice temporary fix until that day comes.

Colors: Walls - Glidden's Smooth Stone, Cabinets - Behr's Navajo White
Projects: Painted Cabinets & Trim, Organized Pantry, Kitchen Cabinet Tour, Organized Fridge
Sources: Frames (similar), Barstools, Pendant Lights, Vase, Toaster, Utensil Holder (similar)


Just inside our garage entrance and tucked behind our fridge, we installed a little wall message center.  LOVE doesn't begin to describe it.

Colors: Walls - Glidden's Smooth Stone
Projects: Organized Mail Bins
Sources: Mail Bins

Heading back towards the hall now, there are a few bedrooms and our main bathroom.


The first door on the right is our main bathroom.  Three little guys share this space each day and it also has to suite our guests.  Although, I apparently tried to claim it as mine when we first moved in... sigh... that is a lot of purple.


The bathroom received quite a few mini updates courtesy of paint, but nothing more than that until 2014.  After 12 years of full time use, both the vanity and toilet were no longer fully functioning.  So we updated the floors, vanity, lighting, mirror, toilet and walls.  The room instantly felt bigger, which was no easy task considering it is only a five foot box.

Colors: Walls - Behr's Burnished Metal, Glidden's Misty Moonstone
Sources: Vanity, Sconce, Mirror, Faucet, Elephant Art, Hooks (found on eBay), Hand Towel, Wall Numbers, Bath Towels


This past year we added some life to our hallway with playful dipped frames filled with some of our favorite memories.

Colors: Walls - Glidden's Smooth Stone
Projects: Dipped Frame Gallery Wall, Hall Light Update
Sources: Picture Frames

As much as we love our home and have completed quite a bit over the years, there is still a lot of fun to be had.  One room I have been working on extremely slowly, is our oldest son's space.


He is growing faster than I like to admit, and suddenly his room needs to be tailored to a teenager!  I don't have the first clue how to design a teenage boy's room, and he really is content with just about anything which means he doesn't provide me with much direction. 


So for now I just let him do his thing and the room is nice and livable , it just needs a few finishing touches.  Fingers crossed we have those done before he heads off to college!

Colors: Walls - Behr's Cayman Bay (lower), Behr's Burnished Metal (upper & closet)
Projects: Striped Curtains, DIY Chalkboard Calendar, Closet Study Nook
Sources: Bedframe (thrifted), Nightstand (similar), Bedding, Dresser (hand-me-down), Docking Station, Closet Shelving, Task Light

Our other boy's bedroom is a different story.  This one was much easier for us to update and although it has already been a few years since we finished it, we still love it oh-so-much.  Decorating for younger kidlets is stree-free - can't go wrong - get to play with colors and patterns - kind of fun!

Colors: Walls - Behr's Windsurf, Pittsburgh Paint's Cityscape
Projects: Wall Map, Painted Stripes, DIY Upholstered Headboards
Sources: Wire Airplane, Pouf, Bedding, Sheets, Throw Pillows, Airplane Posters, Cabinet - Frame/Door, Sconces

Although we have one more bedroom on the main level, our younger two boys enjoy sharing a room for now.  The majority of the room was DIY'd, and our boys provided us with a lot of their own visions and input.  Because we don't store too many toys in the space, we didn't have many storage issues in the main sleeping area.  However, when it came to two little guys sharing a single small closet, it required me to get creative with the storage plan.

Colors: Walls - Behr's Windsurf, Pittsburgh Paint's Cityscape
Projects: Rail of Hooks, Kid's Closet
Sources: Closet Bookcase, Bins (similar), Hooks, Airplane Art, Wall Bookshelves

We divided the closet with an inexpensive bookshelf and paired it with two sets of closet rods on either side.  It has been functioning big for the boys (and us!).  We also added an additional rail of hooks behind their door to add extra hanging storage.


Across the hall is the guest room, however, it initially started out as the master bedroom when we first moved in.


Another project that I have always adored and now wish wasn't tucked so far away in our home, is our guest room desk nook.  That wallpaper gives me giant heart eyes!

Colors: Walls - Behr's Burnished Metal
Projects: Closet Desk Reveal
Sources: Bedding, Duvet, Mirror, Lamp, Side Table (x2), Headboard (DIY), Wallpaper, Pen Cups, Swing Arm Lamp, Craft Drawers, Craft Paper Slots, Clear Chair

The guest room has an attached bath, which once again started falling apart, even before the main bathroom did!  Here is a before of the finishes we selected when the home was first built.


We lived with it broken down for awhile, but when we found out we would be hosting a guest, it was time to get it fully functional again.  A week long makeover happened with a mad dash to the finish line.


Colors: Walls - Behr's Quietude, Vanity - Martha Stewart's Wrought Iron
Projects: Bathroom Makeover Reveal
Sources: Counter/Sink, Faucet, Mirror, Sconces, Wood Vase, Soap Pump, Grace Print, Soap Dish (thrifted), Towel Hooks

Now, let's head downstairs.

We have finished our lower level twice now, due to an unfortunate flooding that took place a few years back.  The second time around we installed a waterproof vinyl laminate flooring and moisture resistant trim.  We hope those updates will safeguard us in the future should our sump pump fail during a power outage again. 


Before we finished our lower level, our laundry room was originally just framed out and carpeted with scraps from the original living room flooring:


There are some spaces I enjoy making over more than others.  Kid's rooms and laundry rooms rank at the top of the list.  Home Offices are typically right up there as well.

Colors: Walls - Behr's Light French Grey
Sources: White Baskets, Cleaning Caddy (tin utensil caddy), Laundry Detergent Bin, Green Boxes
 
Being a short gal, I was excited to upgrade to front loading HE machines.  I have never once felt regret.  We also finished the walls, installed flooring and hung floating shelves (with decorative corbels) to make the most of our vertical space.

The functionality of the room has been evolving over the years, and recently also turned into the room where we store all of our paint supplies.  That required some special storage, so we built ourselves a pretty fabulous cabinet.

Colors: Walls - Behr's Light French Grey
Sources: Woven Baskets, Stain Removal Prints, Frames (similar)

And do you also see that wall to wall storage to the right?  We also built that completely from scratch.  Definitely one of our biggest building projects to date, but we gained some pretty fabulous storage as a result.  It now acts as a cleaning closet, beach gear storage, a place to sort, dry and fold laundry!

Colors: Walls - Behr's Light French Grey
Sources: Paper (garden trellis), Stool (spray painted), Iron Board Holder (similar)

 
Not only do I really like to make laundry rooms look pretty because so many chores take place there, it is also the room I sit and look at all day while I work in my nearby studio.

Colors: Walls - Behr's Reflecting Pool
Sources: Lamp, Glass Box, Pen Holder, Chair Fabric, Pink Pillow, Dot Pillow, Silver Frames

This room has been through change after change after change.  I am not sure I will ever get it "right" or feel as though I am finished with it, because I really struggle working in an area of the home that doesn't receive any natural daylight.  And I sit in this space A LOT.  So I think I am raising the white flag until we can move it someday.  I am pretty happy with how far it has come however.  And the amount of storage I have is pretty gosh darn incredible.

Colors: Walls - Behr's Reflecting Pool
Sources: Cookie Jar, White Box, Rails (similar), White Hanging Cups, Gold Terrarium, Cloche, Craft Cart, Rug

Not only have we built in a lot of cabinet storage, we also finished the closet under the stairs with flooring and walls, and now it is a storage haven.

Colors: Walls - Behr's Reflecting Pool
Projects: Under the Stairs Closet

Another completely untouched room in our home is our family room.  We are talking complete blank slate to play with!  And I have big plans for this space someday! (Can you hear my evil, scheming laughter?)

Colors: Walls - Behr's Reflecting Pool
Sources: Floor Lamp, Coffee Table, Gold Tray, Sectional, Stripe Throw, Blue Pillows, Pink Pillow, Black/White Pillow, Rug

Our lower level is a simple horseshoe shape; the family room marries the studio and our playroom.

Colors: Walls - Behr's Reflecting Pool
Sources: Entertainment Center (craigslist), Green Poofs, Rug

This space is by far the happiest of them all.  Bold color, a lot of pattern, and endless days filled building legos, playing games and entertaining lots of little pals.  Without investing a lot of money in expensive furniture, we have pieced together a few IKEA pieces and Craigslist finds to create storage for a variety of playroom toys, games and crafts.

Colors: Walls - Behr's Reflecting Pool
Sources: Art Caddy (tin utensil caddy), Art Storage Boxes

A bench pieced together from two narrow bookcases now has the room to seat many little bottoms.  And the best part is all of the easy-to-access toy storage below!

Colors: Walls - Behr's Reflecting Pool, Stencil - Behr's Seven Seas
Sources: Pouf (similar), Red Chair, Green Pillow, Corner Pillow, Light, Bench Fabric

Our three boys have received Legos as gifts since they were tiny tots.  And they also inherited bins of Legos from both mom and dad (yes, I loooooved building Lego houses as a kid as well).  They helped devise a storage plan and even sorted them down with me.

Colors: Walls - Behr's Reflecting Pool
Sources: Lego Storage, Blue Boxes, White Shelves

I get asked all of the time if we still love the Lego storage and the answer is YES!  The key is to be super flexible about it and have a large bin to hold in-progress builds and random pieces.  We only tend to re-sort that holding bin every few months.

One last bathroom which located directly off of the playroom and extremely close to the master bedroom. 

Colors: Walls - Behr's Gulf Winds
Sources: Mirror (similar), Faucet, Sink (similar), Linen Cabinet (similar), Nail Caddy, Hamper, Stool, Bucket Basket, Toiletry Baskets (similar)


Last but not least, let's take a peek at the master bedroom.

Colors: Walls - Behr's Frozen Pond
Sources: Headboard, Bedding, Pink Pillow, Floral Pillows, Blue Pillows, Mr & Mrs Art (DIY), Chandelier (similar), Task Lamp, Nightstand, Rug

Our master bedroom, although in the lower level, receives an abundance of amazing natural light.  It feels soothing yet still has a little personality at the same time.

Colors: Walls - Behr's Frozen Pond


When we initially built our home, we dug out a large portion of our front yard to fit appropriate sized windows and allow us to create livable space in the basement.  Therefore, all of the lighting is in the front of our home, the back half is all under ground.  That meant that we had to get a little creative with the layout.  Our master bedroom was divided into a bedroom and a dressing room, as by code we were not allowed to add another bedroom without a proper window.  Say what?  A dressing room?!  At first I was frustrated about the loss of a functional bedroom, but now I believe it was a blessing in disguise.  It makes me feel so very spoiled and I am so grateful for the space now that it is done.

Colors: Walls - Behr's Frozen Pond
Sources: Armoires , Desk (similar), Mirror, Lamp, Chair, Stools, Rug

Someday we may install a dream closet system, but knowing the major expense it would have been we decided to find ways to make the space feel super glamorous and luxurious, on our budget.  That meant dividing the space and storing all of our clothing behind closed amoire doors.  I love that I don't have to worry how organized Bryan's closet is, because I don't have to look at it.


Once again, a lot of Target and IKEA paired with pretty decorative hardware.  Oh!  And another stencil that makes a wow statement!

To organize my accessories, I covered a simple cork board with linen and DIY'd some Kate Spade inspired storage boxes.  We also added a few Closetmaid towers to hold boots, handbags, accessories and travel sized toiletries.

Colors: Walls - Behr's Frozen Pond
Sources: Necklace Board (DIY), Sconce, Dresser, Closetmaid Storage Unit

And the last little corner of our home is where all of our clothes land until put-away laundry day.  I mean it is where we run our little hearts out.  Once a year.  Shucks... I really gotta start using this spot!

Colors: Walls - Behr's Frozen Pond

When the DIY and organizing slows down for the day and we need a place to relax, grill and spend time together as a family, we head out back to our patio.

Our Patio Reveal

And since we are outside, let's finish the entire tour with one last project that we are extremely proud of, the garage.

Garage Before & After


Looking back on our 13+ year home adventure, there have been times we have felt frustrated, burnt out, overwhelmed and even have tried to sell a few times... But at the end of the day, there is no where we would rather be and feel like it is just meant to be our little happy spot.  It has been so exciting problem solving ways to maximize our 2200 square foot abode, and I have especially loved having y'all along for the ride this past 5 years of blogging.

Hold on to your britches my friends, because we are about to take on one of our biggest DIY adventures yet.  The kitchen!


    A special "Thank You" goes out to my father-in-law, who is always there to help answer questions and lend a DIY hand.  This house wouldn't be the home it is without him.