

It's been over a week since we shared our last update on the space, and a week later, I can honestly say we haven't made a lot of progress, although, that doesn't mean that time hasn't been invested and that we still aren't happy dancing about what we have gotten done. Our lower level living area still looks similar to the last update, mountains of miscellaneous items everywhere we turn, however, we have done two really impactful things:
- Took an impulse trip to Goodwill! We dug through the utility room piles that were dumped into our family room and adjoining studio, and loaded up the back of our SUV with items that were worthy of a donation. Things we haven't seen or touched in ages, things we no longer needed and some of those thrift store find blog projects, that would never be completed. Just removing all of those items on a whim gave us a good look at what we are working with, made less visual clutter and gave us a feeling of warmth. I am excited to do it again as we continue to dig through our mess.
- We organized our paint and supplies. I couldn't believe how many gallons of paint we pulled out of the room. With so much piled up, we couldn't see the shelves and floor which were lined with paint. We also had bins of spray paint, spray paint on the shelves and even more in the garage. It was everywhere. Knowing that we will forever be peeps that play with paint, whether for a small crafty project or for an entire room makeover, we needed to address paint and supply storage asap.
So that is where we are at today. Last week I traveled to NYC for four days for a Better Homes & Gardens Workshop, so that pulled me away from the project for awhile {and left my family to live around my giant mess}, and I came home with big and inspired intentions. However, this blog is all about being real, and as much as I wish I could knock out this entire space in a week, and give you a reveal today, that ain't happenin'. In fact, I will be happy if I can get all of our three spaces done within the next month. These areas are TWO years in the making, and it will take a long while to undo the mess. And when you throw in two full time jobs and three boys with schoolwork and sporting events, well, life gets in the way of the hours of time it will take to just sort through things.
I really, really want to get these spaces done right. It is important to address each function of each space, and ensure we are making it simple to maintain those areas once we are finished. I never want to have to do this again, so planning and massive efforts will be going into all we do within these zones.
We had a narrow, long wall behind the door of the utility room, in which we installed the IKEA Gorm shelving. It was the perfect way to maximize the space, and to ensure we can't just create mounds and piles, which we had prior.

The shelves were the perfect candidates for our paint and supply storage. As I mentioned, painting supplies were living in three areas. Some in the garage, some here in the utility room, and the remainder on shelves in our laundry room. They all need to be in one spot, so we hunted and gathered all of the items to be relocated here, to their new home.
First, I wanted to address the visual clutter that was just typical wiring, plumbing and open studs. We decided not to finish the walls within the utility room, as all walls have so many components and wires, that we just didn't feel comfortable permanently covering them up. We would have had to hire in a professional and we think our money is best spent updating the more visual and important areas of our home {cough, cough - kitchen}. So, I had to come up with a different, much less expensive plan. It really is just for aesthetics after all.
I initially was going to paint some drop cloths and hang them from the ceiling, but again SO many pipes jetting out past the studs, and the time and effort to paint some drop cloths, sheets or curtains just wasn't practical given the scope of the project. Plus, with the items we were planning on storing on the shelves, we needed something with a little reinforcement on the backside. So for now, I thought the next best way to get things done quickly and on a budget, would be to use foam poster board. We purchased twelve sheets at $1 per sheet from the dollar store, to line the three shelving unites on the back wall of the utility room. The foam style is much sturdier and thicker than your typical poster sheets.
To add some pattern and color, we used duct tape connect the foam sheets together. Then, using pretty contact paper we already had, we covered the faces of the panels.

I didn't have nearly as much contact paper as I thought I did initially, so we had to use a three different patterns on the three individual panels, but I was all about using what we had on hand, and I sort of the love pops of color that it ultimately added.
The panels were just stapled to the back side of the wooden shelving units, with our staple gun.

The covered foam sheets now hide some of that visual clutter, and also act as a stopper, so the items placed on the shelves do not fall behind.

You may notice those black dots going down the center post of the shelving unit. Those were just inexpensive magnets purchased from the home improvement store, and attached with construction adhesive.

More on those in a moment....
Let's talk about the paint. I was completely overwhelmed with the amount of paint and cans and spray paints that we had. Twelve years of shrinking our home, one layer of paint at a time, creates a lot of old paint. And let's face it, those cans are bulky and could take up this entire wall of shelves alone.
Last year, I created touch-up paint jars, and organized the colors on a cute little printable. So far, the jars have been super useful when we need to touch up a ding here and there. I lovity love the setup and the paint has stayed fresh within the mason jars. We saved the small amounts of paint that were left after creating those jars, and not once in a year, have we needed to touch those cans. I decided they need to go, for good.
It really made me think, why keep all of that extra paint? Would we ever need to repaint an entire room with a same color? And if so, we wouldn't have enough anyway. So, I went through every single can, and transferred the paint into either a half-pint or quart sized jar. If we had initially used a quart of paint, that paint was transferred into the smaller jar size, if we used a gallon of paint, that paint was transferred to the quart size. This worked out really well, because 98% of the time, that is about how much paint we had left in either can {often times even less, I just swirled the front jars in the photos to appear full since they photograph nicer that way #bloggerissues}. For the cans where we had more than what would fit within a jar, I just used two jars. So now, instead of just using the jars for touch-ups and keeping the larger can for... I don't know what... we now just have ALL of our paint in jars {with the exception of four, which were almost completely full or specialty paints}, and have begun the dry-out process of all of the cans, within our garage. We did a lot of researching to ensure we are following the correct methods of paint can disposal, you can find more details all over the web, but we relied on a few articles similar to this one. We also found we had a few cans that weren't even opened, and duplicates of spray paint colors {which goes to show why it is important to organize. Hello! Over purchase alert!}, which we were able to add to our Habitat Re-Store donation pile.

I realized a few things weren't working with my little paint organization project from last year and it was time to address my organizing fails head on. One, the labels were nicely printed and cut with my Silhouette, which was so darn cute. However, that would mean that I would need to print and cut labels with each can of paint that I purchase, to maintain that cuteness. And two, I never used that reference sheet one time in the entire year since I created it {the initial plan was to create a home improvement binder, just haven't gotten to that point yet}, so, I needed a quicker and different method. Bottom line, if the system is not super simple to maintain, I will not maintain it.
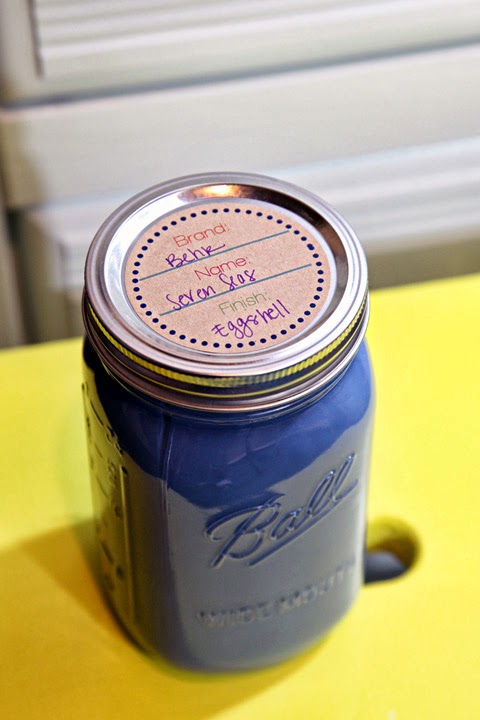
So, I created a label template on some Avery round sticker labels, and printed out a few extra sheets to keep stored on the shelves. They have lines, so I can just hand-write the information on the top of the jar, no more need to head to the computer and print and cut something each time I add to my paint collection.
The other thing I wanted to do is create paint swatches of our colors. I could have gone back to all of the stores I initially purchased each paint color from, and collected the swatches {and cross my fingers they still made them}, but instead I opted to take the DIY route. I just used some super inexpensive marking tags {from Staples}, and painted each one with our paint colors.

On the back side of each tag, I then added the brand, color and sheen; even the room or piece of furniture that the color correlates to. Again, just by hand, so I could quickly add to it in the future.

I strung all of the swatches on a piece of twine, and they now hang in the utility room, right next to the paints.

Other than those few projects {which let me tell you, were a bit more time consuming than I would have imagined}, I just dumped the rest of our paint supplies on the floor and sorted through them.

When placing everything on the shelves, I really thought about what I would putting where. For example, I placed the spray paint {all pretty in color order}, on three different shelves, before settling. I had them on a shelf they fit perfectly, but I couldn't see or easily access the colors in the back, so they were moved to a taller shelf to accommodate my extreme spray paint addiction.
Say hello to our newly organized paint shelves!

Now you know the "why" behind most of this setup, so the rest is just visual happiness.
Those magnets on the front the shelves now hold my paint swatches, paint can opener and paint brushes.


I didn't transfer the specialty paints, as they were all pretty full and the containers were in great condition.

As I mentioned, I can now see my rainbow of spray paint colors, and reach the ones in the back. However, I have been suspended from purchasing spray paint indefinitely.

The bottom shelf holds all of our empty paint buckets and trays. I placed all of my mini-rollers within a clear, sealed container. Now I can quickly see the rollers I have before I start a project, and they stay dust free.

All of the containers used throughout the update, were ones that we already had {and a few I found buried in this room!}.
The other shelf holds many of our supplies and tools for painting. We already had the three painting baskets on shelves in our laundry room, but they made more sense in here. They got re-organized and paired down. I used some inexpensive plate stands to maximize the vertical space in-between the shelves. You can purchase additional shelves for this system from IKEA, and even great slide on baskets, however, we don't live incredibly close to IKEA so we made use of what we had.


Drop cloths and rags are stored inside the clear blue bin.


Extra jars and a cup of tags now ensure that my paint maintaining accessories are all within one spot.

Caulks, adhesives and the caulking guns, were all tossed into a basket and labeled.

So now everything has a place, and we even have room to grow. Those baskets on the top shelf were taken from the guest room and guess what? They are empty!} I can't even begin to type out the emotions I feel when I stand in the room now, and gaze at everything so tidy and beautiful.


Doing this part of the room took another six to eight hours, which included lining the shelves, going through all of the paint and transferring it, DIYing our own swatches and sorting everything down and planning out placement. But it was SO worth it in the end, and I can't wait to continue on with project "Storage Space Takeover"!
We still have a lot on our list, like going through each bin and labeling the contents and even creating a tool station. Just like our paint, we have tools coming out of every crack and crevice of our garage and utility room, so it will be another sit-sort-and-pair-down session.
And for those wondering if I am still motivated? Absolutely! Seeing that mess at the bottom of the stairs and begging our guests to turn their heads, keeps me driven to get it done as quickly as we can! And with each project we finished, a new flame is lit under me to keep hustling!
Thank you again to those cheering us on out there! And high fives to those taking on similar spaces right along with us!

For those just tuning in, you can catch up with Part One and Part Two of our Storage Spaces overhaul.
I love this makeover! Gorgeous
ReplyDeleteCiao,
Manuela
You go girl! Pretty awesome stuff!
ReplyDeleteGet OUT. I love it, of course! It makes my heart skip a beat! xoxo
ReplyDeleteWow! I can't believe how you always manage to make every space--including a storage room!--look so beautiful and functional! Love it!
ReplyDeleteThis is probably my favorite of everything you have done so far. I really love it because I struggle the most with being motivated/inspired to organize/beautify the boring, messy storage-type areas in my home. This project of yours, emptying out and organizing the storage areas and turning them into something much more attractive and--most importantly--functional, is infinitely inspiring to me. You go, girl!
ReplyDeleteThank you so much! So happy to hear that our not-so-blog-pretty project is still inspiring. :) Means a lot to me! xoxo!
DeleteIt is very inspiring Jen! It looks fabulous!! You make me want to tackle our garage, mechanical and storage area. Need to get the hubby on that wagon though too. He is Tim the Toolman and we inherited alot of stuff when his dad died a few years ago. Believe me, it is on the list. I am just happy he hung my new door to the laundry room and has been slowly getting molding back up! LOL PS... I did chuckle a little when I saw your spray paint collection. ;) I love it!
DeleteAMAZING! I love this. You have a knack for making normally ugly things, look so beautiful!!
ReplyDeleteI'm really jealous of all your paint, but if I had that much I'd literally be repainting something every other month. Luckily lack of paint and funds stops that from happening! Its look awesome though! Question, do you really get your brushes that clean after use or do you buy new ones for every project? If your old brushes really are that clean then HOW?!
ReplyDeleteI do clean them all after each use, I use a brush comb, and clean them under running water, then lay them flat to dry. I like to keep at least one newer brush on hand for furniture project to minimize brush strokes, but for most other projects I just use the same brushes over and over. :) xo!
DeleteYou've made a storage room beautiful! Love it!
ReplyDeleteThis is so inspiring! Where do you get your contact paper??
ReplyDeleteThank you Sam! I typically find it on Amazon {I love the Macbeth Collection Shelf Liner}, however, I also occasionally find it at HomeGoods. TJ Maxx, Marshalls as well.
Deletexo!
Jen
Love what you have done with the space. Very clever ideas!
ReplyDeleteI love how you added the magnet for the paint can opener and the samples of all your paints. Brilliant.
ReplyDeleteI'm so inspired! Seeing a total mess transformed into an organized and neat space makes me more excited than a sale at my favorite store!
ReplyDeleteIt looks like a paint store. So beautifully organized. I absolutely love what you've done!
ReplyDeleteI LOVE IT! The space looks great. I would just hang out in your storage room 'cause it's so pretty. :)
ReplyDeleteI love the idea of the foam core on the back of the shelves. What a great way to add color. I may have to do this with some of mine. I have the dreaded task of removing every single thing off of my GORM units to reconfigure and add more shelves to make more room for the canned goods. The thought of moving over 700 jars of canned food makes me want to curl up in a corner and do nothing. This is so inspiring I can't wait to see more.
WOW! Now that is a lot of jars! Way to go creating that many healthy and fresh foods for your family! <3
DeleteWhere does one get contact paper like that?
ReplyDeleteI typically find it on Amazon {I love the Macbeth Collection Shelf Liner}, however, I also occasionally find it at HomeGoods. TJ Maxx, Marshalls as well.
Deletexo!
Jen
Looks awesome! I am glad to know I am not the only one with a paint hoarding problem. My husband wants to know if I own stock in the spray paint manufacturers! :)
ReplyDeleteI have literally been obsessively checking my blog feed for days waiting for this update to show up. I'm that excited about it! You know what I love most? That I can count on you to be thorough. You always dig in and take a project as slow as you have to to get it as perfect as you can. You slog through a process that can be overwhelming and it shows. The results are amazing. Tedious tasks like transferring paint, adding foam board AND making it pretty, experimenting so many time with optimal placement...so inspiring. I identify wi your methods so much I got the same organizing high on seeing these pics as I do on viewing my own accomplishments!
ReplyDeleteThis is way to freakin' awesome! I want you to know that I will be taking inspiration from this when I help my Dad organize his basement.
ReplyDeleteHow Dare you say you haven't made a lot of progress?! You have both obviously worked really hard, and I just Love the result So Much! I'm so chearing you on! :D
ReplyDeleteSokru
sokerimursu.blogspot.fi
Hahaha, thanks Sokru! Sometimes I feel like I can't move fast enough. And judging by the rest of our living spaces which are feeling the impact of the room update, it doesn't feel like we made a dent. Thanks so much for the sweetness!
DeleteWowzer!!!!
ReplyDeleteHoly half-gallon Batman!!! Your paint storage is amazing! Not to mention the bins and backgrounds and labels, I think you've come plenty far since your first post! Also, if you want to organize your paints into caddies (i.e. primers, metallics, etc.) I figured out how to make freebie caddies, http://gottalovediy.blogspot.com/2013/08/gotta-love-free-diy-spray-paint-caddy.html Turns out spray paint cans fit perfectly into bottle packs! Check it out I'm sure you could make them way snazzier than I did but they've worked like a charm for me! Keep up the great work!
ReplyDeleteMelissa
gottalovediy.blogspot.com
Jen, so funny that this is all about your paint storage because I have been working on the EXACT same organizing project for a couple of weeks and came to some of the same conclusions. I liked the cute printed labels you made last year, but knew I wouldn't keep it up, so I made round template labels just like you did to stick to the top of jars and cans. I'll be posting all of my photos last week, but lots of similarities.
ReplyDeleteOne question for you though - is this the same room where your furnace and water heater are located? If so, it is really not safe to be storing your spray paint in there since those cans are combustible. Also, any oil based paints or stains cannot be safely stored near the water heater either. I did a bunch of research on it while working on my project and determined it was only safe to keep the latex paint in my utility closet, and my few oil based paints and spray paints will have to find a home elsewhere. This includes magnetic primer, which I see you have some of as well.
Seriously no judgement if you decide to take the risk of storing all your paint in the utility room despite the combustibility/flammability issues (I know that storage space is limited and we do what we have to do), but I think it's important for other people to have that information to be able to make their paint storage decisions accordingly.
Absolutely Angela!
DeleteI am SO happy you thought to mention this! We looked into it as well, and everything we found mentioned that the pilot light should be sealed within the furnace {which ours is}, and that anything combustible should be stored at least five feet away {which ours are}. But you are correct, everyone should look into this and consider it when planning out their individual spaces. Safety first, and if we are incorrect in our findings, it will be moved.
Thanks so much!
Jen
Paint in bottles - great idea. Why didnt I think of it????
ReplyDeleteI have been using your mason jar system to store leftover paint for about 6 months now. Thanks for inspiring me to organize our paint! The jar system has been working great except for one small problem. Since the jars are on a high shelf and since the labels are on the jar tops, I sometimes have to take down several jars to find the one I am looking for. I solved that problem buy putting the jars on little lazy-susans. One lazy susan is labeled "Bedrooms", another is labeled "Bathrooms", and so on. It has really helped me find the jar I'm looking for. Just thought I'd pass along a tip that has worked for me. -Ann
ReplyDeleteOooh! So smart! Love that idea, thank you so much for sharing!
DeleteYou did it again! Everything you touch turns to a beautiful AND organized space.
ReplyDeleteYour storage room looks like a beautiful rainbow after a rainy day.
Love your idea of the magnets on the shelving to better store your brushes.
Thank you for giving more inspiration I can incorporate to finish my project "Garage Organization"...keep up the great work!
Considering you spent 4 days in NY, I can't believe how much progress you made on this project! I adore the Avery labels that you used. You hit the nail on the head with you observation that if an organization system isn't easy, it won't work in the long run. I have to remind myself of this as I tend to make things too complicated when I'm organizing. You and your husband did an amazing job! This is such a beautiful and useful space now!!!
ReplyDeleteCOMPLETELY IN LOVE! Wow, girl ~ you are an organizing ROCK STAR!! Thanks for sharing. Mucho love it!! :)
ReplyDeleteWhere did you get your small mason jars with the pattern?
ReplyDeleteHi Jen! You can find them at Home Depot, Walmart and Target. I have had mine for awhile now, but I am pretty sure I snagged them at one of those stores. :)
Deletexo!
Amazing!! I love, love, love it!!
ReplyDeleteAwesome! I'm inspired. Look Out, Basement.
ReplyDeleteThis is one of my favorite posts to date! I love that you kept it real and didn't overdo it - those labels make so much more sense to me than something fancier. And LOVE the use of the magnets, and the foam backings to the bookshelves - brilliant!
ReplyDeleteWahooo! Thanks Sara!
DeleteYou have gift and I thank you for sharing it! Looks great and I got so many ideas from you! Thank you so much!
ReplyDeleteFabulous, as always! Your shelf looks like a paint store! :)
ReplyDeleteWe need to tackle our basement this season, and this entire post gives me some great ideas for organizing our paint supplies! LOVE the paint swatch idea.
Jen, thanks showing us, HONESTLY, what you are going through with this organization project. You reminded me that I have old paint to get rid of...it's on my list for tomorrow. After the holidays I am going to do some major organizing and purging and you are inspiring!
ReplyDeleteI seriously need to do this with all the paint in our basement. It's embarrassing what a mess it turns into! Thanks for the inspiration!
ReplyDeleteWow! This is such an amazing organization system and major improvement. Way to tackle this job with so much energy and honesty. This winter my goal is to organize our unfinished basement - it sort of looks like your befores right now. Yikes! But I will definitely keep your afters as inspiration!
ReplyDeleteNow THAT would make me want to tackle a painting project. Good job!
ReplyDeleteyou are indeed organization fairy princess....just love that idea of DIYed paint swatches ....awesome!
ReplyDeleteKeep calm and carry on:)
Thanks so much Gopi! Totally giggling over here!
DeleteHoly GORGEOUS paint storage! DROOOL!
ReplyDeleteJen, it looks amazing!! I admit, I was a little dubious when you first showed the room. The blue was so dark, and it seemed claustrophobic! But man, you completely turned it around with the contact paper backing and the BEAUTIFULLY organized shelves! Our painting supplies are just in a mish-mash pile everywhere in the garage, but this really makes me want to create an organized, beautiful space instead!!
ReplyDeleteThis is INSANE! I love it all! I bet it feels great to have it all organized!
ReplyDeleteSO SO great!
DeleteI am inspired and putting my paint leftovers into mason jars tomorrow! Great idea!
ReplyDeleteJen, I really am loving this makeover! I am currently redoing our entire garage and seeing how you have organized everything for your utility room, is definitely very inspirational. I was starting to feel very overwhelmed at the huge pile of stuff waiting for me in the garage. :( Jen, it is good to know that I am not the only one who thinks a blah room such as a utility room or garage does NOT have to be dreary looking. ;) A room should be a happy place, regardless of location.
ReplyDeleteBeautiful work and I love the color you painted the floor. :D
I love this! I so have to do this with my paints!
ReplyDeleteYou are my hero :) It is SO frustrating to live in France and follow your blog. It is hard to redone your projects since it is often hard to find the same products here. But I always find motivation and your blog is the reason why I wanted to start mine ! You are AWESOME :)
ReplyDeleteWaves from the US! So happy to have you reading along from France! I am guessing you all have some pretty amazing items we can't snatch up either. :) xoxo!
DeleteI'm currently 8 months pregnant and in the phase of nesting of wanting to organize everything. This post got me so stoked! Like Monica Gellar stoked:) I don't even have paint or anything of these things to organize but it made me wish I did. Good for you! I bet it feels just great!
ReplyDeleteYay for team Monica! <3
DeleteI love what you did! I wish we had a space to do this other than our dusty garage BUT there are still many ideas I can apply to our space to get things more in order! Thank you for all of the great ideas and doing the thinking for us!
ReplyDeleteI absolutely love your paint storage. I have a question. I have seen paints also put into purchased small, new paint cans and labeled. I could see an advantage there of not being breakable. My question is do you find that the mason jar lids make for easier access? Do they reseal better than a paint can? Thank you for all of your inspiration. Paint cans, here I come!
ReplyDeleteGood question! I have seen that also, and the only reason I didn't go that route is because it ultimately seemed a little pricier and bulkier. I like that I can see the color of the paint right through the jar, and the lids seem to keep everything nice and fresh inside. Plus, paint cleans up off of glass super nicely. Just a personal preference I suppose. :)
Deletexo!
Wow - that looks amazing! Congratulations on a job well done!
ReplyDeleteThis space looks wonderful. I love the backing for your shelves! I store my paint in mason jars too - it was my post for tomorrow! Your paint swatch is such a great idea- love it!
ReplyDeleteHere is a useful trick to know. If you find an older can of paint with rust flakes from the can or bits of dried paint flakes in it, you can salvage the remaining liquid paint by pouring it through old panty hose stretched over the mouth of your mason jar or other new container. The hose material works like a super-fine strainer and is then disposable.
ReplyDeleteAnother useful tip is to do small paint touch up work (repairing scratches and chips) with a Q-tip. No brush to wash!
Yes and yes! Thank you for the super fab tips! Love the Q-Tip suggestion, such a great way to save your brushes from extra washes! And panty hose are great for so many things, we have used them as a net when cleaning the kid's swimming pool!
Deletexo!
Thanks for the motivation to clean-up and organize our tool room!! :-)
ReplyDeleteMy first comment on your blog....I could not stop myself from not commenting. You truly are an Organizing Guru. You have done an amazing job.
ReplyDeleteYAY! Thank you for taking a moment to comment! I sincerely appreciate it! :)
DeleteWELL DONE JEN! It looks incredible. You deserve a huge pat on the back for persevering and making it through this part of the process. One bit at a time right? Keep it up!!
ReplyDeleteAll that paint in glass jars would make me uber nervous.
ReplyDeleteI was a bit at first as well, however, we have since started using mason jars as our drinking glasses for the kids as well, and they are dropped all of the time and seem fairly unbreakable. Fingers crossed!
DeleteJen.. Super cute.. Love it.. Where did u get the numbers on the bins?? I am thinking of doing something along the lines of bins with numbers for the pantry for each child. That I have.. Any suggestions on the numbers and how to attach them... Do u use glue? Thanks!!
ReplyDeleteThank you! They are inexpensive house numbers I found at a Home Improvement store, and spray painted. :) We attached them with screws which we attached a washer and hex nut to on the backside. They could also be attached with fishing line or twine.
Deletexo!
Jen
Your creativity never ceases to amaze me Jen! I am all about organizing, but you truly inspire me to think more creatively to get the job done and it makes the results that much more satisfying. {Sigh}
ReplyDeleteHow did I miss this post yesterday???
ReplyDeleteI started using leftover glass jars for paint a while ago. More recently I've began to save all plastic jars left from mayo, peanuts, Nutella, peanut butter, etc. and use these for storage- from paint and screws to even my daughter's teeny-tiny toys. Not quite as pretty as mason jars, but practical and pretty much unbreakable.
I love your blog and your house! We live in a small house (smaller than yours) and sometimes feel like we need to buy a bigger one, but really what we need is to be smarter and more organized within the space we already have. Thanks for the inspiration!
Daria
I feel the same way Daria! There are days when I feel like our house is just too small and that we have outgrown it. But for now, this is our forever home, so purging is a constant necessary. :)
Deletexo!
Your organized paint station looks great! Now I wish I would do this to mine! :)
ReplyDelete-kaia
Great job! The effort and thought you put into this is obvious. Don't feel pressured to move faster. Taking the time to be thoughtful will ensure you do this right... and only once! I know I'll be coming back here for lots of great and simple ideas... backing the shelves, the magnets, the swatches. I'm inspired. Favourite line of the post: "Twelve years of shrinking our home, one layer of paint at a time." What a fun way of looking at painting.
ReplyDeleteAmazing!! Wow!!! LOVE it!!!! Keep up the good work:)
ReplyDeleteOh, this totally inspired me! I have a mess in my scary basement and I really need to tackle it!
ReplyDeleteIf I win the lottery I am hiring you to do my house!
ReplyDeleteSounds like a fabulous plan! :) Fingers crossed you win!
DeleteBy the way, those mason jars are PERFECT for my favorite paint sprayer, the Critter Spraygun, which uses mason jars to hold the paint.
ReplyDeleteYou can read more about it here:
http://anniehearts.com/blog/projects/painting/critter-spray-gun-my-new-favorite-toy
Annie XO
That is so great to hear! I recently purchased the Critter Spray-gun as well, and have been so excited to put it to use!
Deletexo!
It looks so pretty! I'm really excited to see how you organize your tools because that is something I am currently at a loss over. I just keep moving on to other projects and leaving that one behind, but it's gotta get done eventually!
ReplyDeleteJen! I read your blog with a HUGE smile on my face! I can't wipe it off! Seriously - I must look like an idiot. :) This transformation is so inspiring and so much fun to watch. I'm loving it!!
ReplyDeleteAmazing!!! Great ideas! It's is very timely for me, as I need to get my paints in order, plus I showed my hubby your spray paint collection & he said mine did not look so bad ;-) Really enjoy your blog, thanks for all the inspiration!
ReplyDeleteHonestly, while reading this lovely post, I'm getting all giddy and itching to transform our own dark corners *right now*.
ReplyDeleteBeautiful result, if anyone could pull of anything like this it had to be you! Awesome, awesome, awesome!
This is impressive and so well displayed. Wow! You are like the Home Depot of spray paint. I want to come shop here! You can see why you have a successful blog. You are the queen of clever and lovely organization. Could you tell me where to find Design Master pure gold metallic paint? I've heard good things about it but haven't seen it. Thanks. First time commenter.
ReplyDeleteThank you Sherri! I found it at Michaels. :) It does cover really nicely!
DeleteWow. I love how well organized everything is. And that is smart about condensing your paint into smaller cans. Looks like a much better use of space and I love that you can see the colors through the containers.
ReplyDeleteThis is fantastic! I love the magnets for holding the paint brushes - great idea. Although I love the look of the paint in the mason jars, I'd be super worried that I'd drop and break one.
ReplyDeleteLast year I sorted all our painting supplies and put them in labeled bins and it's made such a huge difference. No more digging! No more buying extra stuff! If only my husband would put things back in the right box. :)
I love the idea of 'downsizing' the many paint cans that invariably end up piled in the basement. Totally makes sense since most of them are probably pretty empty... thanks again for the inspiration!
ReplyDeleteI love your mason jar labels. Did you buy plain white ones & design the entire label yourself? I don't know how you have time to do all the projects you do AND write about them in detail. You are so inspiring! Thanks for a wonderful blog!
ReplyDeleteHi Jen!
DeleteI actually purchased brown labels which are pre-cut into the circle templates, similar to these: http://www.newegg.com/Product/Product.aspx?Item=N82E16848501001&nm_mc=KNC-GoogleAdwords&cm_mmc=KNC-GoogleAdwords-_-pla-_-Labels-_-N82E16848501001&gclid=CMDG6J3ahboCFeIRMwodBloAJQ. Avery offers online label templates which are pretty simple to use. I prefer to use Microsoft Word to design them, but again, the process was pretty straight forward. :)
xoxo!
I would LOVE your Word template for your labels if you are up for sharing...thanks for the great inspiration. We are tackling our paint storage this weekend!!
DeleteI love everything you do, but for some reason this project has me SOO pumped up and excited! I literally have been checking almost daily to see the progress and saw in your September review that I missed this post and am DROOLING. LOVE your pain storage ideas!! sigh. you rock!
ReplyDeleteRebecca thepresentmom.blogspot.com
I'm hoping to work on something similar in the next few months! I've been storing our leftover paint in cleaned pickle and spaghetti jars, so I am glad to see it's not a totally bad idea to go with glass! =D I love your paint swatch and magnet idea!
ReplyDeleteI use mason jars for pouring touch up paint, but mine are not nearly as beautiful as yours!
ReplyDeleteThis is absolutely gorgeous!! For something so simple as a paint storage area, you've done an amazing job showcasing everything exactly as you need it! I'm super jealous and some day, I promise you, I will steal your ideas! :P
ReplyDeletelove your honesty! now if I could just channel your motivation! I'm wondering if you could share the paint jar template that you used?
ReplyDeleteAre you by any chance willing to share how you made those great labels in Word? I bought the Avery labels, but I'm just not figuring out how to replicate what you did. If you could point me to some info on that, I would really appreciate it! I think the project is amazing!!
ReplyDeleteHi Leslie!
DeleteI just use a combination of shapes and text boxes {but I agree, those avery label templates can be finicky!}
You can download my template here: https://app.box.com/s/l1psfi55v18ph70u8ld3
It looks like it is slightly being modified by the PDF host site, but it still still something! :)
Thanks so much!
Jen
TFS! I've been trying to figure out a way to organize the paint in my garage. This is so inspiring! Thank you!
ReplyDeleteI'm sorry If this has been asked but where are the white baskets from? I'm looking to use baskets like this in my pantry.
ReplyDeleteI love this!!! Can you please come to my house to organize my paint area??? :D
ReplyDeleteOh wow ! That's so smart !!!
ReplyDeleteYou are really amazingly inspiring !
Hi Jen - How have your shelves held up over the past 6 months? Any bowing at all?
ReplyDeleteOh my! It has been six months already! No bowing, still love the shelves and they are holding up lovely. Just need to finally finish organizing the space now. :)
DeleteJust did this....thanks so much for the idea!!
ReplyDeleteStoring paint in a glass jar is a bad idea.
ReplyDeleteHmmm... I am unsure why? I have been doing it for years now and it has been working out really great! I understand there is a small risk of breaking, however, mason jars seem like a durable glass option and the paint has stayed quite fresh.
DeleteDon't have a problem with the glass jars just would never put them on a top shelf.
ReplyDeleteObviously, you've done live in earthquake country or Hurricane or tornado.
And then I'd still run a strap across end to end or mate a bungie cord.
But the organization you achieved has motivated me.
I love this! And love that I'm not the only person crazy about keeping this kind of stuff organized! I recently put all my paints in mason jars (and was actually told this is a MUCH better way to store them) and have pretty little labels on them. Makes me happy just to open that cabinet. :)
ReplyDelete