


Hello you fellow lovers of all things organized! I'm thrilled to be here today sharing a space that has been years in the making. Yep, I said years! Whether it's because of life or my design-ADD, projects don't always move fast around here. But I'm okay with that...it allows me to really enjoy the process, and develop the space to fit our needs best. {Are you buying that? Yeah, me neither.}
And what we needed was a multipurpose work/homework/blog/craft space. I didn't like the idea of being secluded in another room, not to mention, I wanted easy access to see what the kids are doing online. So that means we needed to carve out a nook in the Family Room.
So I'll start you at the beginning....our Family Room had this sweet 1980s wet bar that we used a grand total of never.

Then we enclosed it {along with changing the paint color} and had a more useable, yet dreary, little corner.


Then we accidentally bought a big-screen TV during a holiday sale. And it had to be mounted over the fireplace. Which meant the shelves needed to hold all the TV/Media equipment, too. And on top of all that, because it's such a visible area, we wanted it to look tidy and fit the design of the rest of the room. I mean, really, that's a lot to ask of a little nook.

So you can understand why I'm so excited to finally have the space meet every criteria we ever threw at it.


Between the TV equipment and computer, there's a lot of black going on...so I added a cheerful fabric to brighten up the corner. I wasn't about to unhook all the electronics, so I used oversized decorative tacks to hang the fabric on the back wall {no adhesive necessary!}. This also allows my design-ADD free reign to easily switch it up.


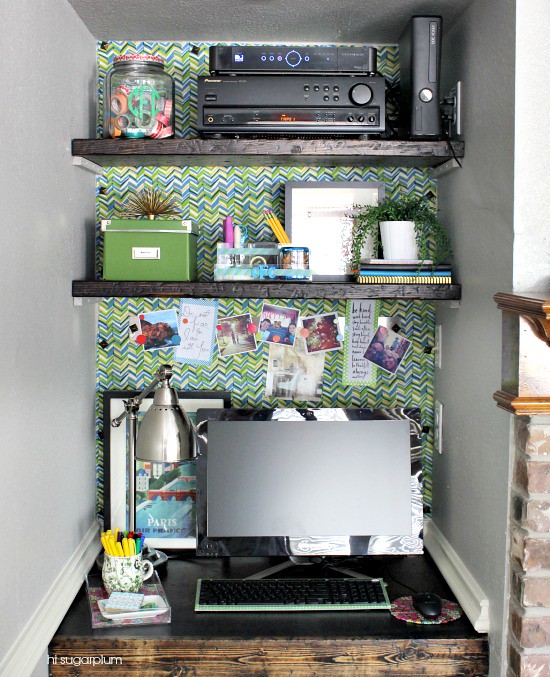
The desk top holds the computer, task light, writing essentials...and treasures. And the keyboard easily tucks away when we need a small working surface.

I lined this acrylic tray with decorative duck tape, then added this mug for pens and markers.


I took a cue from Megan and covered my mousepad with more duck tape, and even added washi to the keyboard.

The Paris print is a bit distracting since glancing at it usually gets me daydreaming about this trip.

I wanted to be able to rotate pictures and inspiration, so I hung this magnetic strip with tacks on the wall behind the computer.

Right now it holds favorite InstaGram snapshots {I'm @cassiesugarplum, if you want to follow me}, and encouraging words. Those I just print out and frame with washi tape.

The top shelf holds notebooks, my planner, and more office/craft supplies.
I turned this organizer into a cute desk accessory here. It holds stapler, paper clips, pencils and sharpener, hole punches, stamps and ink pad. I love having it all in one spot here...it cuts down on the, 'Mooooooooooooom! Where's the stapler??'

The art was this simple project using a postcard and some thumbtacks.

The left side holds our collection of washi tape and DVDs.

This single box holds over 100 movies and games, thanks to our new organizing system. The brass urchin is a favorite from Furbish.


This little corner of the Family Room has come a long way...and is now a useful and cherry corner we all love.


Do you have an area of your home that's pulling double, or even triple, duty?! Thanks for letting me share our hard-working space!


This turned out so well! Sometimes the best plan needs a little time to evolve, right? (or at least that's what I tell myself too!) Great job! =)
ReplyDeleteThanks Bethany! All my plans must be great...bc they all seem to take forever!! ;)
DeleteWhat a great way to clear up the space and make it useable. My only question, if the laptop is right by your tv, isn't it hard to work if someone else in the room is watching it?
ReplyDeleteThanks, Pat! The TV is actually mounted above the mantel, and the computer at desk level, so it's not too distracting. But I guess it's just part of living together in a small room! :)
DeleteCassie always comes up with such cheerful ideas! By the time I got to the end I was wondering about the cords so I can't wait for her to share how she hides them. I have a nasty cable cord popping out of my built-in bookcase that is begging to be hidden. I also love how a little tape dresses up the acrylic office accessories - that way you can switch up the look whenever. Thanks for sharing your space!
ReplyDeleteThanks so much, Laura!!
DeleteI am so in love with your rustic shelves! Thanks for sharing
ReplyDeleteThank you...I am too, Judith! And they were so easy to make!
DeleteCan't wait to hear about your trick for hiding cords! We have big ugly ones coming down from our TV hung over the fireplace as well ... so ugly!
ReplyDeleteThey were photoshopped out. A photographer's best friend. :)
DeleteActually, our TV is mounted over the mantel with the cords running behind the wall...the outlet is on the top shelf of the nook. No photoshop needed! :) The cords I hid for the desk are actually the lamp and computer cables...the outlet for those is under the desk, so I came up with a system so they wouldn't hang down. :)
DeleteHi! I saw this on another blog about hiding the cords. Seems like a great idea: http://www.houseofhepworths.com/2012/01/10/mounting-your-tv-to-the-wall-and-hiding-all-the-cords/
Deletei have to say, i'm in agreement with Nancy@OwensOlivia about the computer cable. as a photoshop user, it looks pretty clear in photo #11 that the cable was photoshopped out. you can even see masking lines where the cables was. if not, that seems like a very strange place to send the cable through the wall.
DeleteHi Cookie!! You are correct...in that one photo I quickly rubbed out a single cable in editing. It's to the Xbox Connect that my kids temporarily used in this room and I didn't notice until after the pics were taken. All the permanent cables for the XBox, DVR and Stereo are routed through a hole in the side wall connecting them to the back of the TV. You can check the corresponding posts on my site for more details. :)
DeleteThe cords to the computer and lamp are cleverly disguised, and I'll get to how I did that soon. Thanks so much!
So cute! Everything Cassie does is just fabulous.
ReplyDeleteYou are my new best friend!!! xoxox
DeleteI love it! I built a study nook in my kids game room in the most awkward space ever. It's great for them and makes so much sense in retrospect. I wish I thought of it earlier!
ReplyDeleteI love using odd little nooks and crannies...it helps to make every last spot in your house liveable. You're paying for every square foot, we might as well use them, right!? :)
DeleteWhat a great space!
ReplyDelete~Sarah
Thanks, Sarah!! We're pretty smitten!
DeleteAs soon as you clean up a space and decide to use it for yourself, what else but everyone else's stuff claims it. Isn't that always the way? At least you found a way around it. Good job.
ReplyDeleteJulie
I Create Purty Thangs
Love how you make this space work so hard! Where did you get your Paris print? I love it!
ReplyDeleteThank you Malinovka! It's from a calendar...you can find something similar on amazon.
DeleteAwesome! Thank you!
DeleteNot trying to be negative or hurt anyone's feelings but I am not a fan -- I feel that there is a lot of visual "noise"/clutter for such a teeny tiny area that is right next to (what I assume is) the main focal point of the room. Would love to see a picture of it from more of a distance. Maybe there is something on the other side of the fireplace that balances it out (?) Love all the pieces individually and the general style though!
ReplyDeleteI agree there's a lot going on, but we're a busy family of 4 in a smallish house...so every nook works hard for us. There is a lot going on, but it's not a visible corner, and not one you see when entering the room. Here's the main part of the room...http://hisugarplum.blogspot.com/2013/02/family-room-adding-matchsticks.html
DeleteThanks for checking it out!
I'm curious to see a wider shot of the full space as well.
DeleteHey Kelly -- check out the link I left in Anon's reply...or hop over to my blog and check the Family Room link on my House Tour! :)
DeleteWhat a great transformation! I love it!
ReplyDeleteI live in Toronto in a tiny little space- which means I need to take a really hard look at maximizing every inch I have- Along with utilizing space, it's got to be cute too!!
ReplyDeleteI love your ideas- they really help transform spaces to be efficient, functional & adorable. THANKS :)
www.caitlinannexo.wordpress.com
How did you make the shelves? I absolutely love them. And how is piece of wood secured that holds your computer? Thanks for any advice!
ReplyDeleteCurious as to why my question about how to make the shelves has not been answered??? I have to do anonymous because I do not have any other way to ask. I love the dark stain and weathered wood look. Please respond back. Thanks so much
ReplyDeleteSorry about that! I will get in touch with Cassie and see if she has a moment to pop over with those details. xoxo!
ReplyDelete