Friday, April 19, 2013

124 Studio Progress: Crafty Storage Cart

I am so excited to finally be making progress in my studio!  I am at the beginning phase of adding in storage and problem solving some of the reasons the new/old built-ins weren't working effectively right off the bat.  The overall idea and shell of storage is grand.  But now to make the grand storage functional for the itty bitty items is where I really need to apply to some brainpower.


The first items to tackle were my cutting machine and all the vinyl and tools and supplies that comes along with it.  Since my Silhouette is used for many of the projects I take on, it is really important to address storage for the machine, and ensure that I keep it simple to access and use.  In the past, I would drag everything out of different nooks and crannies and set it up on the kitchen table or counter.  Such a mess and not the best solution for a quick vinyl label or craft project.

With my Silhouette cutting machine, I have accumulated quite a few items that need a place to call home:
  • 12" Vinyl
  • 9" Vinyl
  • Transfer paper
  • Cutting mats
  • Spatulas, hooks, scrapers
  • Specialty papers and finishes
  • Glitter
  • Sketch Pens
The built in cabinets have two drawers, but I quickly found they were not enough.  I was trying to store things below in the cabinets, in the drawers and in cups on the counter.  So, I cleared everything out and decided to start over, this time with a plan.

My gut told me that a special cart that the Silhouette could sit on, with storage below for all of the accessories, would be the most ideal solution.  I don't enjoy sitting at the counter height workspace because it is not comfortable or ergonomic for longer periods of time, it really functions better to stand and craft.  That is why we added a second desk height workspace for computing.  Therefore, I was on the hunt for something to tuck between the two base cabinets, with storage for the Silhouette and all the accessories.  Bonus points if I could find something that could roll out and then tuck back away when I was done.  Or, roll out if I wanted to sit at the counter, but also act as storage when I wasn't.

I searched and searched and given the dimensions, was coming up short.  I had a very specific space that needed to be filled, and I didn't want to waste any of that space.  I looked at nightstands, filing cabinets, printer carts, dressers.... even adding in a third cabinet...

Then, my IKEA strike came to an end and I ran there as fast as I could to soak up all the new items in the store that I hadn't seen yet.  It was magical.

And I found the perfect solution, in the oddest of places... the children's department.  The STUVA storage dresser was calling my name!


The dimensions were nearly perfect, I had a 24" wide opening and the dresser was 23" 1/2.  And the height was super close too!  And would still give me an opportunity to add casters to make it a rolling cart!  Win win, load it up honey!

Of course, I left you with a vision of all white cabinets and counters.  Did the studio really need more white?  I think not.  This girl looooooves color.

I don't get the opportunity to bring in girly colors too often, since I live in a house full of boys.   Pink blooms here and there are about as girly as it gets.  Oh, and I sneak some pretty drawer liners in there too, but it's really not the same.  My studio is the one and only place where I have the freedom to do whatever I want, for me!

And I kind of wanted pink.  Just a little.

So, I pulled the drawer fronts out, taped them off and game them a single coat of oil-based primer.


The primer would help my paint adhere, since the IKEA furniture always has a nice smooth finish.

I wanted to add a little visual interest, so I thought I would play with the oh-so-chic ombre effect.  I grabbed a paint swatch from the paint store, and had testers mixed of all the colors in each shade.

The shades I used were Behr's Arizona Sunrise, Pale Berry, Deep Bloom and Strawberry Rhubarb.  Wow, I got hungry and ready for summer just typing those names.  Sigh.

 
Each drawer received three thin coats of the paint, the tester size was plenty. 


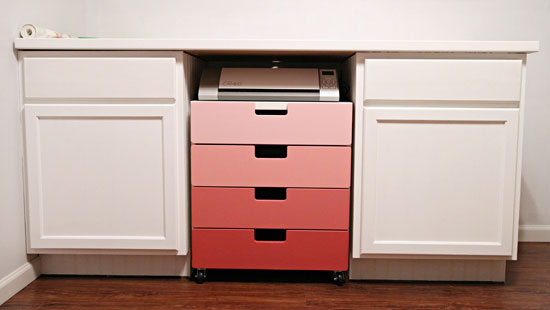
Ohhhh la la!  I love me some pink!  The ombre effect gave the drawers some dimension that the back of the room needed.

The cart received a few more enhancements from it's original out of the box state.  First up, some Martha Stewart bookplates to label each drawer.


These bookplates rock! Just peel and stick and you have an instant label holder.  So pretty!


Next step was to use some washi tape and my label maker to label each drawer front.


Then, we screwed in some casters to the bottom of the drawers to turn it into a rolling cart, we found the casters at Home Depot.


As if the whole process wasn't already my idea of a good time, now it was time to fill up those drawers with my Silhouette goodies!


The top drawer is dedicated to 12" vinyl rolls.


Drawer number 2 holds the 9" rolls.


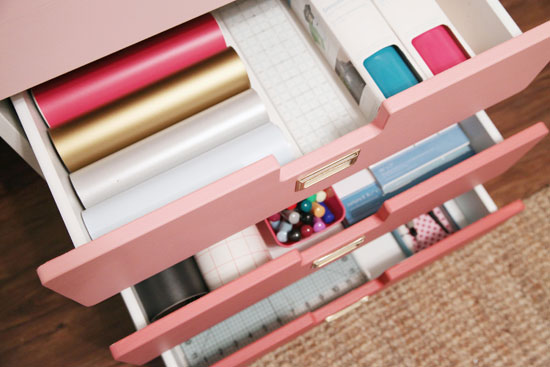
Third drawer down holds all of the specialty items such as transfer paper, chalkboard paper, metallic sheets, double sided adhesive sheets, sketch pens and glitter.  The little bins holding the pens and glitter are from the Target Dollar Spot.


The final drawer holds all of my cutting mats, tools and blades.  The tools are resting in the lid of a box that some gift tags came in, which I lined with a piece of pretty paper.


So pretty in pink!


I love that my Silhouette can sit on top of the cart and all of the items are organized nice and neat below. And because it is on casters, it rolls out, I link up my laptop, use it, and roll it back when I am all done.  Super simple and 100% clutter free!


And as I mentioned, I don't sit at the counter often, since when I did it wasn't comfortable for extended periods of time, however, the option is still very much there should I wish to pull up a stool because the cart can easily roll out.

The pink totally makes me smile.  Call me crazy, it's OK, it won't be the first time {or the last}.  But what I love is that should I grow tired of the color, it is as easy as a quick coat of paint to update.

I still have all sorts of other crafty items to think up storage for, such as stickers, embellishments, papers, punches, adhesives, etc... the brainstorming is commencing in 3...2...1...


Thursday, April 18, 2013

39 UHeart Organizing: Scrapbooking On The Go!

My organized scrapbooking queen is back today to share more of her superpowers with us!  And seeing how organized her systems are at home, it should come as no surprise that Sarah has a process for traveling too!  And scrapbooking is enjoyable in the comforts of your own home, but it's even more fun when you can get together and do it with people you adore!  Here she is now to share how she takes her scrapbooking on the go!


Happy Spring, everyone! As I look forward to getting out of the house a bit more and socializing with some of my favorite crafters, I thought it would be helpful to share some of my tips for crafting on the go.

One time I was scrapbooking at a local craft store and looked up in amazement to see a fellow patron dragging in a full-sized suitcase, a scrap tote and numerous bins. For a four-hour scrap session! While I applauded her clever use of a store cart to reduce the trek to one trip, I was still aghast: crafting should not be so complicated! This experience underscores one of my rules of thumb: crafting on the go should be fun, productive and should not require hiring a moving van to get from point A to point B.

When I travel to scrap, I limit my craft-related luggage to a maximum of three pieces.


I limit myself to three pieces of baggage because I am able to carry them all in one trip if necessary, and more importantly, I’ve proven to myself that it’s all I really need. My scrap tote is my #1 go-to bag, because it can fit nearly everything I need to make great use of my time. Depending on where I’m going and what I’ll be working on, I may also bring my die cutting machine. And if I’m going away for a weekend of crafting {a rare indulgence that affords double-digit hours for scrapping}, I will probably bring an extra bag for paper, embellishments, etc.

Maybe you’re thinking “But wait! How could I possibly fit everything I own into three little bags?!” These bags cannot fit all my crafting supplies, but they can fit everything I need to make productive use of a crafting session. No, they are not magical Mary Poppins carpet bags. Instead, I rely on a good planning system, some prioritization and a simple organizational system.

Planning Head

This is the one where most people get stuck, so I thought I would start here. I recommend selecting a limited number of projects to bring along with you on a craft-and-go session. I know it’s a challenge to even find time to get away to craft, let alone time at home to plan ahead for your craft session. But as with any successful organizational system, it is the planning time at the front-end that saves so much time later. I find that when I periodically dedicate a few precious hours to getting myself organized, my craft time is so much more productive and enjoyable.

Last year I shared with all of you my planning process, which I developed in an effort to be a more productive crafter {read: I got tired of sorting piles of pictures trying to figure out how the heck to get started}.

This process helps makes me a super-speedy crafter at home, but it is a God-send when it comes time to pack up and craft away from home. I am able to quickly flip through my bin of to-be-scrapped layouts and select the ones I want to bring along. I pick a few more than I think I can feasibly complete in the time I have available, so I’ll have a variety to choose from and won’t run out of things to work on.


Even if you don’t have time to plan exactly what you’re going to work on, I encourage you to not bring your entire “must craft” pile. Instead, select a subset of photos, memorabilia or projects to focus on during your craft session. You can’t get it all done anyway, so why not save some space and back pain?

Prioritization

Part of the trick of efficient craft travel is limiting what I bring to what I will feasibly use in the time allotted, i.e. leave the giant bin of ribbon and the kitchen sink at home. This selection process becomes even easier if you’ve selected the projects you’re going to work on, because you’ll have a good idea of the supplies you need to complete those projects.

Here’s how I decide which supplies to bring. Despite its size, I almost always bring my die cutting machine, because it’s an essential tool and I’m guaranteed to make use of it. The same cannot be said for most of my other large tools, so they stay at home unless they are absolutely essential to a project I’m working on. And if turns out I did need something I opted to leave behind, I figure I can quickly make use of it when I get home or save that step for my next craft session. The moral of the story: I pack only what I’m sure I will use.

Good Organization

So now I’ve selected my layouts and made the gut-wrenching decision to leave my giant sticker maker behind. But all that brain-power is wasted if I can’t get packed up and on my way. So my last set of tips centers on how I organize my travel supplies to make it easy for me to get out the door and on the way to fun.

First, I make a list. I know, I know… not exactly rocket science, but stay with me here! I’ve been burned multiple times, getting to a crop only to realize I had forgotten some essential supply, like my paper cutter. There goes my productivity down the drain! So I created a list of all my essential crafting-on-the-go items, laminated it for durability and tucked it into my scrap tote. Here’s what’s on my list:
  • Paper cutter
  • Adhesive roller
  • Glue pen
  • Small sticker maker
  • Ruler
  • Scissors
  • Cutting blade
  • Stylus
  • Spatula for die cutting mat
  • Pen
  • Pencil
  • Colored pens
  • Cutting mat
  • Die cutting mat
  • Inspiration and stencil binders
  • Layouts to work on
  • Sticker and embellishment binders (optional)
  • Additional tools (punches, stamps, inks, embossing tools, etc). (optional)

When it’s time to pack up, I just pull out my tote, grab my list and begin assembling my supplies. I make decisions about what layouts and optional supplies to bring as noted above. As a go down the list and collect the items, I lay them all out on my table. This way I can double check that I have everything before I pack my bags.


In addition to my scrap tote itself, I have a number of containers that help me organize my supplies within my tote. These are not spendy items I picked up from “Expensive Storage Supplies Are Us.” They consist of some vinyl zipper pouches I got on sale in the school supply section at Target, some durable pencil cases I picked up from the dollar section at Target and some inexpensive 12X12 plastic pockets I purchased from Michaels. These containers serve a sole purpose: to organize my craft supplies when I’m traveling. This way I don’t have to try and find containers each time I pack my supplies. And they live in my empty tote between travel sessions, so I don’t have to waste time hunting them down when it’s time to pack up.

Two of the zipper pouches fit all my small supplies that I don’t want to leave rolling around in my tote, like my scissors, my adhesive runner, etc. The third pouch I use to corral any small, optional items I decide to bring along, like stamps or inks.


I usually need two pencil cases to house all my colored pens. I bring almost my entire collection, because I do believe those are essential to almost any craft project. Luckily the cases are compact and fit easily into the nooks of my scrap tote.


The 12X12 pockets are reserved for layouts. Depending on how long I’m going to be gone, I may bring a couple of these. It’s an easy yet inexpensive way to transport in-process and completed layouts and to keep them same from harm, since I don’t typically lug my entire scrapbook along.


Once I have everything laid out, I do a mental inventory to evaluate if everything will fit in my allotted three bags. If the answer is no, I weed things out. Once I’m good to go, I pack it all up. I start with the big items — like my binders, my mats and my pocket full of layouts — and then fill in around with the small stuff.


Selecting a scrap tote with nice side pockets and adjustable dividers helps make really good use of the space. If I need a bit of extra capacity for paper, embellishments and the like, I allow myself a third tote, loading up a durable, reusable bag.


So that’s a bit about how I travel to craft without bringing everything I own and still get a ton done. I’ve found that having this easy process — supported by a little planning ahead — has allowed me to spend more of my time creating. I hope these ideas helped get your creative juices flowing and inspired some ideas to get you out the door with a bit more ease.

What great tips do you have for minimizing your craft supplies when you travel? How do you ensure you spend less time packing and more time creating?


"My name is Sarah Eelkema and I live in a suburb of Minneapolis, MN with my husband of almost two years, Eric, and our two adorable Cavalier King Charles Spaniels, Hermes and Brontë. I am a Communications Consultant by day and by night/weekend/any spare moment, I indulge in my passion for writing, crafting and organizing. I am honored to share with all you dedicated iHeart fans my tips, tricks and secrets for organized crafting, which will not only help you get control of your craft clutter but also allow you to make more efficient and productive use of your precious crafting time. While I am blessed with an entire craft room, I promise to explain how all the solutions I share can be tailored to your specific situation, whether it be a dedicated room, a small storage space or mobile crafting. In the meantime, Happy Crafting!"


Wednesday, April 17, 2013

11 Extra! Extra! Organizing Reads!

Aside from hanging out here at my IHeart home, I have been also seen having a good time in some other towns around blogland.  So, I thought if you were looking for a few extra reads written by yours truly, I would kindly share the link love.


As many of you know, I contribute to the Better Homes & Gardens Style Spotters Blog twice per month.


I recently wrote about my favorite pantry organizing tips {since I just whipped mine back into shape}.


And since spring is in the air {in most parts of the country}, and many are getting ramped for spring cleaning, I also chatted all about organizing a cleaning closet.


Speaking of spring, that is exactly what I was posting about over on Wayfair's Blog, My Way Home.


Majority of the color and design in my home is inspired by the colors in nature and springtime!  Greens, blues, yellows and pops of pink!  So, I shared my favorite tips for decorating with spring in mind.


The blogging beauty, Michaela, invited a bunch of talented bloggers over to chill with her at her home, so we could get giddy about our experiences as bloggers, and why we got started with this wild and crazy ride in the first place.

{source}

Join me, along with Michaela, Courtney, Michelle, Cristin, Megan, Sam, Jenni, Stephanie and Natasha, as we share all of the fun we have had blogging thus far, along with some things that have surprised us along the way - "Why I Started Blogging".


I recently featured a super sweet little lady closet done by the talented Carmona of Home Made by Carmona.   She loves organizing, just like me!


Now, she is featuring me over on her blog!  She is currently running a series in which she interviews some amazing peeps from around the blogosphere, and I was over the moon honored to be included.  You can check out my Q&A with Carmona here.


SheKnows.com did a roundup of swoon worthy office spaces, and kindly included my happy DIY desk!


And to my surprise, they also named IHeart Organizing as one of their Top 5 Organizing Blogs!  Dudes, someone please pinch me!  I also spied some uber fabulous IHeart Organizing contributors named; a special congrats to Courtney and Megan!


Thanks everyone!  I hope you all are having a super duper April!


22 Reader Space: A Pretty Place to Play

Organized and pretty?  That is the name of the game around here!  And I love what superstar reader, Cas from Clutterbug.me, created for her kids!


Cas created really effective storage and most of it was thanks to the Dollar Store!  A dolla makes you holla!  Everyone's favorite place to snag a good deal on storage!  Here she is now to share more details:

What is the main function of the space?

"I wanted my three children to have a place to play, create and MAKE A MESS!  I rotate the toys often, so it's always a place they want to spend time and play in."


Any superstar tips for keeping it organized?

"Love a labeled bin system.  It's easy for my little ones to find the toys they want and just as easy for them to put everything away in it's proper 'home'."


What items did you find were essential in organizing the space, and why?

"My girls love doing crafts, so creating an art center was essential for the space.  I used an old, low book shelf to hold all of their craft supplies in easy-to-access containers.  With all the supplies being visible, they are inspired to really get creative with their masterpieces!" 


What did you do to go the extra mile and "Make it Pretty"?

We went with a "garden" theme to bring some of the outdoors in during the cold winter months.  My husband made the picket fence headboard for the daybed and hung pretty butterflies and flowers in the room.  We recently had a baby boy!  I can easily make the "garden" theme gender neutral by adding some fun bug decals and brightly coloured kites to the space.


What items did you DIY to stay on a budget?

My girls made the artwork for the room and I love how their hand and foot print art is also a keepsake for me!  I LOVE organizing on a dime, so I bought the white plastic bins from the dollar store!  To label them, I printed out pictures from Google images on full sheets of clear labels and stuck them right onto the bins.  I've had the same bins for a few years and the labels have held up great!  If we change the toys, we simply peel off the label and print a new one!  With each bin being only a dollar, it was a real budget saver!


How has it impacted your life for the better?

I'm never stressed out about toys being all over my living room floor!  I'm a bit of a neat freak when it comes to the rest of the house, but in the play room, they can just have fun and go crazy.


I completely agree with my gal Cas.  I know not every home is cut out for a playroom, but if you have the space, they are fab sanity savers, for both kids and the parents.

Let's chat quickly about what makes this room so heart worthy!
  • It just screams happiness and creativity to me.  I can picture myself sitting in the room and being swept away to a garden tea party where us gals sip tea, paint our fingernails and chat about all sorts of giggly girl things.
  • I love that it promotes art and free play.
  • I adore that the storage is all labeled to it is simple for the kids to maintain the space.
  • Dollar Store bins and labels.  Enough said.
  • The overall setup of the room is super savvy too, because there are defined zones for different types of play.
  • The versatility factor rocks!  The fact that it can easily be updated to suite both boys and girls was a really smart mommy  move.
  • That daybed, how darling is that?  What a great place for the kidlets to snuggle up with a good book.  When can I move in?

A special Thank You to Cas for taking the time to share her darling play space today!  You can find all the details on her blog here.

Raise your hand if you love your playroom more than any space in the house.  Me me me!  What are your favorite playroom tips or "rules"?  What about top tips for organizing toys when an entire room dedicated to play, is not an option?

ATTENTION!!  Want to be featured in a Reader Space edition?  Have an awesome organizing story to share?  I am looking for projects that have made a positive impact to your life.  Please submit your story and photos here and I would heart to feature them right here, on the blog!!  Photos should be high resolution and unedited.  Please include a description of the project, including any costs, inspiration, and how it has changed your life and routine for the better!  Oh, and no worries my friends, we will NEVER judge "before" pictures because that just wouldn't be nice!  Only love goes on at this blog!