

I have received this question here and there over my years of blogging, but canvas bins must be totally hot right now because the question has popped up multiple times in the last few weeks. That's my sign to finally answer this common question with another chapter to my labeling 101 series.

It is no secret that organizing and labeling go hand-in-hand. It is also no secret that I love to share my labeling tips with you. That is how the Labeling 101 series was born.
Does organizing have to be pretty to be effective? Absolutely not. But I always say, "Why not love it, have fun with it, and find ways to keep yourself motivated?" Any time that I have invested a little extra heart and attention to a project, it lasts much, much longer.
That said, when it comes to labeling, I prefer to add a little ooh, la la value. Whether it be a label made on our computer, or placed inside of a decorative bookplate or even created with my label maker, I want it to stick around for awhile and look the part. Labels keep everyone on the same page and really are a crucial part to most organizing projects.
So how do you label canvas bins? And do it quickly, easily and with a little pizazz? I am sharing four different darling options with you today, and with that I am only scratching the canvas surface.

To get started, I whipped up a few label options using my printer, and one cut with my Silhouette machine out of heat transfer material.

- Name Badges
- Print, Cut & Laminate
- Clip-on Label Holders (alternative in Silver, Black, Gold & White)
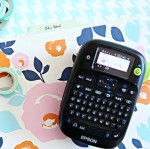
- Iron-on Transfer
I picked up a standard canvas bin with a small grommet handle from Target. Although there are an endless variety of canvas bins on the market, most of these techniques should be fairly universal.

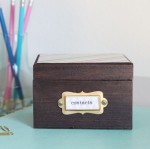
First up, name badges! I found a small pack of these at our local office supply store. They are clear and this specific type had a safety pin affixed to the back.

I created a label on my printer, cut it to fit the holder and pinned it directly to the front of the canvas bin.

I really like this option due to the flexibility and the fact that it is couldn't be easier. But I wouldn't recommend this option with littles, just given the fact that it is attached with a safety pin and I don't find those to really be all that safe.
__________
The next label I created using my print, cut and laminate tutorial, which is always a much more kid friendly version.

Canvas bins work great for children's toys, and so do picture labels. For this label, I used a hole punch paired with a piece of baker's twine. I then affixed it to the bin through the small handle by tying the twine into a simple knot.

These print and cut labels tend to be my favorite because they are completely customizable and easy to make using supplies I always have on hand at home.
__________
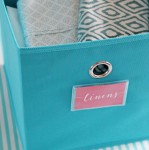
You all know I am a long time fan of the Martha Stewart Adhesive Labels (which are now back!), so image my excitement when I spotted a similar version at Target.

These holders are designed to slide over the edge of bins and boxes, creating a quick and non-permanent labeling solution. And again, I opted to print the label using my printer (because I am not a fan of my handwriting), however, you can quickly write out your label or use a label maker paired with tape. Whatever tickles your fancy folks.
(Alternative label holders in Silver, Black, Gold & White)
(Alternative label holders in Silver, Black, Gold & White)

__________
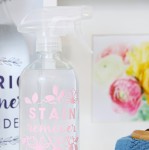
Last but not least and the trickiest of them all; the iron-on heat transfer.

I used this type of label in our boy's bedroom closet, and they are still going strong! However, the application can be a bit of a hassle. The iron-on heat transfer material is found online and at some craft stores, and cuts beautifully with the help of a die cutting machine. However, if you don't have a craft machine, don't fret! This material can easily be cut with a simple scissors as well. I would just recommend keeping the outline/shape fairly basic. For this pet bin example, I decided to do a cute cut-out of a balloon animal. I followed the heat transfer directions and used my iron to adhere the label to the front of the bin.

I have learned after doing this a few different times that not all canvas bins are created equal. The inexpensive canvas bin shown above has a thin webbing finish, which can melt if you keep the iron on the canvas too long. You definitely want to do this with a thin cloth as a buffer. On the other hand, the transfer doesn't want to stick if you don't hold the iron down for long enough, So it is all about striking that perfect balance. But gosh darn it, I had to include this method because it does create a stinkin' adorable label and you may find it worth the little extra time. And if you use a canvas bin that does not have a webbing finish (similar to this one or this one), then you shouldn't have too hard of a time with this method at all.
__________
So there you have it, my favorite four ways to label a canvas bin. Working on this post made me realize just what a label lovin' fanatic I am. OK, so I already knew, but it was so much fun to get back into the label-making game. And if you are looking for more label inspiration, you can find all of the posts in this series shown below.
 |  |  |
 |  |
Last year when I organized my daughter's closet, I gave regular outdoor vinyl try on her canvas bins. A year later and it's still there and holding strong.
ReplyDeleteThat is great to know, thank you for sharing Courtney! ♥
DeleteI was just doing this very thing this morning! I used chalkboard tag labels and tied them on with twine. I love all your ideas! Hey, this reminded me of your playroom-switcharoo you talked about. :-) My kids still love their wooden train tracks too - i think its one of the best toys ever!
ReplyDeleteHave a blessed day - thanks for sharing :-)
Your labels sound adorable Amy. :) And yes, the new boy's space is ready for some love. Currently just holding their belongings, but the boys will be out of school soon and will want an awesome place to hang out this summer. Can't wait to get the ball rolling.
DeleteGreat options! I especially love the plastic name tag holder idea. I love the Martha labels and have used them for my bathroom plastic drawers under the sink. I also personally like the idea of creating a pretty label, laminating it and using a clothespin to attach it. Looks kind of cute! www.californiatocarolina.com
ReplyDeleteI am redoing my closet now and have bins with no labels... what was I thinking? This post has definitely inspired me to remedy that immediately!!! What is the font used for the "linen" label? I really like it and think it would be so pretty in my updated closet!
ReplyDeleteThe "linen" label is done with Salt and Spices font. Here is a link to that as well as a few similar versions: https://www.fontspring.com/similar/fontforecast/salt-spices-pro
DeleteHave fun with your closet!
Thank you Jen! I got a few new fonts, and will definitely enjoy using some of your ideas when I get things put back together!
DeleteI LOVE this series - labelling is my porn ;) A side question, what have been the best reader tips you've drawn inspiration from or used? I'd love another Q&A post!
ReplyDeleteThat is a great question! I know there have been a few over the years. ♥
DeleteLove all your ideas! Will you please share the fonts you used for these labels? Thanks!
ReplyDeleteOf course!
DeleteLinens: Salt & Spices Pro
Trains: ITC Avant Garde Bold
Sandals: Raleway
I LOVE the iron on transfer idea!
ReplyDelete-Jen
www.asipofbliss.com
Jen, this post brings you back to your roots! I always pick up some new tips or products -- e.g. the clip on labels from Target seem awesome. Canvas bins can be pesky to label.
ReplyDeleteTara.
Thanks Tara! I love these types of posts!
DeleteYour idea of using name badges is just what I need! This may be a silly question, but how do you print your words in white?
ReplyDeleteHi Kia!
DeleteI just create a colored box and insert white text over the top. My printer just doesn't print the white space (it does't use white ink).
xoxo!
I always loved how easy and budget friendly canvas totes are for storing things like kids toys. The iron-on transfer is so adorable. Thanks for the tips on getting them to work right!
ReplyDeleteI have done the print/cut/laminate steps, but instead of using twine to attach I've used stick-on velcro pieces. I did this for the Drona bins I bought for the Expedit in our daughter's nursery a few years ago, and they are still going strong!
ReplyDeleteI really love all these ideas for labeling canvas bins! I feel motivated! Tx!
ReplyDeleteAll great ideas! Thanks for sharing.
ReplyDeleteThis came at the perfect time. I just made new labels for my toddlers canvas bins and the 2 ways I've attached them both failed. I bought a laminator and Velcro dots, can't wait to try this!
ReplyDeleteI love organizing, and I have plenty of canvas bins that I store things in. I definitely could use some labels. I love how many options you've given here! I'm also a fan of the Martha Stewart adhesive labels so I'm glad to hear they are back. I always say that the secret to organizing is to but things in bins... and labeling is probably step two! Great post.
ReplyDeleteI have a Cricut machine. I hadn't thought of using it for iron on transfers. Fabulous idea! Thanks!
ReplyDeleteHi Jen, All of your ideas are great. On your bin labeled, linens I loved the items inside of it. Would you happen to have any information on them? Thanks!
ReplyDeleteThank you!
DeleteThe contents pictured is an extra set of sheets that we use in our guest bedroom - the sheets are from Target: http://bit.ly/1pwfxZg
And the pom pillow cover was from HomeGoods a few years ago.
xoxo!
Don't know if you've seen these: http://www.target.com/p/3-pack-dry-erase-fabric-bin-labels-white-room-essentials/-/A-15093308#prodSlot=medium_1_2&term=label+RE but they'll work with the fabric bins as well as the mesh drawers which is what I used them for. I did vinyl labels as I was afraid of rubbing up against them and getting the pen on my clothes.
ReplyDeleteLove the bookplate idea! I like to use print/cut/laminate, using pictures and words for my toddlers, and then I attach them to the basket or bin handle with a metal 1" book ring--so easy to open and close, as our toy use seems to change almost weekly and that way I can easily move the lables and clip them to whatever bin is now the "blocks" or "animals" bin
ReplyDeleteHello, I love all your ideas. I am currently under construction organizing my home. I have been using my printer to do the labeling but I was wondering where you get your fonts and the pictures to go along( like the label "trains") Is there a website that you would recommend and are you printing in white ink on the colored paper that you showed in the pictures above? Thanks for your help?
ReplyDeleteHi Audra,
DeleteGreat question!
I generally just look for free fonts on Pinterest, and occasionally purchase through https://www.myfonts.com/. A lot of the icons I either create using photoshop or use by searching for free graphics.
To print white font, I just create a colored label box and use white font (on the computer). I print onto white paper, and the printer just doesn't fill in the text, making it white.
Thanks,
Jen
I can't find the Room Essentials clip on labels anywhere in Target or on line. Has anyone any ideas where I can buy some.
ReplyDeleteHi Elaine,
DeleteIt looks like they are no longer available at Target, but these are a really great alternative from the Container Store:
Silver - http://bit.ly/2hlBYCz
Gold - http://bit.ly/2hmRbD5
Black - http://bit.ly/2hmwxTT
White - http://bit.ly/2hjTS8w
I got this web page from my friend who told me concerning this website and now this time
ReplyDeleteI am visiting this site and reading very informative content at this place.