

But what does all of that mean without before and after visuals? That is where the magic of the story happens, am I right?

ATTENTION! NEW FUN WEBSITE GADGET BELOW! I found a really great Before & After sliding tool that I wanted to use to share these photos, so below you will see that each drawer and cabinet photo contains a slider bar down the left side of the image. You can pull it left to reveal the full after photo, and to the right to reveal the before photo. I will go into detail about how the specific area changed and why, as well as the specific product we used to get it there. Are you ready?
I am just going to work my way around the kitchen and try to keep everything easy to follow. Let's get started with the catch-all/medication cabinet.
W H A T W E D I D : Sorted down all first aid and medicated items. We categorized them even more by type and used a combination of large open faced bins to hold the His and Hers vitamin packs and the smaller bins to organize medications for stomach, prescription, sinus/allergy and pain relief.

The remainder of the cupboard was simplified and purged down. Lightweight baskets were used to further divide some cutlery, napkins, and lunch making items for the kids (their kids are old enough to understand this cabinet and the products in it, but you may want to consider storing items for young children and medications in separate cabinets). The back was lined with black dollar store poster board and the bins were labeled with clear labeling tape.


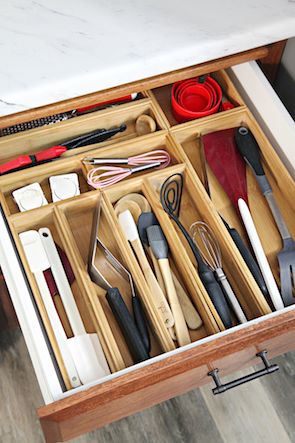
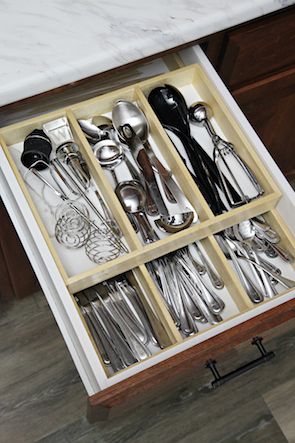
W H A T W E D I D : We sorted down the contents and decided they would make more sense in a smaller drawer in a different area of the kitchen. This larger drawer next to the stove was ideal for all of the family's baking and cooking utensils.
After taking careful measurements, I looked at a variety of organizers and dividers that would make the most of the entire drawer while also keeping some divide within. We fell in love with some wood options that not only looked great but also come in a variety of sizes.
Q U I C K T I P : Yes, it great to categorize your dividers when you can, but they also serve the simple purpose of preventing all of the items in the drawer from sliding around and becoming a jumbled mess. So sometimes those categories might be more specific to shape and size and not as much about function. As long as it is all visual and easy to find, you win. Dividers also make you think for a split second before just tossing something inside of the drawer, thus preventing them from becoming a dumping ground in the future.

W H A T W E D I D : Everything was removed, the drawer was cleaned and then we lined it with a grippy drawer liner. All of the containers were stacked by shape and size, and the liner prevents them from sliding around inside of the drawer when it is opened and closed. Two small wood racks were placed side by side to hold all of the lids, keeping them brilliantly accessible.
W H A T W E D I D : Everything was removed, the drawer was cleaned and lined with the same grippy drawer liner. Inexpensive file bins created some general divide for the variety of bakery items and even gave them a place to store their jars of peanut butter.
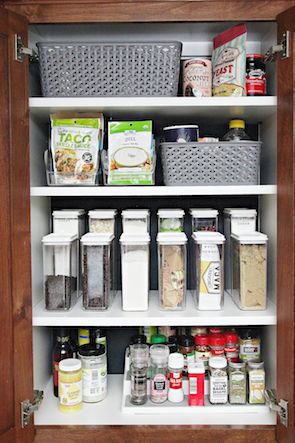
W H A T W E D I D : Everything was removed and the back of the cabinet was lined with the black dollar store poster board. We decided to keep the spices and common oils stored here and expand on that by adding in all of the baking powders and ingredients. Everything was pared down and sorted, the powders were decanted into narrow air-tight containers that fit two deep. We went with two heights so the contents and labels can be seen, mimicking the effect of the tiered spice organizer below. Clear labels were created to identify all of the container contents.

The baskets hold bulkier items, baking soda, cookie cutters, sprinkles, honey, syrups, etc... Narrow open top bins do their job corralling a variety of food/spice packets.

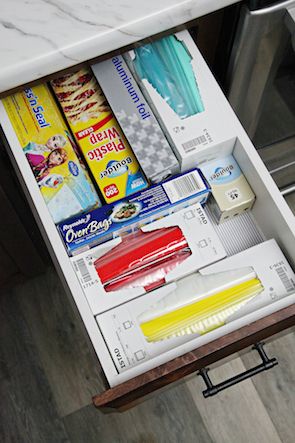
W H A T W E D I D : Everything was removed and the drawer was cleaned and lined with adorable stripe vinyl shelf liner. The contents were tidied, and aside from some Tetris skills, no additional product was necessary to make a difference in this simple drawer.
W H A T W E D I D : Everything was removed and the cabinet was cleaned. Shelves were adjusted and a second wood lazy susan was added. These amazing little spinners allow items to rotate within the triangular cabinet and brings items from the back to the front with very little effort. We also use them in our corner cabinet and they are a dream. The lower turntable holds a coffee tin and filters, extra oils and supplements, while the upper turntable holds all of their coffee and travel mugs. Another shelf up houses cookbooks and serving dishes and bowls.
E X T R A N O T E : There is a second corner cabinet located below that is even more challenging to utilize and access, so we emptied it and it is now the primary location for any bulk grocery and paper product purchases. This way they don't have to fight it daily and can purchase some items at discount bulk prices without storage issues. (There are no before and after photos of this so it is not pictured.)
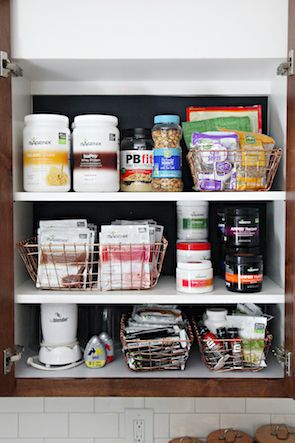
W H A T W E D I D : Everything was removed, and the cabinet was cleaned and the back was lined with black dollar store poster board. Wire baskets were utilized to better categorize the snacks and smoothie packs because they are see-through for quick grab-n-go mornings/afternoons.
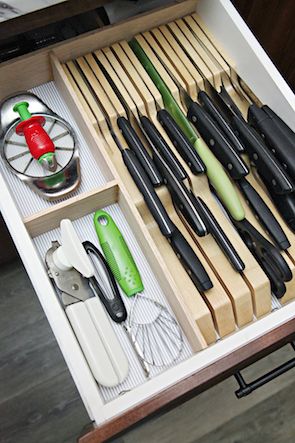
W H A T W E D I D : Everything was removed, the drawer was cleaned and lined with adorable stripe vinyl shelf liner. I recommended a knife block to hold as many of their sharp knives and cutting tools as possible, as they prevent the knives from dulling on surrounding objects and are safer when grabbing into a drawer. The block size necessary to fit their utensils was large and I was unable to source dividers to fit nicely around it while maximizing the use of the drawer.

We purchased a couple pieces of wood from the home improvement store to simply create our own dividers (using the tutorial we shared here for our own drawers).
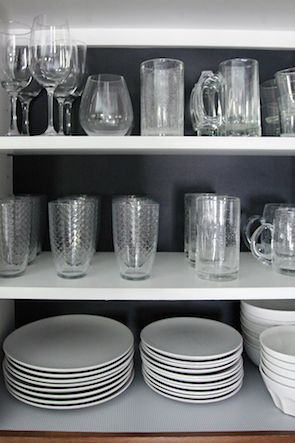
W H A T W E D I D : Everything was removed and the back of the cabinet was lined with the black dollar store poster board. All dishes and glassware were moved here. Simple updates can make huge differences, and this shows the power of some tidying and cabinet lining.
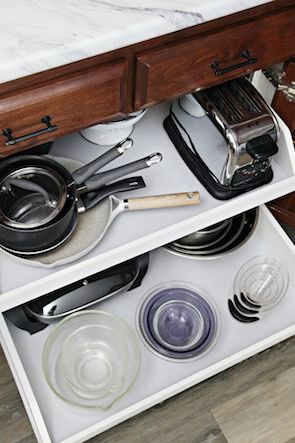
W H A T W E D I D : Everything was removed, the pull-out drawers were cleaned, repaired and lined with adorable stripe vinyl shelf liner. Their goal was to get as much off of their counters as possible, so we stored their toaster here where it is still easily accessible. The bowls and cooking supplies were pared down and simplified. The baking supplies were moved to the nearby spice cabinet shown above.
Other than that darling shelf liner, no additional products were used to make these pull out drawers awesome again.
W H A T W E D I D : Everything was removed and the drawer was cleaned and lined with adorable stripe vinyl shelf liner. The contents were tidied, and the existing tiered, sliding organizer was already working hard in this drawer so we continued to use it for their daily dining needs.
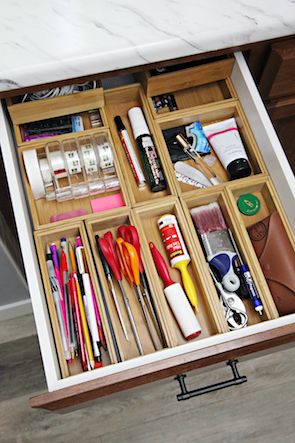
W H A T W E D I D : I was able to create room below their kitchen sink to hold the rags and scrubbers, so this drawer was now free for those paired down junk drawer items we chatted about earlier.
After taking careful measurements, I looked at a variety of organizers and dividers that would make the most of the entire drawer while also keeping some divide within. We fell in love with some wood options that not only looked great but also come in a variety of sizes.
Junk drawers should have common daily items that you reach for frequently, including a few office supplies and tools to help with quick household maintenance.
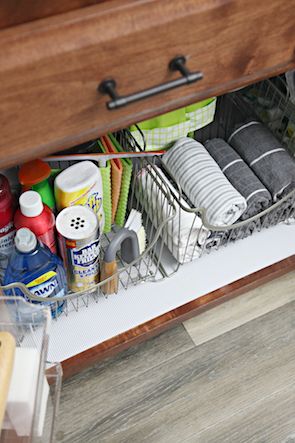
W H A T W E D I D : Everything was removed, the cabinet was cleaned and lined with adorable stripe vinyl shelf liner. I was able to reuse their existing wire baskets to hold a very pared down version of the cleaning supplies they actually used and needed, the other holds rolled dish towels. When something works really well for us, I can't help but recommend it, which is why you see we added a lightweight spice rack to one door for sponges and dish scrubbers. The opposite door now holds a paper towel roll, the holder is light enough to be attached with outdoor strength Command Strips.

Another repeat recommendation is to use stacking shoe drawers to make the most of the space on the far side of the plumbing. They are awesome for holding trash bags, dishwasher tabs and cleaner, wash rags and specialty rags and scrubbers. I made sure there was enough room for them to pull out without hitting those hinges by storing a thick drying mat on the far right as a buffer. Each drawer was labeled with clear tape so the entire family can stay on the same page.
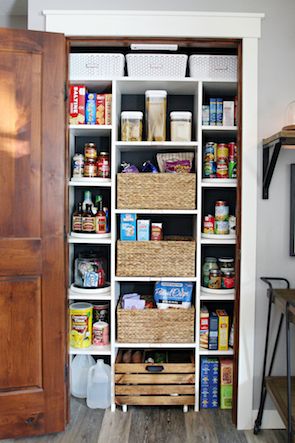
W H A T W E D I D : Pulled everything out, ripped out the previous system, moved all of the household maintenance items to nearby closets in the entryway and laundry room, painted, installed new custom adjustable shelving, loaded it up with all of the family's food and pantry items, and shared every last detail in this post here. I try not to play favorites, but I absolutely love this spot in their kitchen and the end result was exactly what I had envisioned from day one. I am so proud of the entire project, and this closet has a special little spot in my favorite projects file.

I have to say, I am sad to be done working on this project but I am also incredibly proud to have spent the time and energy on such an amazing update. I am so grateful that others let me work on their spaces and share their stories on this blog. Again, you can check out more details about the process it took us to get to the after photos in this post here.

 |  |
 |  |
 |  |
 |  |
 |  |
 |  |
 |  |
What a beautiful transformation! So many great ideas here that I will be able to utilize. Thank you for your hard work and inspiration.
ReplyDeleteAMAZING!! After reading this post I feel better about cleaning out my kitchen and pantry. Thanks for all of the wonderful tips and ideas!
ReplyDeleteI love the new photo-sliding feature! These types of before and afters are so inspiring to me because they look like any average family's kitchen cabinets/pantry and your techniques and products are so practical and accessible. Please keep sharing!
ReplyDeleteI love the small turntables and the stacking shoe drawers. They would solve a lot of problems for me! Motivating! The sliding pictures are awesome too!
ReplyDeleteThere is just nothing like a good before-and-after to inspire me! Thanks so much for these. The only one you forgot was the countertops! I am wondering if you were able to stash more of the things we tend to leave out, as you did with the toaster and dish stuff. My husband and I are always battling about putting stuff away and off the countertops! Right now he has 3 coffee pots on the counter (Keurig, 12-cup brewer, and mini) and 2 6-cup mug trees - it makes me crazy. I really appreciate your links to the products, because of all the info and measurements available in the link. Thanks again!
ReplyDeleteFunny, I actually told my girlfriend today that I wish I would have taken a full shot of her kitchen after. Not only are her counters clutter free and wide open, but they also installed a backsplash that really made a beautiful difference. Maybe I can sneak back to grab another shot. :)
DeleteThis warms my heart. Thank you!
ReplyDeleteYou are always motivating me to make my spaces more functional. I love that you take that extra step to make things beautiful.
ReplyDeleteI am always concerned with space that is not taken advantage of - example, laszy susans leave corners of the cabinet unused - also products that take up room - such as the boxes used to make dividers in the drawer shown above - the dividers become thick (and the boxes are often too shallow not taking advantage of the height of the drawer). In a kitchen with little cabinet storage - even after decluttering - one wants to use every inch that is available.
ReplyDeleteReading your posts always makes me so happy. I'm pretty organized, but this post made me want to find a section in our house that isn't because it just gives me all the good feels!
ReplyDeleteBeautiful afters, really an amazing transformation! I thought I was going to love the sliding feature in the photos but it actually made it incredible difficult to navigate this post on my mobile device. I would start to swipe to see the afters but if I swiped outside of the picture at all it would take me to the previous post because of the way the blog is set up. Honestly since the feature where you can swipe left or right to see previous or next blog post was added it's been much more frustrating to read this blog. Im only saying this because I love your content, this is a great blog, but sometimes I give up halfway through a post because I have redirected myself to a different post and I don't have time to go back to the original post and scroll through to where I was. Hope this is helpful, sorry it's not 100% positive.
ReplyDeleteI think it's a Blogspot thing, not something she has control of. There's another blog I follow on Blogspot that has the same "swipe by accident and it goes to another post" issue.
DeleteThank you for these posts about this kitchen! I am in dire need of reorganizing my kitchen as well. This serves not only as motivation but also as a treasure trove of ideas! Thank you.
ReplyDelete