

To say these little things really excite me is an understatement. I selected a new unit for our son's closet that offered up five large drawers of storage, but those large drawers needed a little division to prevent them from becoming full-on jumbled messes down the road. This super quick and easy project was born out of a need that wasn't being met by retailers, and also by giving myself a few days to let my ideas swirl.

You can see the most recent photos of the closet in this post here; the interior measurements of the drawers come in at 25 1/2" x 21". That is a LOT of drawer area! And I really didn't realize it until I put some of his clothes inside and started looking for interior organizers and dividers. So much new space to play with!
I considered quite a few options, and the ultimate goal was to add front-to-back dividers to all of the drawers to categorize the articles of clothing by type.
We have DIY'd quite a few drawer organizers over the years (I will link those projects below), but none of our previous methods were standing out as great options here. Although it seems simple enough to add a divider down the center of a drawer, there are a lot of ways to achieve this, but most are permanent. Especially if you are looking for something that is a bit sturdier. My objective was to do something easy, not construction heavy, and not permanent to the drawer. He is a growing boy and how the drawers are used is sure to evolve over the years.
I have seen expandable dividers on the market, and they were my "go to" for this project. But the more I searched, the more I realized that they are generally A) costly and B) don't fit the full depth of these larger drawers. I also needed 6-7 dividers, and when I started adding all of those up, it seemed a bit silly to spend $50+ on something to hold shirts in place.

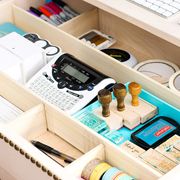
And that is when I came up with the idea to use cord clips! I have used them to hold toothbrushes, pens and of course, cords, so why not a slim piece of wood? It just might work!
The best part is that the adhesive on the rubber cord clips can be removed from any surface (sometimes with a little help from rubbing alcohol or heat), or the clip can be used with a Command Strip as well. No commitment required.
So I did a little online searching and shopping and found a pack of twelve for $7 with free shipping. I quickly placed my order and went to Home Depot to search for thin wood options. (Note: There are plenty of more expensive options in terms of the rubber cord clips, but for this type of project, these worked great for us and I didn't notice a difference in quality when compared to others I have used in the past.)
Could you use foam core? Probably! But I really wanted something sturdy. I have used foam core in the past, and while it is a cheap and great option, it doesn't always stand the test of time. And with a careless kiddo, I ruled that out quickly.
I found a few inexpensive wood types to select from but ultimately decided the biggest bang for my buck was to purchase a couple of these boards and cut them down to size. That way I could take advantage of both the height and width I wanted and get two full dividers from a single piece of craft wood. (You may also have luck finding easy-to-cut options at craft stores.)

We cut the boards to just shy of the drawer height and width and sanded down the edges to a smooth finish.
Quick Tip: You can also have the wood cut for you at Home Depot (you may just want to be prepared to still do a light sanding on the edges).
Then measured inside the drawer and used a pencil to mark the location of the dividers.

Using a straight edge, we drew a light line on the inside of the drawer that could later be erased/washed off. This gave us a visual of where to place the cord clips.

Once the cord clips are in place, it is as simple as inserting the wood pieces.
Quick Tip: We cut the wood about a half an inch shorter than the drawer, so it was still a tight fit. I found it easiest to place a finger under each clip when installing the wood pieces to prevent the clips from sliding down/slipping.


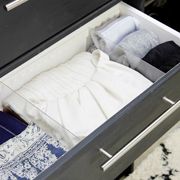
Once I had all of that figured out, I decided to wrap the boards with some white vinyl. They could also be stained or painted, this was just the cleanest, quickest solution at the time.


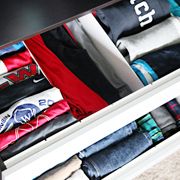
I couldn't fold and put away his clothes fast enough!


We still have some final closet details to wrap up and then I will share all of the organization and do a quick folding tutorial for the shirts. I would rather file clothes than paperwork any day!
OK, so that was a lot of words for the quickest customizable drawer divider project ever! To summarize:
Measure, cut the wood to length, mark the drawer, stick the cord grips, add the wood divider. DONE!
There are no limits to how many you can add, or the number of ways you can divide the drawer to fit your needs. This is especially helpful for those deeper drawers, like dressers and pantries, in which there may not be a lot of off-the-shelf options on the market. And the wood slats can also be customized to compliment the drawer and contents with paper, paint, stain, etc.... So many wins! Definitely my favorite DIY divider solution to date.

Speaking of DIY drawer dividers, as promised, below you can find a variety of alternative solutions that may better fit your project needs:
 |
 |
 |
 |
 |
 |
Using those cable clips... That IS genius!!
ReplyDeleteI love your blog and I'm trying harder to make sure to comment :) :)
Thank you Candice!! ❤️
DeleteHoly crap you're a genius. I just added these to my cart! Thanks for the tip!
ReplyDeletegreat idea! I would have never thought of that! Thanks for sharing.
ReplyDeleteSo so brilliant!!!! Can't wait to do this to my deep mud room draws that are a mess of hats gloves and scarves!
ReplyDeleteYes!! Perfect for that! ☺️
DeleteAhhhh Jen, this is SO good!!!! I've missed you! xo
ReplyDeleteGreat idea! Thanks for sharing!!!
ReplyDeleteThis is really clever! Good job!
ReplyDeleteThis is so, so smart! What a great idea, and thanks for sharing. His closet is looking good!
ReplyDeleteGenius idea! I love the end result and am amazed at how easy it was to accomplish. Thanks for sharing!
ReplyDeleteThis is brilliant! It looks so nice and clean, but still very sturdy. Can't wait to try it! Thanks for sharing!
ReplyDeleteThis is amazing. I’ve been trying to come up with a cheap yet sturdy drawer dividers and this is the perfect solution. Jen, you are awesome!
ReplyDeleteThis is just so perfect! I've bought spring loaded ones before and they just scoot around and make me sad. This is the perfect solution...in looks, function, and price!!
ReplyDeleteThat’s good to know! I have always wondered how well they work and have considered them a few times now. 😬
DeleteClassic Jen organizing home run. Makes me day. Thanks for everything!!
ReplyDeleteThis is SO SMART and I have been trying to find a drawer divider solution for YEARS! We just got my daughter a new dresser and I was about to buy those adjustable ones but this is so much better! Thanks for sharing, keep the lightbulb ideas coming :-)
ReplyDeleteLove this! We have those same ikea drawers in several places and they are tough to find dividers for! I’ll be trying this for sure. Thanks!
ReplyDeleteI love this idea! I've done the foam core board in my own drawers, but it didn't have the best fit and it has bent.
ReplyDeleteThis isn't too time consuming or costly. I also thought it was brilliant to cover the board with vinyl since I hate painting!
This is exactly the fix I've been needing for my dresser drawers! I just couldn't bring myself to spend the money on adjustable dividers. Thank you for sharing this great idea!
ReplyDeleteWhat an awesome idea! :) I will definitely be trying it out. Thank you!! :)
ReplyDeleteGenius!
ReplyDeleteI swear not only are you a genius, but also a mind reader. I've been desperate for a simple and cost effective drawer divider. You are a superstar!
ReplyDeleteFantastic. This project looks easy enough for me to do. Thanks.
ReplyDeleteGenius! What kind of saw did you cut the wood with?
ReplyDeleteExcelente!!
ReplyDeleteOh my gosh this is genius! Can't wait to implement this in my own home! Please make sure you let us know every new invention you come up with...you are the master at solutions for all the things! :)
ReplyDeletePerfect solution! I have an antique dresser and the drawers are very deep. I have never found anything that would give me the separation I need...until NOW! The vinyl is a great touch as well since it will keep clothes from snagging on the wood. Thanks so much for the inspiration!
ReplyDeleteIngenious!!! This is one of those tips that even sparked my creativity for other uses for those clips. I'm moving into a travel trailer (FT RVing) and am looking at all the organization tips I've saved in the past. This IS a new one. Thanks for sharing!
ReplyDeleteYay! And that sounds like SO much fun! Happy Traveling!!! ♥
DeleteClever organizing hack! Thanks!!!
ReplyDeleteI love it! Such a great solution. Definitely filing this away for future use.
ReplyDeleteGreat idea! I plan to put this to use. Thank you so much for sharing!
ReplyDeleteWonderful idea!! I will be using this idea this weekend. Thank you! I know you have given ideas for charging ipads etc. on a counter or desk, but I wonder if you have any suggestions for under an end table (shelf) we seem to still be struggling with this. :)
ReplyDeleteI would look at some sort of paper trays that stack? Many are decorative and modifiable. We used a large one in our family cabinet awhile back and still love the functionality!
Deletehttp://www.iheartorganizing.com/2016/02/family-charging-station-cabinet.html
love this idea! can't wait to add dividers to my own dresser drawers!
ReplyDeleteLove it (and you'll be happy to know that I've never seen this before ;) )
ReplyDeleteThis is so brilliant!
ReplyDeletethis is such a great idea!!!
ReplyDeleteAwsome! I really don't like the look of the expendable ones and that's why I've just hoped for my clothes to keep in line for some time (and thrown some stern stares at my tops). This might just be the solution! It's easy, not expensive and you don't need much. Thank you :D
ReplyDeleteI love it!
ReplyDeletei love your posts, jen. Always look forward to reading your blog!
ReplyDeleteO. M. G. This is seriously the best thing I have seen is so long. #organizingnerd Thank you for sharing! I love your blog and your style. I'm always checking back in the hopes that you've posted something new. I understand your hesitations with continuing to blog, but I really miss your posts on this space and on Instagram. You always provide so much inspiration for home decor and personal style. (I hunted down those Ugg slippers with the poms on the top after I saw them in one of your blog posts. It was way more than I've ever spent on slippers, but they were too cute to pass up.)
ReplyDeleteOoh I'm so excited. I've been thinking I need something like this. Thank you!
ReplyDeleteGood one!
ReplyDeleteThis is GENIUS!
ReplyDeleteWow. This is soooooo good.
ReplyDeleteThank you for this! My girls have an awesome closet system but their clothes are so small that they just become a jumble in the big drawers. I, too, had looked at drawer divider options but they seemed either too expensive or too cheap and likely to fail. And the fact that I can switch this up easily is fantastic!
ReplyDeleteGreat idea! I’m going to employ in my kitchen. Thanks.
ReplyDeleteAmazing!! It’s these genius hacks that made me fall in love with your blog to begin with. My husband is in the army so we move often. We can’t do anything major to our rentals, but we are constantly looking for ways to reorganize and utilize our spaces. Your tips on various ways to use simple things have changed my home for the MUCH better! My all-time fave is the multi-use bins from container store. I’m pretty sure I have them in every room of my house. I’ve been meaning to write and tell you since your January (?) post, my favorite posts are the simple organizing/decorating tips that use inexpensive items but make a big impact. I love looking at your bigger projects but those are just not reality for me right now. Much love!
ReplyDeleteBRILLIANT!! I've never seen this before. Thank you, Jen!
ReplyDeleteI haven't seen this before, and I love it! Really clever solution, I'm definitely going to try it to separate my top dresser drawer with all my small clothes that slide everywhere.
ReplyDeletethat's brilliant! <3
ReplyDeleteBrilliant! Just brilliant!
ReplyDeleteGenius! I knew you were cooking up something good. 😊 Major inspiration to make pretty & functional spaces...while staying within a budget.
ReplyDeleteWonderful! I will be copying this! :)
ReplyDeleteFabulous idea. And easy to do. Thank you for sharing such a great idea.
ReplyDeleteI love this idea! Thanks for reminding me that I can use those cord clips as pen holders...it came at just the right time!
ReplyDeleteGreat idea! Thanks for sharing.
ReplyDeleteFantastic idea. I might have missed it but are the cord clips removable?
ReplyDeleteAwesome idea. I will definitely use it. I've always looked for ways to keep drawers neat and wish I had thought of this while my 4 children were still at home. I will share this with my adult children while installing them for my own storage needs. Thank you so much :)
ReplyDeleteThis. Is. GENIUS.
ReplyDeleteWe already have a pack of these little bad boys lying around. Guess they're not going to waste anymore. ;)
Any recommendations on how to store sports bras???
ReplyDeleteI love these clips, but I never even thought of using them like this!!! Seriously awesome idea. I am getting ready to organize my daughter's dresser and was just thinking of how I could divide it better.
ReplyDeleteOmg genius!! I will definitely be trying this when we redo our closet!
ReplyDeleteThis is so inspired Jen! I'm bookmarking it AND leaving a comment on a blog...something I haven't done in forever!
ReplyDeleteAlso I have to say, I really like the feel of your boys' bedrooms...they are so nicely styled but still feel like a liveable space. Makes me think if I ever have a boy their bedroom won't have to be a cesspit. ha ha! You're awesome xx
I love your idea! My family has a few IKEA Hemnes dressers with larger drawers, and things tend to get jumbled without organization. I can’t wait it to try this!
ReplyDeleteAbsolutely brilliant!
ReplyDeleteLove this! I bought plastic tension dividers a few years ago and have never really been happy with them. (I always feel like I'm going to lose a finger when I reset them.) But, I could totally do this! Great idea.
ReplyDeleteWow! Just wow. Gonna use this in my new kitchen in my new house. You are a GENIUS! Thank you for the fabulous idea and great instructions.
ReplyDeleteThanks for this great idea! I found something similar, called "display holders" at local a office store. They have adhesive on the back and have a slit for your dividers. Work like a charm!
ReplyDeleteLOVE!!! Thank you for always having such great ideas that are so practical.
ReplyDeleteThank you! I had wood cut for dividers in some drawers in a new to us antique wardrobe, but I was getting stuck on how to install them!
ReplyDeleteThe link to the boards you ended up using appears to be broken. Would you mind letting me know what type of boards ended up working the best for you? Thank yoU!
ReplyDeleteI am so sorry that the links broke, that is super frustrating. I believe we used these boards and cut them down to our exact dimensions: https://www.homedepot.com/p/Builder-s-Choice-1-4-in-x-12-in-x-2-ft-Birch-Plywood-Project-Panel-Actual-0-236-in-x-11-875-in-x-23-875-in-PW002-PY024C/207195819
DeleteJen
This is inspired Jen!I ordered the identical Pax wardrobe but it won't get to my place till 7 business days from today - but want to get started on these dividers now. Can you share the measurements of the dividers (l x w x h)? Also the home depot near me doesn't carry the exact wood but I'll go look for something similar. Super excited to get this project started! I even got the clips already. Thank you for sharing your GENIUS ideas!
ReplyDeletethis is amazing! i can't wait to try this! we have done more permanent built-in dividers but this is great for something more temporary and easier!
ReplyDeleteThis is awesome!
ReplyDeleteDo you have tips for wrapping the dividers? How did you get such clean and sharp corners?
Thanks!
I'm just seeing this - Very clever and perfect!
ReplyDeleteJUST what I need. Where did you get the drawers?
Thank you! The drawers are part of the PAX system found at IKEA. :)
Deleteit was said but you ARE a genius!
ReplyDeleteShut the front door! This is genius!! I have an 11 year old boy and just recently redid his closet to better fit his larger clothes. However, I got so frustrated trying to find drawer organizers. Most of them are 2-3 inches tall and just simply don't work well. This is a great solution! Thanks for sharing!
ReplyDeleteGenius! Literal genius! Going to do this for my drawers asap!!! Thank you!
ReplyDelete