About two years ago, we found a great drum pendant on eBay and
gave it a little face lift with some vinyl decals...
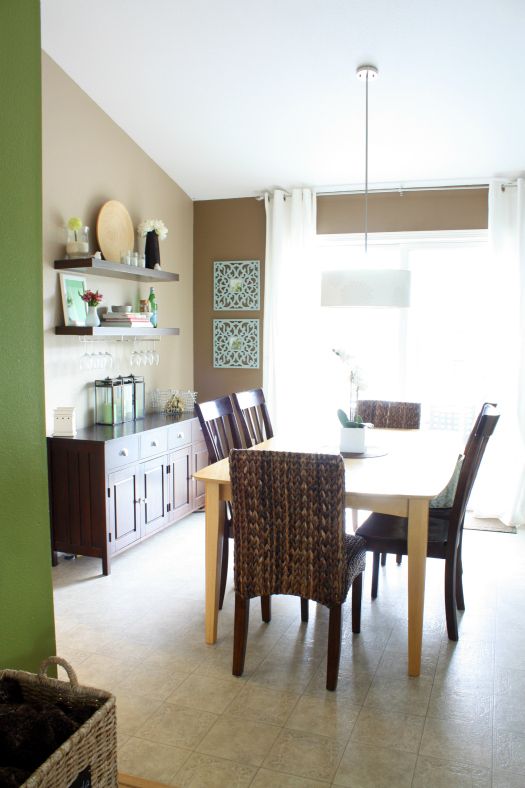
As you can see, the pendant is fab, and what I really loved is that it had three bulbs vs. one.
Now, one of my deep dark secrets. In my studio space, I have been living with a light like this....
It was a boob light. I took the cover off since I zero natural light in that space. Anything I could do to maximize my lighting situation. But it wasn't all that pretty.... and I was sick of it!
UPDATE! It seems as though not everyone has heard of a boob light. I feel it is my duty to educate. This, my friends, is a boob light. I will let the picture be enough of an explanation:
So, I talked the hubs into switching it out with our kitchen drum pendant {since it has three bulbs which meant a little extra light for me}, and updating the light fixture in the kitchen to a chandelier with five bulbs, which meant extra light in the kitchen. Win win!
The decals weren't going to mesh with my vision for the studio, so I sat and watched four DVR'd designed shows and picked away each and every decal petal...
So, I was left with a blank slate white drum pendant again...
The plan was to follow one of the bajillion tutorials on the www to recover the shade with a pretty green fabric {
this one specifically}
I started by very carefully removing the white trim at the top and bottom. I wanted the fabric to cover smoothly.
Then we measured the drum shade...
And measured the fabric, leaving a one inch margin on each side and using a piece of trim to draw straight lines with a pencil.
As far as knowing the length of fabric that we would need, we just used the ribbon trim that we had removed, as a guide.
The next step was to iron over a nice edge...
And use a small amount of hot glue to affix it right at the seem of the drum pendant.
The next step was easier than I thought it would be. A little spray adhesive, roll, smooth, more spray adhesive, roll some more, smooth it out and keep going...
Once I got all the way around, I ironed over a nice edge again and hot glued it down.
Now with the one inch extra on each side of the drum pendant, I just pressed it down over the lip of the pendant frame. It still had spray adhesive, so it stuck down nicely.
I used an exacto knife to
very carefully slice my fabric right under the lip of the frame. I stress very carefully so that I didn't puncture through the shade itself.
Once the excess fabric was cut out, I used some hot glue to make sure it was secure. Leaving a nice and clean edge inside.
It looked GREAT, but after looking at it for awhile, I thought I should probably hot glue that white trim I pulled off, back on.
Yes, much better!
I know I am a broken record when I say, "forgive me for the lighting in these photos", but now I am attempting to take pictures of a pretty drum pendant in a dungeon of zero light....
I love it! Here is a look at it from below, nice and finished!
It gives off much more light than than the two bulb boob light, even with the diffuser... super fab for me!
The lack of natural light in my workspace has been a little bit of an issue for me. Talk about depressing. I love light. Outside light. So I got my Mr. on board with taking out another wall in the lower level {in-between the under-stairs storage area and playroom}. It won't 100% solve the problem, but it will give a more open layout to the lower level {like a giant circle around the stairs}, and it will hopefully let the natural light coming in through the one playroom window, to circulate the entire lower level better. I can't wait. That actually didn't express my excitement well. I CAN'T WAIT to get started on that!
I have also been evaluating the use of space. I decided my choice to install a rail of knobs and book ledges may not have been as genius as I originally thought. I adore it all, but it really restricts me in using that area of the room at effectively. Especially since I am dreaming of creating a craft space that I can spread out and work at... and that corner is the perfect spot to build!
Wanna see a glimpse of my vision?
The paint for the dresser has been purchased, as well as the knobs! The corner desk planning is in the works and I finally have a defined color scheme. Something I should have done long ago. So exciting!
So there you have it. An easy pendant update and a plan!
Anyone else make over a pendant or lamp shade recently? Or build in a corner desk? Or tear down a wall? I would heart to hear your stories!


LOVE that light! We have boob lights everywhere and I hate them. Your new light looks gorgeous with the fabric and trim. Thanks for the inspiration... again!
ReplyDelete-Sandy
I love that fixture! I can't wait to see the rest of the room!
ReplyDeleteAllyson
http://cupcakescandycanes.blogspot.com
LOVE, LOVE, LOVE!!! We just moved into a new house and I am having a ton of fun repurposing the things we have. I have a couple of lamp shades that are in need of some help and you have inspired me! :-)
ReplyDeleteAlso, I laughed out loud with the "boob light" comment. HAHA!! We had them all over a previous house and we used to have a little giggle about it. That was great.
this looks gorgeous, jen! :)
ReplyDeleteLove that light! I hate, detest Boob lights. We have one at the top of our stairs and I'll be replacing it eventually if we can find the right thing.
ReplyDeleteWe did just put up a new light in the kids playroom - HUGE difference in lighting up a cave-like space.
http://goofymonkeys.blogspot.com/2012/02/things-are-looking-up.html
OK, now I am going to have to try and make one of those light shades. Wish me luck.
ReplyDelete:-), Susan Cooper
Good luck Susan! You can do it! <3
Deletexoxo,
Jen
SO cute! I love it...great job!
ReplyDeleteI love the fabric you chose. Super cute!!! Like I always say, "sometimes small adjustments make the biggest difference."
ReplyDeleteHave a wonderful weekend!
Kristin
theocdlifestyle.blogspot.com
Lack of light => MIRRORS. One of the few acceptable times to use them. Also,pictures of bright outdoors, preferably with backlighting. Change the pictures seasonally...
ReplyDeleteYour light is beautiful.
I love the fabric and your shade turned out great!! I just re-covered a lamp shade and the tip of ironing the edge over would have been a big help for me!! So I know for next time! Thanks for the tip!
ReplyDeleteI love how this came out. The end result is great! The fabric is very pretty.
ReplyDeleteI love how it turned out! The fabric is really fun!
ReplyDeleteWhat a cute fabric - the colour is probably my favourite! :) Wish I had a lamp shade to cover... and the courage to do it!
ReplyDeleteRachael
That green fabric is fabulous! Am I the only person who never heard the term "Boob light"? I thought it was a typo!
ReplyDeleteI hadn't heard of it either! LOL
DeleteI have never heard of it either, but then realized I have 4 of them in my house! I need to change them immediately!!!
DeleteAll I can say is LOVE IT!!
ReplyDeleteLOL!!!! I thought my husband was the one who came up with "boob light"...*snort* we suffer from those in our home as well. Ah builder grade fixtures. I love what you did with the drum shade! So much better than the mammary lighting you had before ;) I am probably going to take advantage of your genius and get rid of the boob light in our bedroom using this brilliant idea!
ReplyDeleteJen!!! I love it! It's gorgeous. It's so you and looks perfect in your studio! Nice work!
ReplyDeleteI have always called those boob lights! I didn't realize it was a professional term! ;)
ReplyDeleteHaha! That made me giggle out loud! <3
Deletexoxo,
Jen
LOVE this light..much better!
ReplyDeleteVery nice ! I loved it. and i loved the fabric too. it matches so good the colors of the storage boxes you have in your studio. It is very inspiring! Funny thing I just arrived home with a plain white lamp shade to my 3 month old daughters room, wondering how to spice it up a little bit. it is so plain white that it is asking me to do something with it. It is so plain white that I call it a blank lamp shade waiting for a make a make over and you just showed me the way. Thanks, Jen!
ReplyDeleteJen! I wondered how you would afix the fixture in your office. I really really like mounting the fixture flush with the ceiling AND the diffuser. As with others, I really liked the fabric too. You've inspired me to look for "pendant lamps" on craigslist and ebay. It's a much cheaper alternative to the ceiling fan/bulb lights than recessed lighting in my office. Thanks for the inspiration.
ReplyDeleteDawn
P.S., I, for one, would *love* to see more pictures of your puppy. :)
Sounds great! <3 I will get some more added to the family blog soon. She is growing big!
Deletexoxo,
Jen
Gosh I love this! This would be perfect in my entryway. Thanks for the inspiration. :)
ReplyDeleteI don't know what a boob light is, but your covered lamp is beautiful!
ReplyDeleteI have ceiling pendant lights for my downstairs living space too. I have been tossing up whether to keep them neutral, or add a trim or pattern. This is definately encouraging me toward pattern, but it does look like you have higher ceilings than me. Love that green fabric you've chosen!
ReplyDeleteOur ceiling height is very deceiving. We have lower ceilings in our family room area due to the heating ducts, but the ceiling in my studio area is actually a standard ceiling height.
Deletexoxo,
Jen
Thank you for sharing this, it is beautiful. I really adore the color scheme that you picked for your space and am trying to figure out where in our home I can put it.
ReplyDeleteSo pretty! I love the color scheme you chose! Pinning!
ReplyDeleteHow funny! I have never heard it referred to as a "Boob Light" but I remember when I was at wits end with nursing my oldest son and leaning back in the rocking chair only to look up and think, "That light fixture looks like a boob." I quit nursing shortly after :)
ReplyDeleteNice upgrade on the pendant light too!
Love it all! The new drum looks anything but DIY... you did an amazing job and I love that fabric. I can't wait to see your space!!! I love all of those colors. Thanks for sharing!
ReplyDeleteOh boob lights! So blah, love the new pendant look.
ReplyDeleteThe new shade looks amazing! Your colors are the exact same as my playroom/craftroom {except my walls are a dark celery green}. Speaking of paint colors, what is the color of your walls? I'm considering a blue for my little boy's room makeover and the one you used looks so calming. :)
ReplyDeleteThe color is Behr's Prelude. It is a very nice and calming gray blue color {more blue than gray}
Deletexoxo,
Jen
This is definately encouraging me toward pattern, but it does look like you have higher ceilings than me. Love that green fabric you've chosen!
ReplyDeleteLooks fab Jen!! I am totally loving your new studio-well actually I am loving your whole new lower level! You are so inspiring. I am even going to take part in your prettyify challenge this week :)
ReplyDeletehttp://lottieandme.blogspot.com.au/
Jenn, have you thought about getting an Ott light for your desk? It's still not sunlight, but it's the best replica we have. http://www.ottlite.com/
ReplyDeleteJust a thought.
Never head of an Ott light, but thank you for sharing, I will take a peek!
Deletexoxo,
Jen
Ott lights are fabulous! I have one over my sewing cabinet. Love love love it. JoAnn has them at 50% off quite often.
DeleteLove the fabric! We have a couple of those boob lights too and that's all I see when I look at them lol. I am loving your color scheme. Green is my very favorite color. Don't think I can convince the husband to paint the upstairs living room like yours though. I have really fallen for teal lately.....duh I know.....it has green in it. But I'm trying to figure out how to incorporate it into my home. I also have deep reds.
ReplyDeleteLisa
What is the paint color of the green wall in the first picture? We are looking for that type of green for our kitchen and that's exactly what I've been looking for!
ReplyDeleteIt's Behr's Grape Leaves. LOVE it!
Deletexoxo,
Jen
Thanks for the great post. I'm in the process of gathering things up for my craft room decorating. I have a lamp shade that I want to possibly cover but didn't even know where to begin. Now I do. Thanks !
ReplyDeleteWe recently furnished another room for our daughter (she now has a playroom and a bedroom). We have the IKEA Maskros lamp there, which on the one hand is really beautiful and all, but in the other hand takes up a lot of space, esp. as that room has a pitched roof area. So I was thinking of a drum lamp, only it`s hard to get one of those, because they aren't very popular yet here in Germany. Bit I am a very inventive person and will find a new solution. You can see the playroom on my blog: http://inside9b.blogspot.com/
ReplyDeleteI also love your inspiration board with the teal dresser - is that wallpaper or fabric in the left top corner? Love it!!!
Jule
Sorry, it's in the right corner :)
ReplyDeleteIt's fabric and it's SOOOO lovely! :)
Deletehttps://www.jossandmain.com/Hedge-Fabric-in-Seaglass~VZA1086~E557.html?referrerid=bNS
xoxo,
Jen
I love the hooks and wall racks! I didn't realize you'd moved your desk over to that wall till I saw this picture. If you make a corner desk for crafting over in that space, wouldn't you be getting rid of the table opposite your desk? So couldn't you move the hooks and wall racks to that wall? Oh! - and where did the fabric bulletin board go? Didn't that used to be where the sunburst mirror is?
ReplyDeleteHi Kelly!
DeleteI have really been switching things around and playing with the space. I had to use the stair wall for the desk because the of hooks and racks. But now the room is really off-balance so the corner desk should fix that and give me better crafting space than the single table I have now. I think the dresser will go where the table is, and then a large corner workspace in the back. The wall of hooks will most likely replace in cheapo hooks in our garage/kitchen entry and the book ledges will either be integrated into the corner desk or moved to the playroom for books. The cork board hasn't been getting much use yet since I don't have an idea setup for it, so I popped a mirror in it's place temporarily to see if I could get some extra sun light into the space. It's all a work in progress as I am figuring things out, but nothing will go unwanted or be wasted! <3
xoxo,
Jen
We just tore down the wall between our kitchen and dining room. It's THISCLOSE to being finished and I can't WAIT!! I love opening up a space!
ReplyDeleteLove the light!!!
So jealous! The wall between our kitchen and living room is next, lol! <3 I bet you just LOVE the new feeling without a big wall in the way! Congrats!
Deletexoxo,
Jen
Hi Jen, WOW! just found your blog and LOVE all the organizing inspiration!! Love the fabric you used it's beautiful!! I can't wait to comeback and see more Jen!!
ReplyDeleteHugs,
Norma
I have been working on my own basement project -- really just getting major work started -- and I did just tear out a wall -- thought I'd share.
ReplyDeletehttp://nateandchellieison.blogspot.com/2012/02/basement-renovation.html
Maybe when it's done I'll submit it for a reader space -- but we definitely don't make progress as quickly as you and your hubs.
Ha ha - I thought we were the only ones who called them boob lights!
ReplyDeleteHaha I thought that about myself also!!
DeleteBoob light! I almost fell out of my chair laughing.
ReplyDeleteLove it! I've been wondering how to cover a lampshade myself, and it didn't occur to me to use a craft knife to tidy up the edge. tfs.
ReplyDeleteI love the way this turned out! I am looking forward to doing some DIY projects of my own (need the house first, lol!) I used to use spray adhesive for my scrapbooking but found myself sticking to everything afterwards. Did you have this problem???
ReplyDeleteI always use a drop clothe so it hasn't been too much of an issue {and I always use the same one}. But it would definitely be a mess without it!
Deletexoxo,
Jen
OMG!! I thought my hubby and I were the only one that called those "boob" lights. LOL!! Love it!
ReplyDeleteIts beautiful! I didn't know what you meant by boob light either and after I saw the pic I said "duh" lol! I have a boob light in my craft room too. Its a pain to pull the cover off and replace the bulbs in that thing.
ReplyDeleteJen I HEART your vision for that side of the room. The drum shade turned out so well too. Gorgeous material. Love the color.
ReplyDeleteThis weekend I repurposed a tray with some wrapping paper and I even used some shoe boxes for storage on a shelf...Of course I used some wrapping paper for that too. ;)
We have only taken down a wall once and it was the best thing we ever did because we have our Family Room because of taking those walls down. You can see that here if you want. This is ground level in a Hi-Ranch. http://thedecorscene.blogspot.com/2011/04/our-family-room-tour-big-reveal.html
Lots of luck to you for making your space brighter feeling. I'm sure it will awesome when you are done. :)
Bravo on the lamp shade. It looks awesome! The thing I most love about your blog and your home is that we both have the same color choices. I'm inspired now to maybe redo some of our shades that are, shall we say, less than fabulous. LOL
ReplyDelete"Boob light" OMG, I have those all over my house...I'll never look at them the same way again....
ReplyDeleteThis is PERFECT timing, I just bought a large plain white drum light at Ikea this past weekend for the future nursery and I was trying to find a way to spruce it up. I had envisioned a trim or ribbon, but now I'm thinking of fabric or vinyl... thanks for the ideas!
Looks awesome. My new house is basically covered with the boob lamps. I was starting to think about what to do instead so thanks for including this tutorial!! I'll definitely be giving it a shot.
ReplyDeleteWow oh wow, that looks so great!!! And no, not everyone knows the boob light. I called it that to the guy at Lowes last week!!!!!!! He just stared at me and then we both turned totally red faced!
ReplyDeleteIt looks great! I would love to see how it went from hanging pendant to semi flush. I have never installed a light fixture, so I didn't know you could do that! :)
ReplyDeleteMy favorite part of a boob light is that the part that holds the cover on is actually called a nipple! My instructions for installing one actually used that word! It was awesome! I'm glad there are people out there educating the world in boob lights! ;)
ReplyDeleteso glad I found your blog! whats the paint color for the dresser?
ReplyDeleteThanks! The color is Behr's Restless Sea.
Deletexoxo!
Jen
Love what you did with this drum pendant! You may have already answered but I am curious what light you will use now for your kitchen above the table?
ReplyDeleteWe updated it with a simple chandler. I will have to take some updated pictures and post soon! :)
Deletexoxo!
Jen
I love this! I'm thinking of doing something similar in our kitchen. You may have said this earlier, but I can't find it. Where did you get the white diffuser piece you put on the bottom of the light? Did that come with the original shade?
ReplyDeleteHi Amy! The diffuser was part of the pendant kit when I purchased it initially.
Deletexoxo!
Jen
I will never look at our light fixtures the same.
ReplyDeleteI love the light. And even more, I really really really love the color scheme. May need to copy it in my office :) that dark real with the fresh greens is great.
ReplyDeleteThe lack of natural light would really bug me. I'm so glad you can open up the space a little more.
Great thoughts, you got there, believe that I may possibly, try, as just, some of it throughout my daily life.
DeleteJust found your blog. I love everything in it. I had to laugh because I've been in the process of picking out a nice ceiling fan for a 3 season porch and a few ceiling lights in other rooms. I kept telling my husband "I don't want any boob lights". He wasn't quick on the uptake - really? I thought that's all they thought about?
ReplyDeleteHAHA, I totally just giggled out loud!
Deletexo,
Jen
Hi Jen,
ReplyDeleteI love the fabric on the pendant! was it hard to make the pendant flush, I love this idea and we have low ceilings so I would need to make it flush mount?
How did you cover the bottom of the drum so you can't see the light bulbs?
ReplyDelete