


Our system is nothing fancy or even too revolutionary or exciting. But I did make some changes this year that I have already found helpful and beneficial.
TIP ONE: SELECT STORAGE THAT FITS YOUR SPACE
The first thing I did this time around was invest in some new storage bins. This is something I have been wanting to do for years, but continued to make excuses and put if off because it was a bit of an investment. At the end of 2014 we organized our storage room, and the previous Christmas storage bins were too big to properly fit the shelving (causing them to occasionally become stuck between the shelves). I told myself they were fine, but would secretly curse under my breath whenever I needed to access them. With the previous bins, we were only able to store one large bin per shelf while leaving some awkward space to fill on the shelf beside the bin. The new bins allow us to place two side by side, and because they are not as tall, we were able to add an extra shelf to our shelving unit. Even though there are now more bins involved, the dimensions made much more sense for our storage space and left us with room to spare.

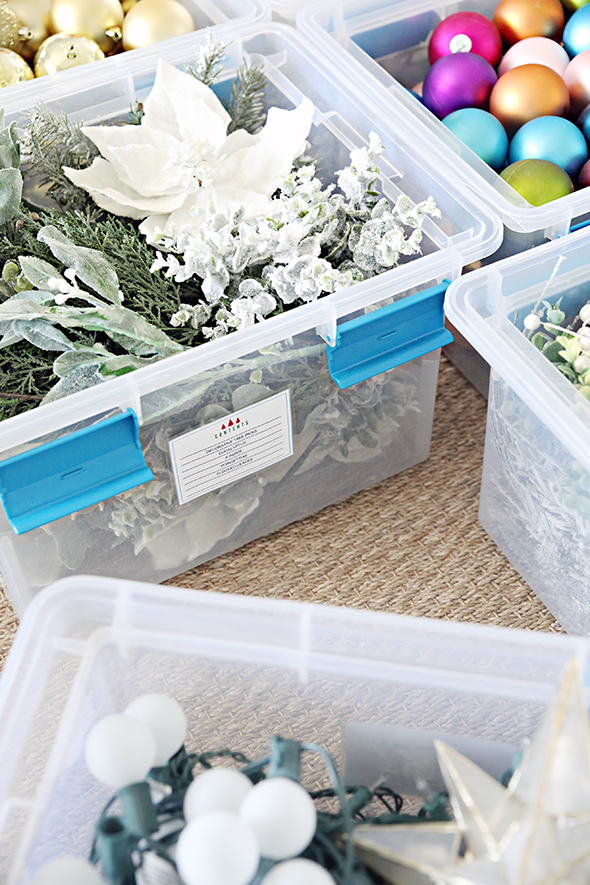
The smaller bins also allowed me to better categorize the items inside. This year when I opened our over-sized Rubbermaid bins, I was instantly overwhelmed. The contents were not all that organized and my labels on the front were far too vague to be of much help. There were things hiding in the far bottoms of the bins that were lucky to be found. So not only do these new bins fit our shelves better and allow me to better divide our decor, the last big bonus is that I can see the contents. This is something that I thought I would really dislike, because it can seem a bit visually cluttered on open shelving, but I admit it is so much better when trying to track down something quickly.
I did decide to keep one large bin to hold my six wreaths and the coffee filter garland I recently made.

That garland is HUGE! The good thing is that even if it gets a little squashed in the bin, it bounces back nicely.
TIP TWO: CREATE BIN CATEGORIES THAT MAKE SENSE
I did my best to sort the bins by categories that fit together. Garland was stored in two bins, ribbon and tree embellishments were in another bin, bulb ornaments were in their own bins...

I had a few bins where categories overlapped, but keeping items as divided as possible will keep things easier to find.
TIP THREE: SHOP YOUR HOME
There were a few occasions when I was handling items that were a little awkward and bulky, and I didn't have anything specific on hand to keep them corralled. And in no way did I want to go out in the cold at 9:00 at night to shop for proper light and garland storage.

I found myself reaching for food storage bags more than anything else while organizing our Christmas decor. Not only did they allow me really break down my categories more, they also saved a lot of space inside of the bins by giving them a "vacuum sealed" effect. By pressing out all of the air in the bags, I was able to flatten our ribbon, stockings and tree skirts to better fit the space available inside the bins.

They also keep all of those smaller pieces sorted and organized; such as ornament hooks, small beaded garland, spare bulbs and light clips.

Although the food storage bags were the biggest winners, I also cut up some cardboard to hold the stringy garland and used hair ties to keep the string lights bundled.


TIP FOUR: PICK YOUR STORAGE BATTLES
There are so many (expensive) products on the market specific for organizing and storing your Christmas decorations. And believe me, the storage loving gal I am could have gone crazy. The bins I purchased were about as basic as can be, yet still allowed me to utilize other (also basic) options for dividing the items inside. I even ditched our wreath box this year because it was awkward to store and majority of my wreaths never fit it properly to begin with. Selecting generic storage pieces allow for versatility down the road.

When it comes to all of the bulbs, the majority of ours are the shatterproof versions. Even the glass options are a dime a dozen at Hobby Lobby after sales and coupons. They do not carry a lot of sentimental value, so I am OK (carefully) storing them loosely inside of the bins. I did make sure to keep the glass versions separate, and also labeled that bin accordingly to be sure others know to handle that specific bin with extra care.

However, when it comes to the ornaments that do have special meaning because they were created with love by our kids or we have received them from our friends and family, I did purchase a soft divided storage container. (I purchased ours from Amazon for $18 but the price has since significantly increased so it may be worth shopping around. These also look to be a good alternative.)

We like to take time the week of Christmas to place all of our cherished ornaments on the tree, talking about each one. I divided some of them into specific slots based on type; children's first ornaments, family favorites, gifted ornaments, handmade ornaments, etc... I also like that the bin is deep enough to allow some of the ornaments to hang from their hooks, while others have plenty of room to stack.

You can take protecting your ornaments a step further by wrapping them in tissue paper or newspaper as well.
TIP FIVE: LABEL, LABEL, LABEL
Organizing 101 stuff right here, but it really does help! When my labels were vague, I was rummaging through multiple dark "Holiday Decor" bins to find our Christmas books and Santa hats. Although our bins are now clear, it can still be challenging to tell where one thing stops and another begins.

This time around I was extremely specific when indicating the bin contents, and I am sure I will be thanking myself next year for taking a few extra minutes to complete this simple task.

You can download blank labels for free here, they are the same labels I have been using in our storage room for all of our bins. I love to pair them with clear I.D. badge holders I found at Staples, Target, and Amazon.

So those are the tips that helped me this year, and a peek inside of our new happy holiday bins. You can find additional Christmas storage tricks in this oldie post of mine here.
I am already covered in paint and taking on my next organizing project, I can't wait to finish it up and share it with you soon! Happy organized 2016 everyone!
*** UPDATE ***
I have created some updated labels for our holiday storage bins, which are now editable!
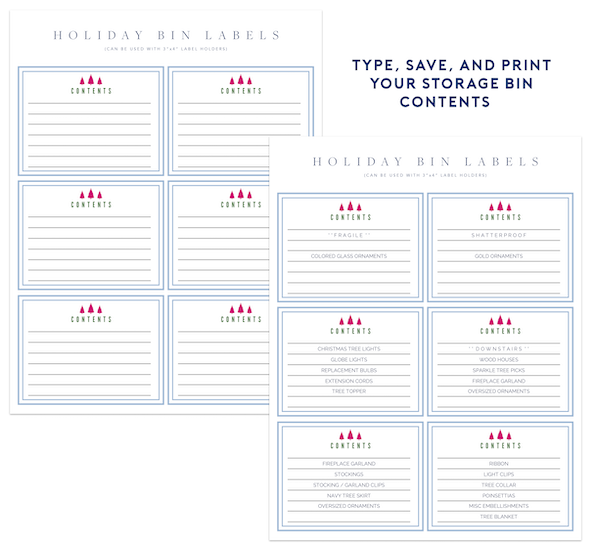 |
| DOWNLOAD FREE EDITABLE HOLIDAY BIN LABELS HERE |
This makes my heart happy! I've made it a goal this year to tackle the Christmas decoration closet...because it's a hot mess. I'll be saving these tips for when that day comes!!!
ReplyDeleteAwesome ideas! I like the way my mom organizes her's. She uses clear totes and labels really well, but she boxes them together by room, with details about what goes where. That way when December rolls around she can take her time decorating and isn't left trying to remember where she liked things the year before.
ReplyDeleteThat's a great tip! Thanks for sharing Erin!!
DeleteOh wow! What a genius idea! We broke one of our first Christmas baubles and ended up paying £50 ($100 ish) on eBay to replace it. So we need to be more careful next year!
ReplyDeleteI am so sorry to hear that, but happy to hear you were able to find a replacement. <3
DeleteI've searched for the clear ID badge holders at Staples and don't see any that are adhesive. How do you keep the holder affixed to your storage bins? Thanks! Robin
ReplyDeleteHi Robin,
DeleteI typically just affix them with clear mounting pads (pictured in the last photo), hot glue or glue dots from the craft store. Double stick tape would also work. :)
xoxo!
Thank you for the freebie, Jen! I can't wait to take off my ugly yellow post-its and replace them with your pretty labels! :)
ReplyDeleteJen, this was super helpful!!! Thanks! Keep 'em coming! From, a faithful reader
ReplyDeleteOrganized holiday decor just makes me happy! Thanks for the tips, Jen!
ReplyDeleteKristi | Be Loverly
just seeing how organized this is makes me happy lol
ReplyDeleteFirst of all, I just want to say that I am soooooo super obsessed with this blog and all your decorating sense, etc. Your house is so beautiful. I have a question that isn't totally related to this post but I'm curious about. I need a color printer and am wondering if you can recommend one? Also, where do you get your gold box labels? THANKS!!!
ReplyDeleteThank you Katie! I love my HP laser printer because it gives me print shop quality images and documents, but the ink can get pricey and may only be worth it from a business perspective. I have previously used HP inkjet options that I also loved, the Photosmart line tends to be pretty good. :). The gold bookplate label holders were part of the Martha Stewart line at Staples, but have since been discontinied. If you google search "bookplates/label holders", you may find similar options that could be painted.
DeleteGreat tips, I am gonna try some of your ideas/tips in my Christmas storage bins :)
ReplyDeleteYou amaze me!! I would love to be just half organized you are!
ReplyDeleteThanks for the tips!
Hi Jen. Are you still looking for ideas for 2016 posts? I'd love to see a "flash back" post. You have posted so many great ideas, but over time I know I have forgotten some. Could you re-post some of your favourites? They don't have to be the big ones, the smaller projects are often my favourite! Thanks!
ReplyDeleteI would love to do more of this! Just shared all of last year's posts earlier this week here: http://www.iheartorganizing.com/2016/01/home-organization-projects-best-of-2015.html, and will try to do it a bit more frequently, maybe by category. Thanks so much!
DeleteI love the ID badges for the content cards. I have been using a laminator which can be very time consuming to change out a label if the contents change. Thanks for the great idea!
ReplyDeleteI love it. Organizing 101 stuff is what I need. I had an aha moment when you talked about the smaller bins allowing you to categorize stuff. My bins don't even fit on the shelf but stack in front (leaving the shelf mostly empty.) It doesn't make good sense but I couldn't figure out a better way until now.
ReplyDeleteHi and Happy New Year,
ReplyDeleteCould you share what brand and size the clear containers are? What do you do with larger decorations? For instance, I have a set of tealight houses which are approximately 1'x1'-ish. Others such as candle sticks, etc..
Thanks for any help you can give me.
Hi Cathy,
DeleteI don't personally have too many larger items, I tend to keep our decor pretty simplified over the holidays. But my first thought would be to find boxes close to the sizes of your items. Some stores and shipping facilities allow you to purchase boxes very inexpensively (example: http://www.containerstore.com/s/10---14-wide-corrugated-boxes/d?productId=10003524&q=Box&sort=meta:low_price:A::::F) Then I would wrap the object in protective paper and store the boxes in a larger box or bin.
The bins I pictured in the post can be found at Target and Amazon: http://api.shopstyle.com/action/apiVisitRetailer?url=http%3A%2F%2Fwww.target.com%2Fp%2Fsterilite-54-qt-air-tight-storage-tote-transparent-with-blue-latch%2F-%2FA-15079778%23prodSlot%3Dmedium_1_1%26term%3Dsterilite%2B54%2Bqt&pid=uid4964-12917342-28
Adorable organizers! Love it!
ReplyDeleteI love the way the bulb ornaments look in the clear bins. So pretty! And your christmas lights are so neatly bundled. I need to do that :) Thanks!
ReplyDelete- Jen
www.asipofbliss.com
Love your idea for using china/stemware boxes for storing more precious ornaments. I've been looking for a way to protect them better and this was perfect! Thanks!
ReplyDeleteI'm so proud of myself this year because I finally organized my Christmas stuff similar to how you did here! I bought a specific storage container for each type of item! My favorite is one just for ornaments and used lil baggies too! =) I did find that one of the lids didn't exactly close well on one of the containers I bought so definitely try out the lids on the containers next time you buy them! =)
ReplyDeleteMelanie | Blog: Toots + Dill
What a way to start a new year :) Have a happy and healthy one, first of all and may you keep amazing us all with your excellent projects, like always. I must admit the large quantity of holiday decorations make me a bit nervous while thinking about storing so I'm very careful about getting any new piece of decor into my home. I couldn't agree more with your advice here - boxes or bins should fit both the stored items and the place in the house. As for the food storage bags, those are so great for so many things besides food and your tips here are really easy to do. Oh! And of course I wasn't surprised that all those string lights were "under control" :) Thanks for the amazing post!
ReplyDeleteIt sounds silly, but I never thought of clear ziploc bags for this purpose and they will work well with the decorations I have. However, I already put my stuff away for this year soooo here is my tip.... I'm going to write myself a post-it citing this post and stick it in my Christmas bins so next year when I get them out I will see the note and remember to look back at it:)
ReplyDeleteP.S. How do you have the name badge holders fixed to the totes? Are those adhesive? Love the free labels,thank you!
ReplyDeleteHi Kara,
DeleteI typically just affix them with clear mounting pads (pictured in the last photo), hot glue or glue dots from the craft store. Double stick tape would also work. :)
I just wanted to thank you for this post! When I took down my holiday stuff, I sat it in the basement so I could take my time and organize it. Then your timely post...yay! I'm proud to say my Christmas things are nearly organized and contained with those adorable labels.I referred back to the post several times. Just finished this morning.
ReplyDeleteThank you for your blog, I look forward to each post. With your help I am finally understanding the reason for most of my epic organizing fails....CORALLING but not ORGANIZING! You have helped me learn the importance of sub-catergories within out organizing.
Hi! I used the labels with the clear ID badge holders for my bins of Christmas decor after seeing this post. 3 months later, they are all falling off the bins. I'm so sad! What product did you use to stick the ID badge holders to the bins? I used scotch mounting squares.
ReplyDeleteI am so sorry to hear that! I wonder if it is a climate/humidity difference? Or if you are using the temporary version vs. the permanent? (http://www.officedepot.com/a/products/151581/Scotch-Permanent-Double-Sided-Clear-Mounting/) Another option to try would be a strong clear double-sided tape.
DeleteI hope one of those solutions work out for you. :)
Hi Jen, thanks for these tips. I'm using them and very happy to always have your help with all my organising needs xx
ReplyDeleteI love these labels! I can't wait to put them on my bins!
ReplyDeleteI see that these comments are pretty old but they were so helpful. I am reading what you have said and I really need to organize my Christmas as I put away, so good time for me to think about this. I too, never thought of using zip lock bags to organize. Thanks for all the hints! Tomorrow begins the Christmas take down!
ReplyDeleteMy decorations are in boxes in larger tubs but I am inspired to do this in the summer when I have a day in the loft sorting decorations planned. This is definitely easier to find ....
ReplyDelete