


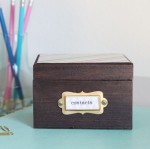
It is no secret that organizing and labeling go hand-in-hand. It is also no secret that I love to share my labeling tips with you. That is how the Labeling 101 series was born.
Does organizing have to be pretty to be effective? Absolutely not. But I always say, "Why not love it, have fun with it, and find ways to keep yourself motivated?" Any time that I have invested a little extra heart and attention to a project, it lasts much, much longer.
That said, when it comes to labeling, I prefer to add a little ooh, la la value. Whether it be a label made on our computer, or placed inside of a decorative bookplate or even created with my label maker, I want it to stick around for awhile and look the part. Labels keep everyone on the same page and really are a crucial part to most organizing projects.
For our media cabinet project, we needed a few new labels for our movie bins (purchased from the Container Store here). We recently added a fifth bin and have been in the process of re-sorting our movies by rating (in the past they were sorted by genres). It has been a bit of a time consuming process, and the cabinet has been hiding the clutter in-between sorting sessions. Yikes.

It was time to finish things once and for all, so while Bryan completed the sorting and documenting of our media, I whipped up some darling new labels.
There are a variety of options for creating labels, especially with a Silhouette die cutting machine, but one of my favorite ways is the Print and Cut method.

This method can also be done without the Silhouette; I have personally created dozens of labels using Microsoft programs, printing them on paper or sticker sheets and cutting them to size with scissors. But the Silhouette machine has really made the process easier, and I thought I would share a quick tutorial since I have been known to use this type of label fairly frequently (see them in our craft cabinet here and in our storage room here).
Silhouette sells a variety of different of sticker papers; I have purchased clear, kraft, gold, silver and the white options. Although I haven't personally used another brand for this specific purpose, I would guess most any brand of sticker paper would work just fine.
To get started, I measured the surface of one of our movie bins to give myself an idea of a good label size.

I then opened the Silhouette Studio software on my computer.

Before I begin designing, I like to get my page set to the correct dimensions. This ensures I am creating something that will fit the media I am ultimately cutting, and staying within the guides.

With the sticker paper I find it works best with a cutting mat, so I also be sure to select the appropriate mat size (not shown above but added on prior to printing).
Now for the VERY important part of this process, adding the Registration Marks.

The registration marks will print on your design, and the Silhouette machine has the ability to read those marks and know just where to cut your labels.
Once I have the page and registration marks set, I begin designing. I had previously purchased a label template from the Silhouette store, and imported it in to modify. This is where I adjust the size and add in any text.

I was also able to update the shape color, as well as the line and font colors.

The next very important step is to update the cut settings for each graphic and font you plan to print and cut. I only wanted the exterior of my shape to be cut by my machine, so I selected both the inside shape line and the font and clicked the 'no cut' option for those items.

Because I wanted all of my labels to be the same shape and size, I created one and then duplicated it for the remaining categories. To duplicate my design, I highlighted all of the first label, right clicked and selected the 'Duplicate' option from the menu.

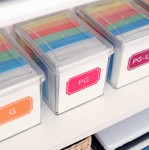
I ultimately created a total of five labels in a variety of colors.

Once I was complete with my designs, I double checked my page setup and then printed the labels to my home computer.


Now that the pages were printed, I double checked the blade setting recommendations in the software (which appear based on the material type selected).

Which prompted me to update the blade using the adjusting tool on the machine.

I then lined up the printed page on a sticky cutting mat and loaded it into my Silhouette.

(Hint: I later found that it worked better to line the mat up with the feed guide lines on the left, not the actual sticker paper).
The best part, sending the project to the Silhouette to cut! Once you click the 'Sent to Silhouette' button, it will begin reading the registration marks. I actually received an error the first couple of times until I loaded the mat in correctly.

When the machine is able to identify all of the registration marks, it will begin cutting the design along all of the specified cut edges.
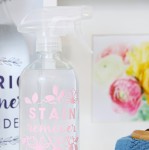
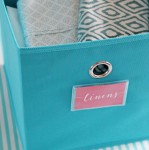
Then, all that is left to do is peel and stick!


I added some ivory cardstock to the inside of the movie bins to give the faces a clean and simple look.

The similar labels create a dreamy, cohesive and colorful outcome for our movie cases!

And as I mentioned, the labels also played a huge part in the before and after transformation. Just look at what some streamlining and labeling can do to a messy cabinet.

I removed the extra cases, electrical components and bins that no longer belonged in this cabinet, and put everything back in a fashion that made sense and should be simple to maintain moving forward.
Movies are now organized on the top shelf by rating, my old laptop (for the kids) and my husband's laptop both sit on the middle shelf with our chargers tucked inside of the basket, and the bottom shelf holds our video game bin, video game controllers and a box of our family movies.

I was able to use items I had right at home to update the cabinet; a few storage box swaps, shelf adjustments and labels made it feel fresh and new.

A few things I have learned about these stickers:
Does organizing have to be pretty to be effective? Absolutely not. But I always say, "Why not love it, have fun with it, and find ways to keep yourself motivated?" Any time that I have invested a little extra heart and attention to a project, it lasts much, much longer.
That said, when it comes to labeling, I prefer to add a little ooh, la la value. Whether it be a label made on our computer, or placed inside of a decorative bookplate or even created with my label maker, I want it to stick around for awhile and look the part. Labels keep everyone on the same page and really are a crucial part to most organizing projects.
For our media cabinet project, we needed a few new labels for our movie bins (purchased from the Container Store here). We recently added a fifth bin and have been in the process of re-sorting our movies by rating (in the past they were sorted by genres). It has been a bit of a time consuming process, and the cabinet has been hiding the clutter in-between sorting sessions. Yikes.
It was time to finish things once and for all, so while Bryan completed the sorting and documenting of our media, I whipped up some darling new labels.
There are a variety of options for creating labels, especially with a Silhouette die cutting machine, but one of my favorite ways is the Print and Cut method.
This method can also be done without the Silhouette; I have personally created dozens of labels using Microsoft programs, printing them on paper or sticker sheets and cutting them to size with scissors. But the Silhouette machine has really made the process easier, and I thought I would share a quick tutorial since I have been known to use this type of label fairly frequently (see them in our craft cabinet here and in our storage room here).
Silhouette sells a variety of different of sticker papers; I have purchased clear, kraft, gold, silver and the white options. Although I haven't personally used another brand for this specific purpose, I would guess most any brand of sticker paper would work just fine.
To get started, I measured the surface of one of our movie bins to give myself an idea of a good label size.
I then opened the Silhouette Studio software on my computer.
Before I begin designing, I like to get my page set to the correct dimensions. This ensures I am creating something that will fit the media I am ultimately cutting, and staying within the guides.
With the sticker paper I find it works best with a cutting mat, so I also be sure to select the appropriate mat size (not shown above but added on prior to printing).
Now for the VERY important part of this process, adding the Registration Marks.
The registration marks will print on your design, and the Silhouette machine has the ability to read those marks and know just where to cut your labels.
Once I have the page and registration marks set, I begin designing. I had previously purchased a label template from the Silhouette store, and imported it in to modify. This is where I adjust the size and add in any text.
I was also able to update the shape color, as well as the line and font colors.
The next very important step is to update the cut settings for each graphic and font you plan to print and cut. I only wanted the exterior of my shape to be cut by my machine, so I selected both the inside shape line and the font and clicked the 'no cut' option for those items.
Because I wanted all of my labels to be the same shape and size, I created one and then duplicated it for the remaining categories. To duplicate my design, I highlighted all of the first label, right clicked and selected the 'Duplicate' option from the menu.
I ultimately created a total of five labels in a variety of colors.
Once I was complete with my designs, I double checked my page setup and then printed the labels to my home computer.
Now that the pages were printed, I double checked the blade setting recommendations in the software (which appear based on the material type selected).
Which prompted me to update the blade using the adjusting tool on the machine.
I then lined up the printed page on a sticky cutting mat and loaded it into my Silhouette.
(Hint: I later found that it worked better to line the mat up with the feed guide lines on the left, not the actual sticker paper).
The best part, sending the project to the Silhouette to cut! Once you click the 'Sent to Silhouette' button, it will begin reading the registration marks. I actually received an error the first couple of times until I loaded the mat in correctly.
When the machine is able to identify all of the registration marks, it will begin cutting the design along all of the specified cut edges.
Then, all that is left to do is peel and stick!
I added some ivory cardstock to the inside of the movie bins to give the faces a clean and simple look.
The similar labels create a dreamy, cohesive and colorful outcome for our movie cases!
And as I mentioned, the labels also played a huge part in the before and after transformation. Just look at what some streamlining and labeling can do to a messy cabinet.
I removed the extra cases, electrical components and bins that no longer belonged in this cabinet, and put everything back in a fashion that made sense and should be simple to maintain moving forward.
Movies are now organized on the top shelf by rating, my old laptop (for the kids) and my husband's laptop both sit on the middle shelf with our chargers tucked inside of the basket, and the bottom shelf holds our video game bin, video game controllers and a box of our family movies.
I was able to use items I had right at home to update the cabinet; a few storage box swaps, shelf adjustments and labels made it feel fresh and new.
A few things I have learned about these stickers:
- The Silhouette stickers are not repositionable; once they stick, they are there until it is time to remove them.
- The stickers seem to print better with an ink jet printer, I noticed some smearing with my laser jet.
- If your Silhouette can't recognize the registration marks, it may just require a little adjusting of the mat to the left or right.
- This type of labeling option offers endless varieties of colors, creativity and styles. I love that I can quickly create something with the design program, print it and have it cut precisely. This is especially nice with more intricate labels and designs. I am definitely not a scissor wizard.
Isn't it amazing what a different an hour, some ambition and labels can create? If you are looking for more label inspiration, you can find all of the posts in this series shown below.
 |  |  |
 |  |  |
Your labels look great! I don't have a Silhouette machine but I bet I could try the same thing on my Cricut. Great idea!
ReplyDeleteWhat a cool idea! I'm starting law school in the fall so I'll definitely be looking through your blog for organizing ideas!
ReplyDeleteBest,
Kristin
http://www.kristinhecker.com
Thanks for the great tutorial! I bought this sticker paper a long time ago, now I understand how to use it! Thanks so much😃
ReplyDeleteI don't have a Silhouette machine, but I'll try to design labels as beautiful as these in PicMonkey or Canva, and then using my Creative Station Sticker Maker! Great idea, I used to organize my movies by alphabetical order, but I like your idea of ratings much, much better!
ReplyDeletexx | www.recavi.com
Jen, I love this tutorial! A little questions off this topic, but what type of lightbulb do you recommend for your home? I am struggling to find a bulb that makes my new light gray walls looks true to color. Depending on the light sometimes they look gray but at night they look like a light blue. Your lighting always looks so great, so I was curious. Thanks!
ReplyDeleteHi Holly!
DeleteIt really depends on the room and the type of lighting source. In our main living areas, we recently added LED recessed lighting in our ceiling and it is beautifully crisp and white light and I love them. I feel they are the closest to natural light I can find, and don't do too much to change the feeling of the space. I also use daylight or white bulbs throughout our lower level, as it can feel darker in those spaces and I like the daylight feel - just look for the daylight verbiage on the packaging. In smaller lighting sources, such as lamps, I have also slowly been switching to LED bulbs, but on occasion I like to use standard bulbs to put off a warmer, softer glow.
In terms of photography, I love using a lighting kit if I am fighting natural daylight, it really helps balance the warmth of the sun or create a fresh and bright feel. You can read those tips here: http://www.iheartorganizing.com/2014/11/iheart-blogging-series-photography-tips.html
Jen
Ok Jen! You gave me the courage to finally try this! I have had my machine nearly FIVE years. I am just still scared of it haha! I cut vinyl but that's about it. But these are LOVELY. Thank you!
ReplyDeleteWhat kind of printer do you have? I desperately need a new one and want something good for crafting.
ReplyDeleteHello,
DeleteI currently have a HP Color Jet Pro CP1525nw, and I have had it for quite a few years now. I purchased it at Staples on sale one Black Friday and I will be very sad the day it stops working. I do a lot of printing, so I highly recommend an HP Laser printer for brilliant crisp lines. However, their inkjet options are a bit more budget friendly and also do a great job.
xoxo!