

This blog has always been about all things home; specifically DIY, home organization, cleaning and simplifying. That said, it can feel conflicting to just keep blogging about those things because they seem a bit trivial at the moment. I have so much sadness for those who have endured the recent storms and destruction and am also keeping the folks located in the Carribean and Florida in my thoughts as they brace for the major storm heading their way. We have a lot of friends and family located in both Texas and Florida, and I have been keeping my eyes and ears peeled for appropriate ways to help from here. Although the hurricane has been absolutely horrific, it has been really heartwarming to see our small town put together fundraisers and donations, and watching so many people across the nation come together to help those whose lives will forever be impacted. If you are looking for reputable charities and donation resources, I encourage you to check out this list here. Also, keep your eyes on social media where new ways to join together and help and donate are shared daily. And as much as I always encourage individuals to use their recently purged items for good, it is important to be aware of how too many items and belongings can negatively impact the affected areas.
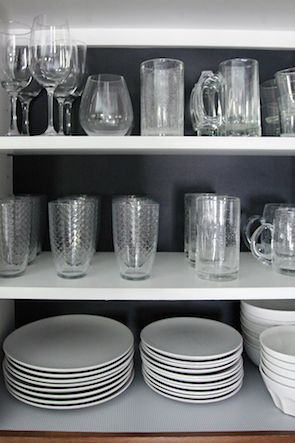
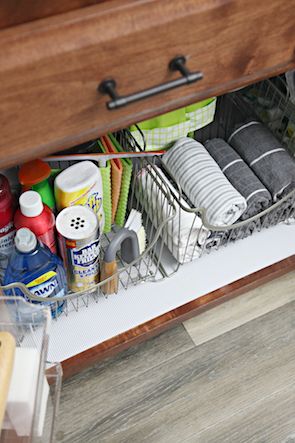
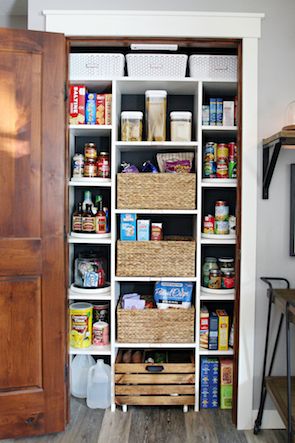
Over the past couple of months, I have shared a few glimpses of a bigger project I recently worked on (check out the pantry here and the lined dish cabinet here). It was honestly one of the most incredible, fun and rewarding organizing projects I have ever been a part of. And I have SO much to share.
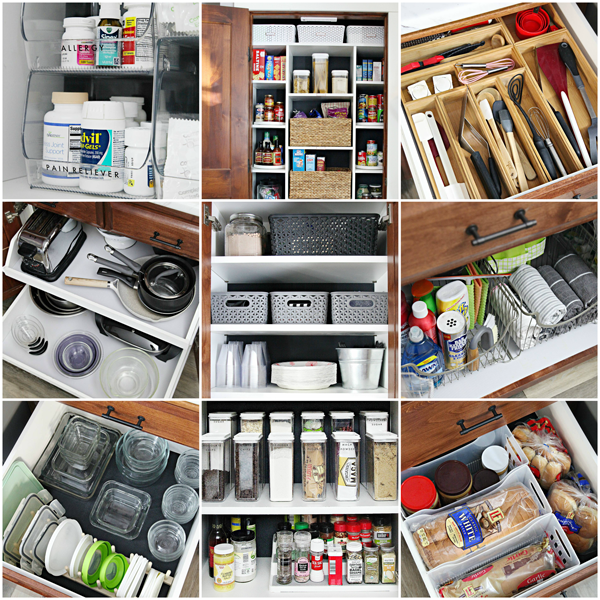
To quickly refresh your memory, I was asked by a dear friend to help her put some order into her kitchen for their family of five. Not only did I want to help because I absolutely adore this family, but their kitchen was like so many I have seen over the years. This family spends a lot of their time in this space, and they do a lot of cooking at home, so it was important to me to set it up in a way that makes their daily lives easier, saves them money and even brings them joy.
We all have spaces in our homes that could use some TLC and they get to that point for a variety of reasons; we get busy, the space wasn't initially setup with the proper tools, we go through something personal, it isn't easy for our family members to understand or maintain, once it reaches a certain point it becomes overwhelming, etc... And if even one cabinet becomes too full, then it can quickly snowball to another and another. If this is you, you are normal! This happens to all of us, even those of us who organize around the clock.
Being that this was such a real and relatable situation, I thought I would break down all of the steps that we took and the key things we learned as we tackled this kitchen one cabinet and drawer at a time.
S T E P O N E

Commit! My friend finally decided enough was enough and asked for my help. We scheduled dates on our calendars and made sure to cross tasks off of the list together. Working with someone is a great idea for holding each other accountable and staying on track. Trying to take on large spaces on your own can quickly become overwhelming and cause you to shut down, so grab a pal whenever you can. Regardless, it is important to schedule time and be willing to give the project your attention. Don't forget that organizing is a huge return on your investment both financially and in terms of time. You will get back out what you put in.
S T E P T W O
Remove everything! Whether you are just working on a single drawer, cabinet or closet, or taking on an entire room, start with a blank slate. This ensures that you touch everything, that you are thinking through where things go and why, and also encourages some deep cleaning in easily forgotten areas.
S T E P T H R E E

Sort and purge! As you are removing items from cabinets, drawers, shelves, etc... discard obvious items right away. Things that are old and expired, broken or that you no longer love. Bye bye!
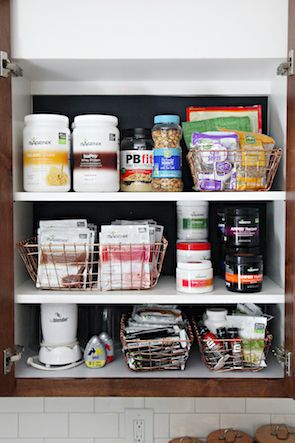
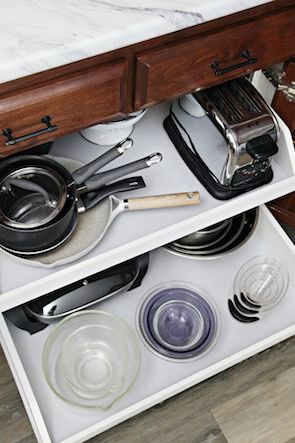
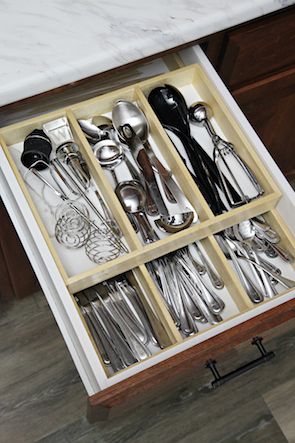
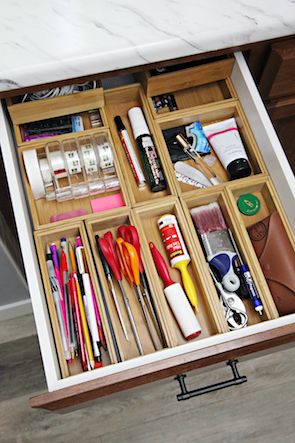
Next, create general categories and begin grouping items accordingly. In this kitchen, for example, we created categories for pots/pans, utensils, food storage containers, dry foods, baking supplies, cleaning, small appliances... We also added a "keep" bin for anything that didn't quite fit a category or that we were on the fence of keeping or discarding.
Purge again, and this time be really ruthless. Now that you can see how much you have and things are broken down by category, it is time to rid yourself of any duplicate pieces. How often do you use those really specific kitchen gadgets, and could other gadgets and knives create the same outcome? How many potholders and dishtowels do you use/need? Sure, your quesadilla maker might make a mean lunch, but could you achieve a fairly similar result in a pan? Just things to ask yourself as you go, really question every single item you touch.
It can be really hard to let go of items. We work hard to pay for these things, and getting rid of them might make us acknowledge we made a purchasing error. Or that something didn't work out as we had hoped. We think about that one specific time we needed it or who gave it to us and how they might feel if we didn't keep it. But it is also really important to think of how that item might be slowing you down and frustrating you the other 364 days of the year you don't use it. That stuff is just stuff, and that less is more. That donating your belongings to those less fortunate is a really great feeling. And that true friends and family will understand your quest to simplify (or may never even know that you didn't keep aunt Ruth's old table runner).
For this project, we were able to remove three full bins of expired food, old cookbooks, mismatched dishes, broken utensils, duplicate items, etc... This one very important step made all of the difference in the world.
S T E P F O U R
Clean! With all of your drawers and cabinets empty, take a vacuum to rid the surfaces of crumbs and dust. Follow up with cleaner and a rag to remove smudges, sticky residue, fingerprints, and spills. This is a great time to get at nooks and crannies that are rarely accessible and require a good cleaning from time to time.
S T E P F I V E

Put items back where they make the most sense. For this step, think really hard about how you use the space each and every day. From sun up to sun down, consider the activities that take place and the motions of the individuals that come and go. Where do you make your coffee and are the filters and mugs nearby? Where do you unload the dishwasher and are the dish cabinet and silverware drawer easily accessible? Where do you store your leftovers and are those containers easy to find near the fridge? What if you want to bake, are the cookie cutters near the flour?
Play through your day in your head, then categorize and set up the space accordingly. Put things back loosely and use temporary storage bins and containers if necessary. DO NOT PURCHASE ANY STORAGE YET.
S T E P S I X
Now it is time to just live and enjoy the new space. Play around with the new changes and adjust if necessary. Ask your family to weigh in and give their feedback. What is working? What could use some tweaking? You most likely won't get everything right the first time, and if you do, consider yourself a rare genius.
Spend a good amount of time in this phase. Do you miss any of the items you discarded? Are there even more belongings that you don't use as often as you thought you would? How have your days changed?
A few things my friend said at this point in the project:
"I feel like I can breathe again!"
"My family was in shock, and they were able to find things so much faster in the morning and after school!"
"I am constantly categorizing everything now, and I love it! It has become second nature to group like-items when putting them away."
All of those feelings and still not a penny spent.
I know that you will want to just be done, believe me, I get it. I am ridiculously impatient and I also thrive when everything is in order and tidy and another box is checked off of my list. But rushing to purchase storage can be costly and problematic down the road. And we found that as close as we were with this kitchen to getting most things right, as they continued to use it, a few things wiggled and shifted and new ideas were born.
S T E P S E V E N

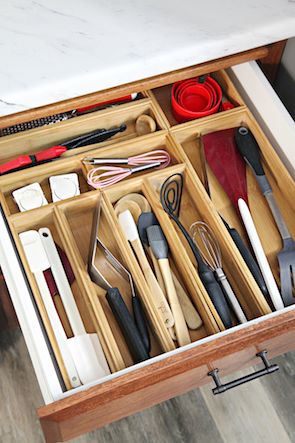
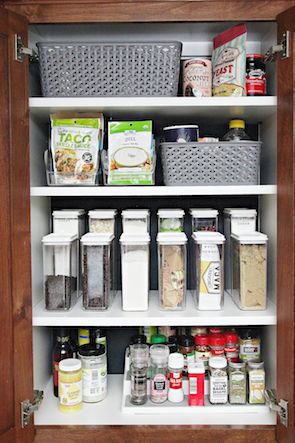
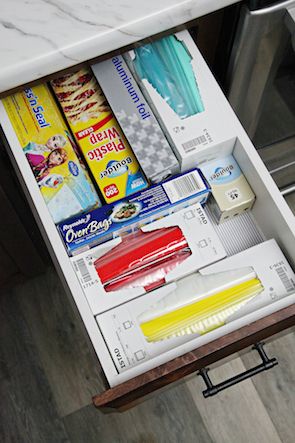
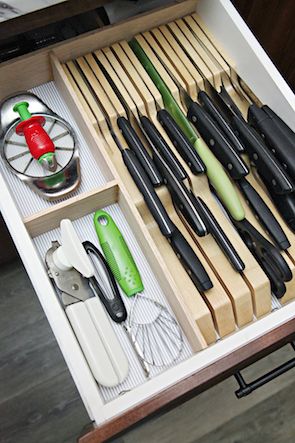
As you live with the changes, begin making a list of the types of storage that would take things to the next level. What would make the new setup even easier? Stacking open face containers? Filing bins? Lid organizers and drawer dividers? There are some cabinets and drawers that we didn't add any new storage to because the simple act of cleaning things up and categorizing was enough. But sometimes storage can be crucial in protecting your items (think a knife block for sharp blades), and make your life easier (think a food storage container lid organizer for preventing jumbled messes). Clear canisters are a great way to give yourself visual inventory and may even be space saving and provide longer shelf life for your ingredients. Simple baskets corral smaller items and prevent them from falling off of shelves or out of the cabinet when the door is opened.
As you are taking note of the specific items that you would like to source, also take a plethora of measurements. We measured every single cabinet and drawer in this space, and referenced those notes multiple times over the course of the project. Remember to consider any obstructions such as hinges and drawer handle hardware screws, even the smallest things can impact final dimensions and fit.
Lastly, shop around! We found the majority of the items we wanted at The Container Store, but there were times when we found a better fit or price at HomeGoods, IKEA, Target, Amazon, etc... We even made some of our own dividers when we couldn't track down any with the exact measurements we needed. Don't settle until you find exactly what it is you are looking for. The best part is that most stores provide very specific measurements right online, which can reduce errand running and error making.
S T E P E I G H T

Line and dine. Yeah, baby.
Are lined cabinets and drawers an absolute must? No. But, a good shelf liner really does make a difference in protecting your cabinet and drawer surfaces. It is easy to clean and also adds some motivation to keep your drawers tidy enough to see it. We added a thick, striped vinyl liner to all of the drawers and cabinets, and we also lined the backs of all of the upper cabinets with black poster board from the dollar store. That was purely cosmetic, but it added a little wow and blended her newly organized cabinets in with the remainder of the gray, black and white kitchen. A couple of the drawers had some loose items that we wanted to stay put, and we found a grip/no slip liner to be ideal for holding glass food storage containers and a couple of loose filing bins in place when the drawers are opened and closed.
S T E P N I N E

Fall in love with labels! You know I am already in love with labels, but now it's time to make them work some final magic in your newly organized space. No need to label your dog or kitchen sink scrubber, but labeling does have a lot of added benefits. Most importantly, it allows you to differentiate specific food types (gluten-free flour from regular flour). It also keeps your entire clan on the same page. It's easy to understand how things fall apart quickly when no one understands the new system or knows where things should be put back.
For this project, I tried out a new mobile friendly label maker. It allowed me to create labels through an app on my phone and Bluetooth print them for areas around the kitchen. I kept everything simple and basic, but I am excited to explore more of the functions of my new labeling tool and then share it with you. And yes to clear label tape! Such a clean look!
S T E P T E N
Enjoy! Kick back and celebrate the space with a glass of wine, or have a party with your favorite friends and family. You earned it!
 |  |
 |  |
 |  |
 |  |
 |  |
 |  |
 |  |
A few final tips for tackling a space of this magnitude:
Work with a friend or a partner. You don't have to do these projects alone (unless you want to). Working with someone makes the overwhelming seem doable and even fun. We listened to music, laughed, sang, celebrated, shopped and bonded over this project. There are parts of organizing that can feel mundane and monotonous, but when you have someone to chat with and sing with, it doesn't feel like such a chore.
Be gentle on yourself. Organizing is a process. It takes time. It is ongoing and evolves. There is no right or wrong way to get there. And trial and error is the key! Be open to learning and just know that even the pros don't always get it right the first time. And never feel bad about your "befores" or how you got there, just be proud that you are doing something about it.
Find your motivation, whether it be Instagram, Pinterest, blogs, magazines, catalogs, store displays, etc... Look for ideas that inspire you and excite you to create systems that make your heart pitter patter.
Use your sorting, lining and labeling time to catch up on movies, podcasts, and audible books.
Get your family on board with your goals. If they understand the process, provide input and feedback, and even lend a hand with the sorting, purging, and installation, they will be more invested in wanting to maintain it with you.
Take before and progress photos on your phone and store them in a project folder. This is a great quick reference of where you were, what you still want to achieve, and is extremely helpful as you begin sourcing product.
Play a lot of Tetris as a kid. It really does come in handy someday.
In the words of Sinéad O'Connor, Nothing Compares. You and your space are unique. What works for me may not work for you, and that is OK. Don't forget that everyone has a different set of circumstances, resources, available space, budgets, time, etc...
The end goal should always be to simplify. You want to make your life easier and less stressful and your systems should also be simple enough to match that goal. Set up solutions that work for you and your clan, don't over think things, don't overly decant and label and stack and store. But do pick storage that is helpful and provides you a service.

If you are looking for a great project planner to take notes and schedule your time, you can download one that I created for free here.
_______________
This kitchen received a lot of love over the course of a couple of months. We purged, cleaned, planned, shopped, planned some more, lined, labeled, painted, built, and overhauled almost every single cabinet, drawer, and closet. Everything about this space made me happy and excited and I loved helping someone else create some harmony in the heart of their home. This was so rewarding in every way, but it especially fills me with joy to visit and watch their family navigate the space so naturally, and seeing how easy it has been for them all to maintain.
This post is already bursting at the seams with information, but I still have all of those before and afters and more specific details about how each cabinet and drawer evolved, as well as the products we found to be our workhorses. You can find all of that in this post here.
So many great ideas! But I'm especially taken with the bread drawer. Such a good solution!
ReplyDeleteThank you Tricia! Those lightweight filing bins can be used for just about anything, they are definitely a favorite!
DeleteLooks amazing and I agree a good organizing project does make you feel lighter! I have to look into that new Mobile label maker, I love the fonts. Did you order online? Xoxo ERIN
ReplyDeleteI tried to click on the link to see more and the interactive links but it said that the post was not found
ReplyDeleteThanks Carol, I have updated the links and they seem to be working correctly now. :)
DeleteWhere did the lid organizer come for the food storage containers? What a great use of space and organizes those lids so well! Thanks!
ReplyDeleteHi Shelley - We used these wood racks to organize the food storage lids: http://bit.ly/2eHU78E
DeleteSaving this post for whenever inspiration to organize is required!
ReplyDeleteAfter you posted the pantry makeover I was inspired to tackle my own pantry - a project I had been putting off for too long. Not to sound too dramatic, but it has literally changed my life! I have a decent sized closet pantry but I just shoved everything in at random. #lazy It turned into a giant mess and was super embarrassing to open whenever I had guests over. Now there is a place for everything and it is easy to keep neat and organized! It warms my heart everytime I open it, haha. Thanks so much for the inspiration!
ReplyDeletep.s. I'm in Florida waiting out the storm. Thanks for keeping us in your thoughts! We're hoping for the best but trying to prepare for the worst.
This made my day! I love hearing that you were inspired to tackle your pantry and that you are enjoying the results. Totally warms my heart too! ♥
DeleteKeeping you in my thoughts! I hope Irma is gentle to my favorite state and the people who live there. Stay safe!!!
I loved the before and afters post, but this post really speaks to me. The psychology behind decluttering is fascinating and I'm so grateful that you can explain it so clearly, without judgement. Thanks for the inspiration. xx
ReplyDeleteThank you for sharing these ideas. I am ready to add some better storage bins to my kitchen since I have a deep pantry and things start to get hard to find. I also love the idea of working on big projects with another person. Friends and family are less attached to my stuff and can keep things in perspective!
ReplyDeleteAmazing post project!!! A extreme concept. I love your tidy cabinet. It's look so nice. Your use of space and formulate those store so beautifully.Thanks for sharing a great project. I will try to apply this project.
ReplyDeleteThis kind of posts is why I love your blog! :-) Full of useful information and inspirational photos, clear, adaptable to every situation, not pushing unuseful consumerism... Love your work!
ReplyDeleteI'm loving these ideas. I've been working so hard to tweak and sort smaller spaces in our house and this has given me some great inspiration for the kitchen cupboards! Thanks xx
ReplyDeleteSo inspirational! Can you share a ballpark on how much is spent on storage containers and liners in a normal project? I'm looking to tackle a few things but want to save up so I can purchase all the needed storage organizers.
ReplyDelete