

I think two different actions accomplished that feeling of openness we were after; painting the walls a solid light blue-gray (almost white color - Sherwin William's Nebulous White) and widening the closet opening to create more storage that will ultimately live behind a closed door (see that post here).
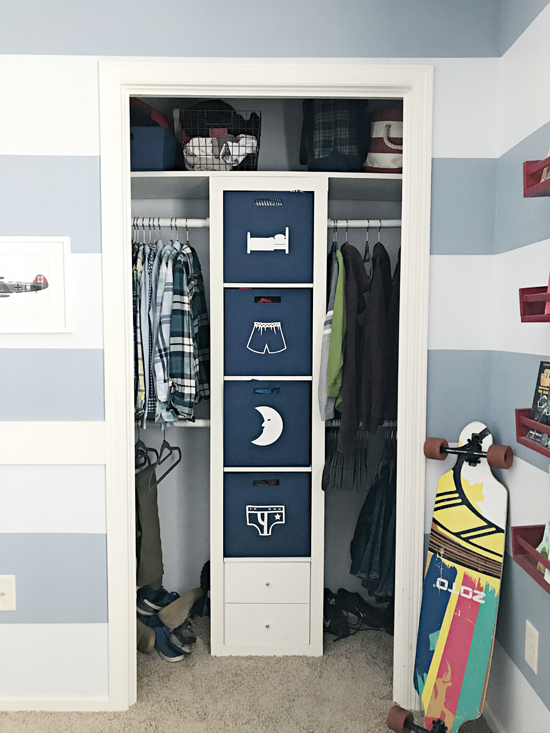
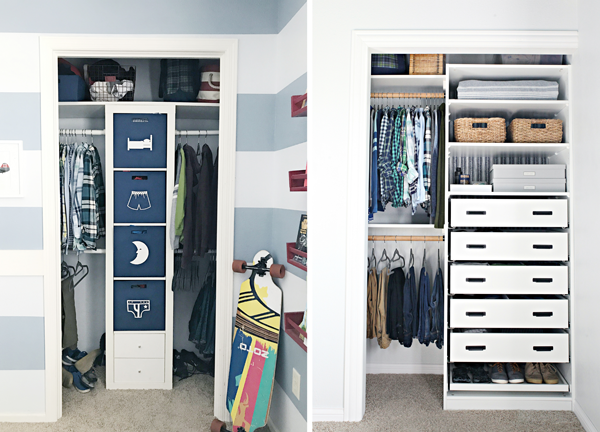
And a quick reminder of the closet the day before we cleared it out for a makeover:
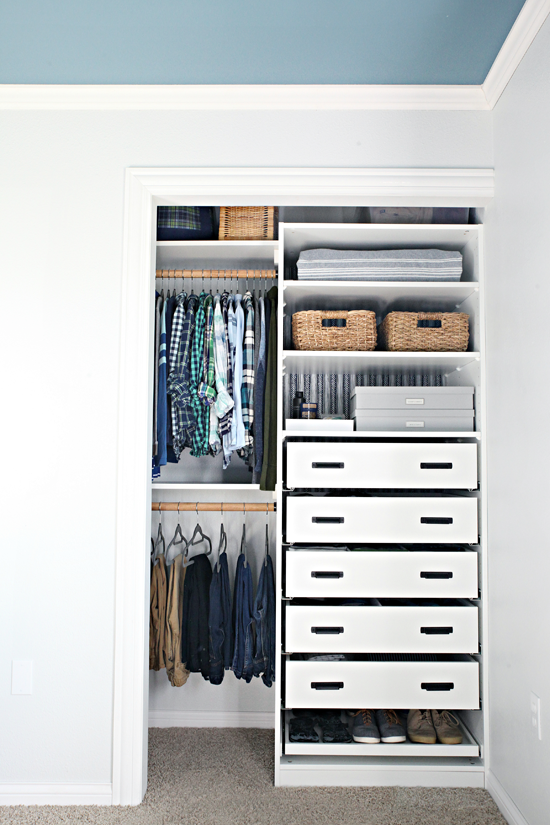
And here it is today!

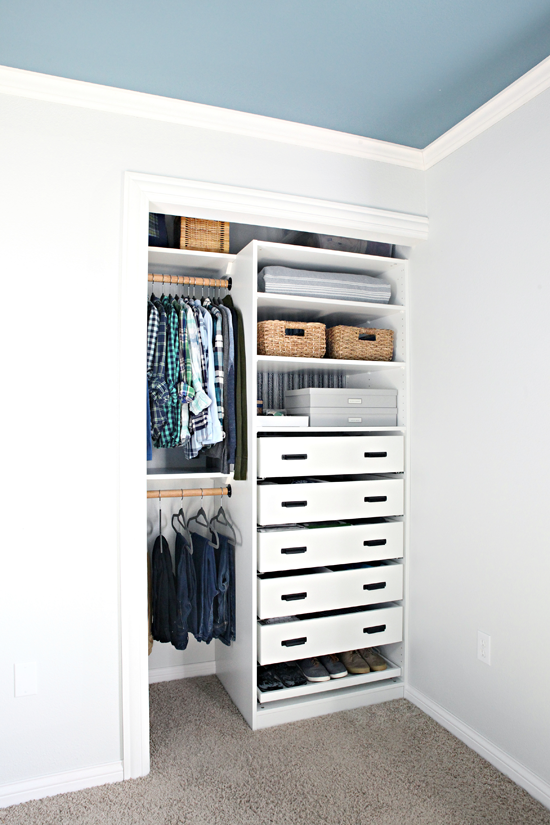
Although the last make-shift closet system served us well for quite some time, the biggest problem we all had is that our son had outgrown the bins and they were literally bursting at the seams. He needed some actual drawers and to keep his bedroom floor area nice and open, we wanted to add those drawers inside of the closet. I also wanted to be sure he had a place for his shoes off of the floor and that we made the most of the 8 feet of vertical space, so after looking at a variety of options, I decided on the IKEA PAX wardrobe frame (measuring in at 29 1/2" wide x 22 7/8" deep x 79 1/4" tall). This unit offers more than enough space and I appreciate that there is plenty of room for him as he continues to grow.
This kiddo is the beneficiary of a lot of hand-me-down items. Not only does he have an older brother that has always taken pretty good care of his belongings, but we have a few friends with older boys that like to pass on their clothes as well. We try to limit the number of clothing items we keep in general, but it is also nice to have some options. The updated closet not only provides adequate storage for his current wardrobe, but also for the plethora of hand-me-downs waiting for when he goes through another growth spurt.

So let's talk about the hand-me-downs for a minute. We have three boys so we do our best to preserve and reuse clothes as much as possible. They grow at different rates and are always different sizes, so there are times we need to store those extra clothes that they just haven't grown into yet. Twice a year we do a quick closet purge and inventory and rotate out their closets (spring and fall). I prefer to keep their hand-me-downs stored on the top shelf of their closets, and in this room, these medium Elfa drawers were the perfect solution. Did you know that although they are meant to be used with the Elfa drawer system, they can also be used as stackable bins? Mind. Blown. I love that they are frosted and sturdy and come with slim lids that clip in. They are a really great size and by using two, we were able to easily fit them on top of the IKEA tower in our son's closet.
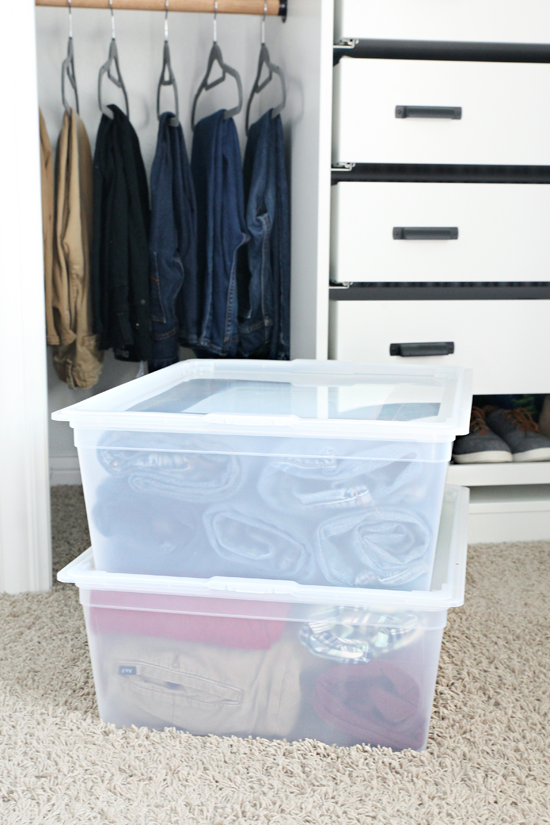
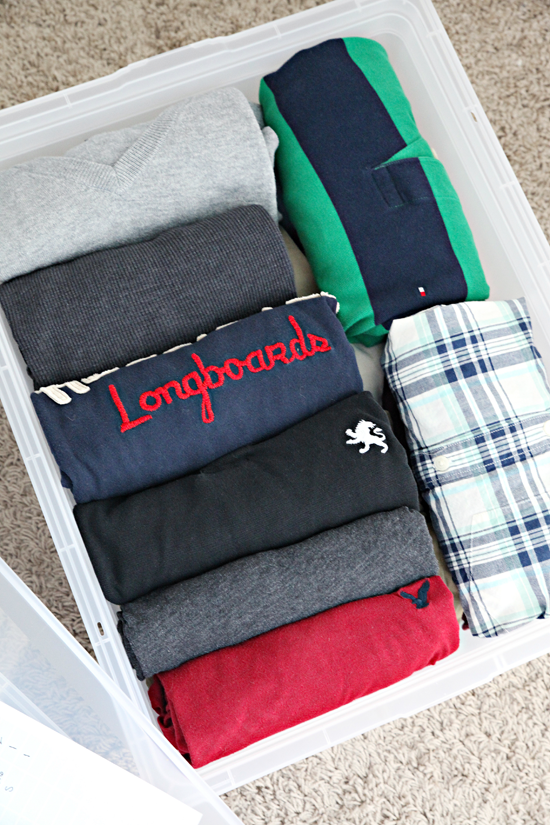
These two bins hold 10+ pairs of jeans in a variety of sizes, as well as dress shirts/pants, shorts, sweats, t-shirts, etc... I found that I had plenty of room to roll and stack the items inside.
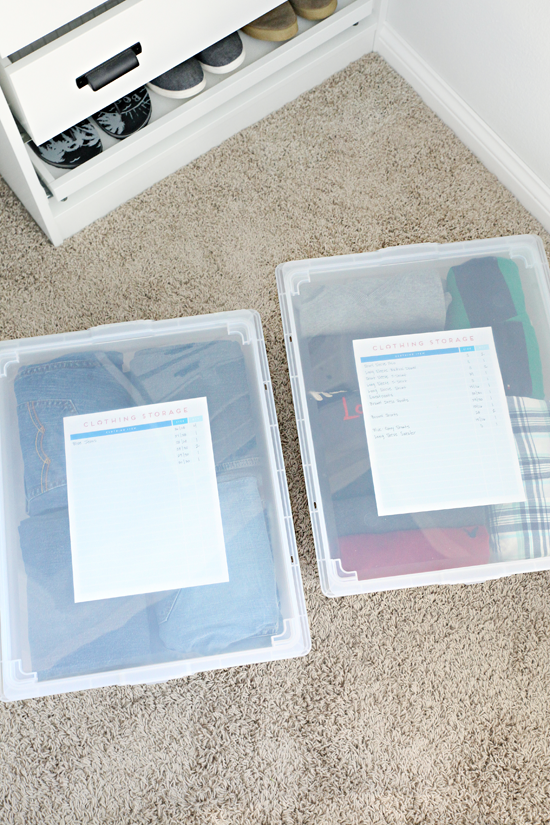
To keep track of the contents, I created and printed out a quick inventory tracker that I filled out and tucked under the lid. I am able to see through the lid just enough that this worked out perfectly, but the sheet could also slide into a clear plastic sleeve on top of a solid bin as well.
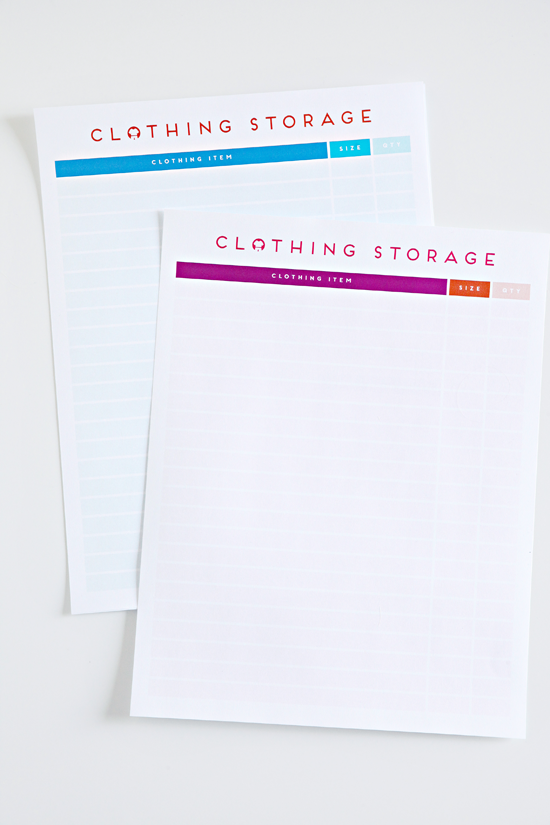
You can also download the trackers for free if you would like!
 |
| DOWNLOAD FREE CLOTHING INVENTORY PRINTABLE HERE |
 |
| DOWNLOAD FREE CLOTHING INVENTORY PRINTABLE HERE |
Now, back to his current clothing...
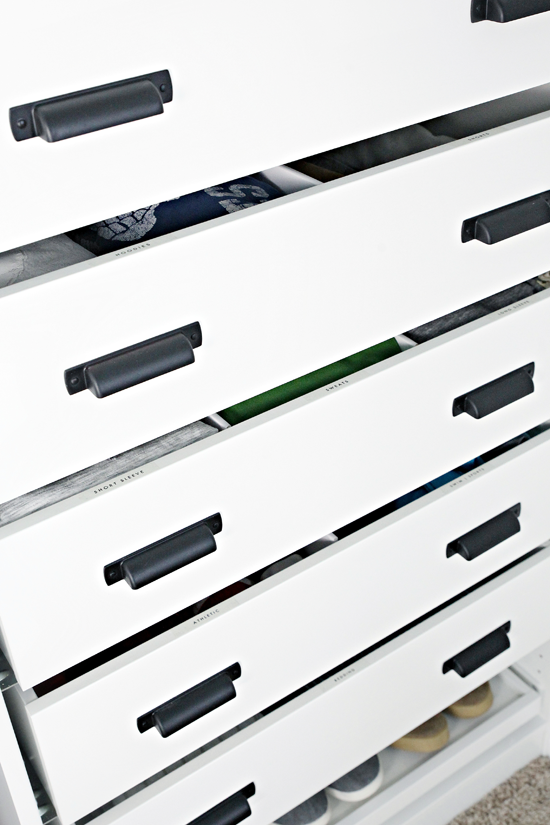
Remember how we DIY'd the easiest custom drawer dividers ever? I can't rave about them enough! They worked out so well in these drawers and offered us a lot of flexibility.
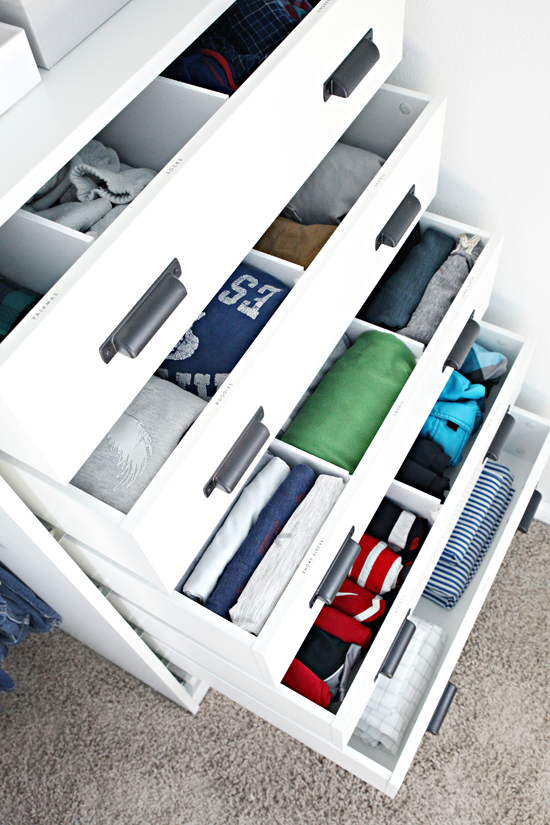
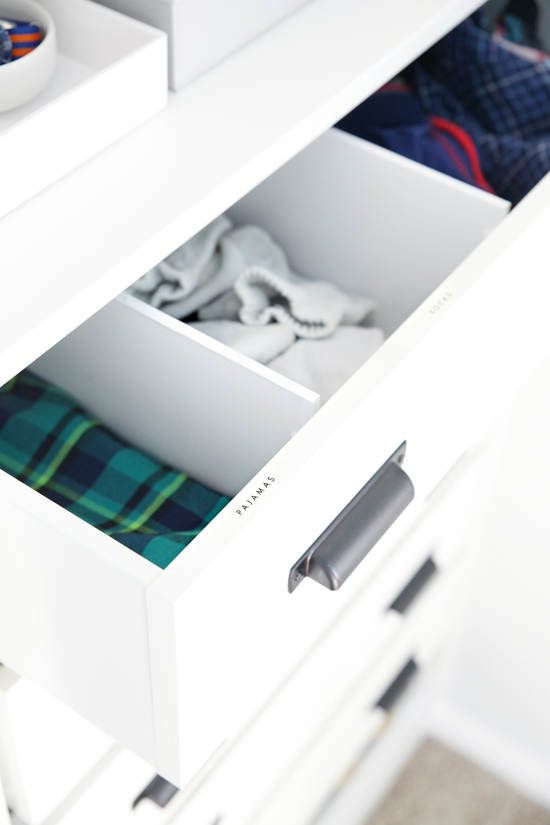
I divided the top drawer into three slots; one for pajamas, one for socks, and another for underwear.
Quick Tip: I typically purchase a different type of sock for each boy, one to two packages of white and one package of black. This makes it easy to identify which socks belong to which boy, and also allows them to just toss their socks into their drawer with no matching necessary. In the past, I have also used colored Sharpies to mark the bottoms which helped in identifying and quickly sorting all of their socks after washes (or when they are laying all over the house).
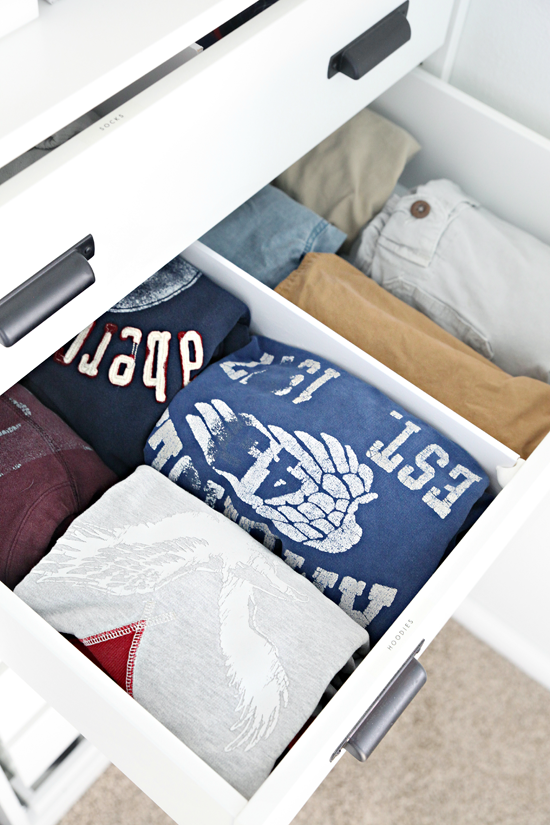
The next drawer down divides his bulky hooded sweatshirts and shorts.
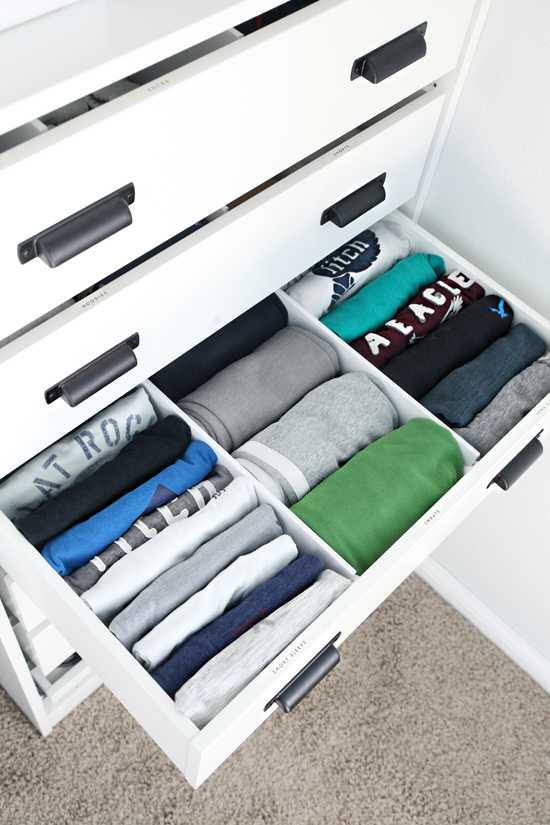
Then his short sleeved t-shirts, sweatpants and sweatshirts, and long sleeve t-shirts are divided into three narrower sections.

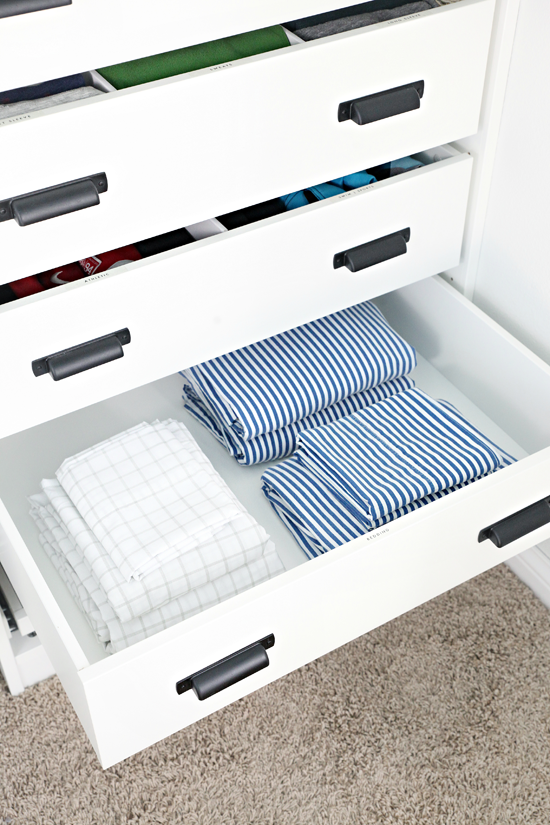
The bottom drawer has plenty of room for sheets and seasonal bedding.
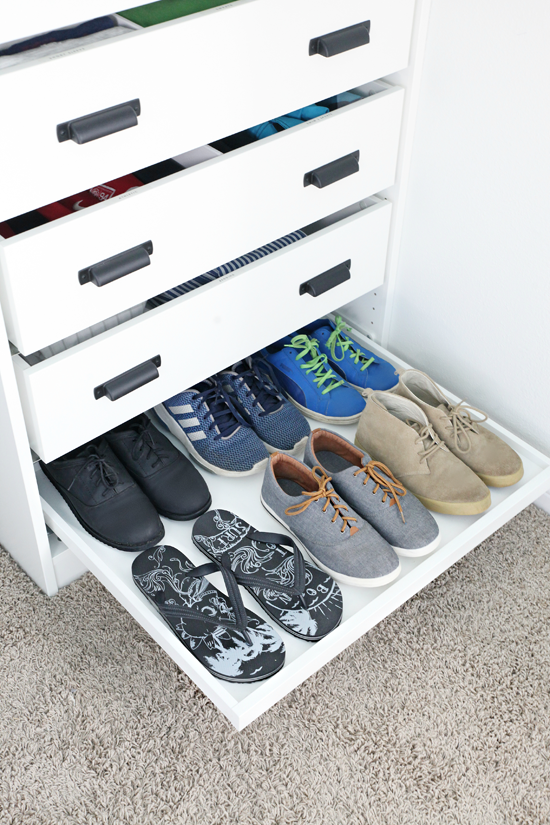
And the smaller pull-out at the bottom holds his shoes.
You may have also noticed that I added some labels to the top of each drawer, which can be seen when the drawer is both closed and open. I used this label maker with clear tape.
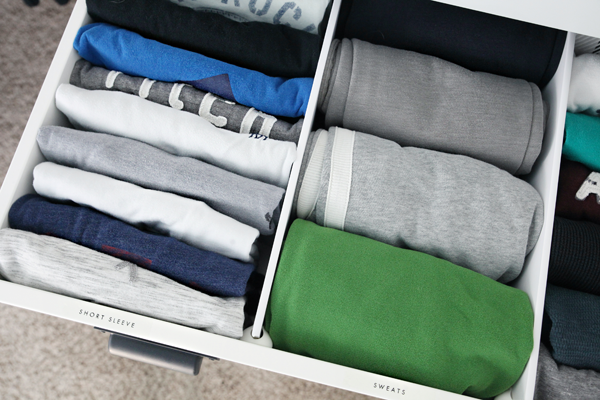
Our son prefers to fold his clothes vs. hanging them, and this folding method was so quick and easy for him to learn. He basically files his clothes so that everything is visible and compact.

Four easy steps, the shirts can be folded in just a few seconds each.
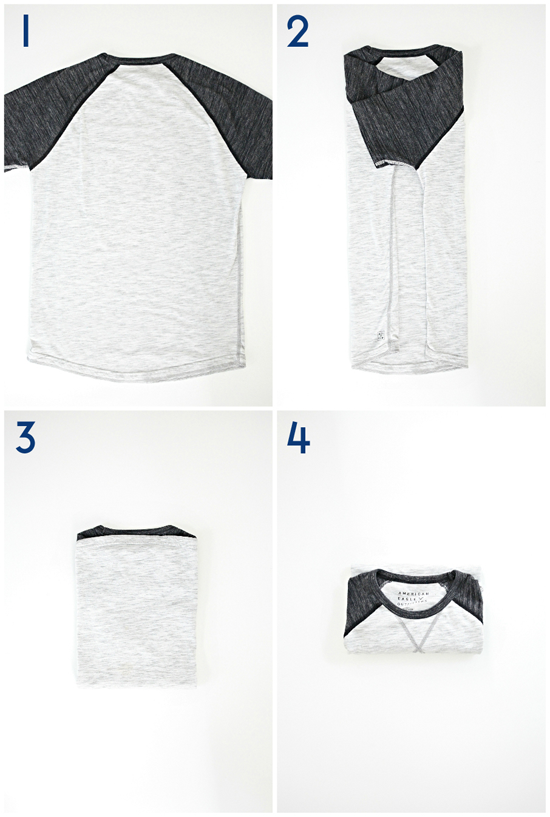
1. Shirt face down
2. Fold in both sleeves
3. Fold bottom up to the top (in half)
4. Repeat and fold the bottom up again (in half)
Everything else is just rolled or folded to best fit in each divided section.

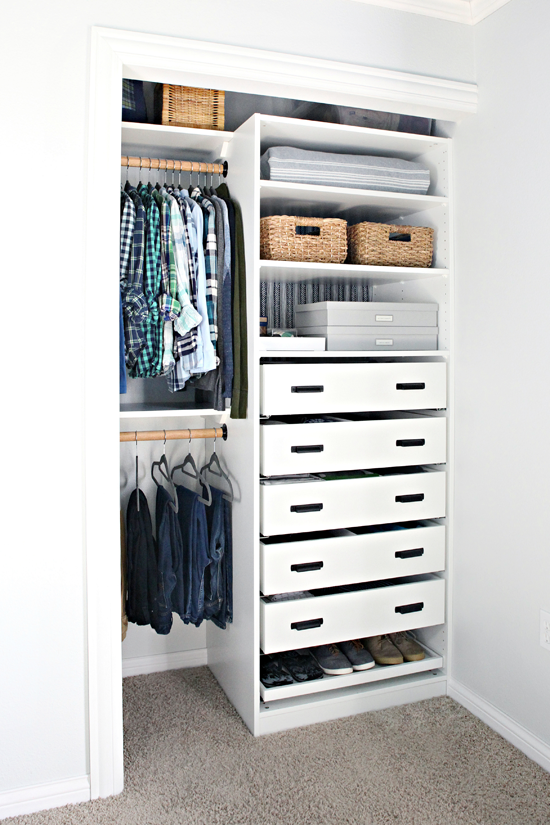
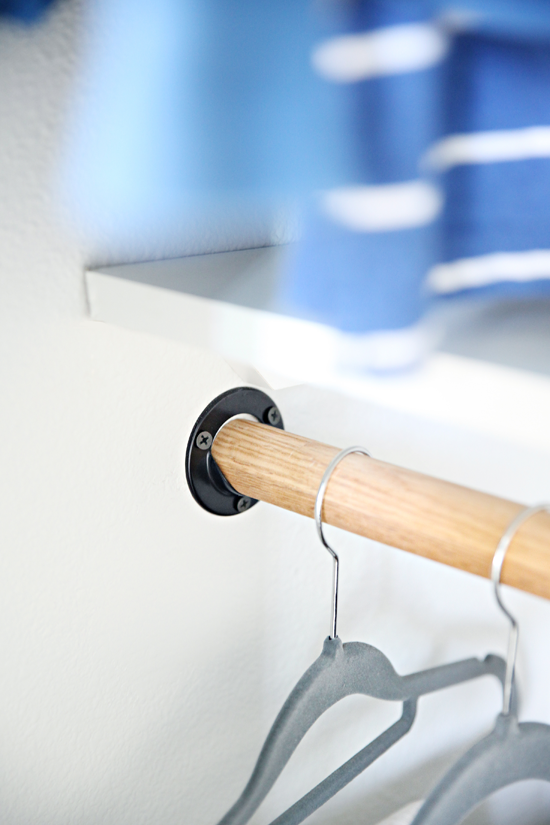
For the clothes that he does hang (essentially anything a little dressier with a collar or buttons), we installed a solid oak closet rod which I stained a warm wood tone. And as always, I recommend doubling up on the rods whenever possible.
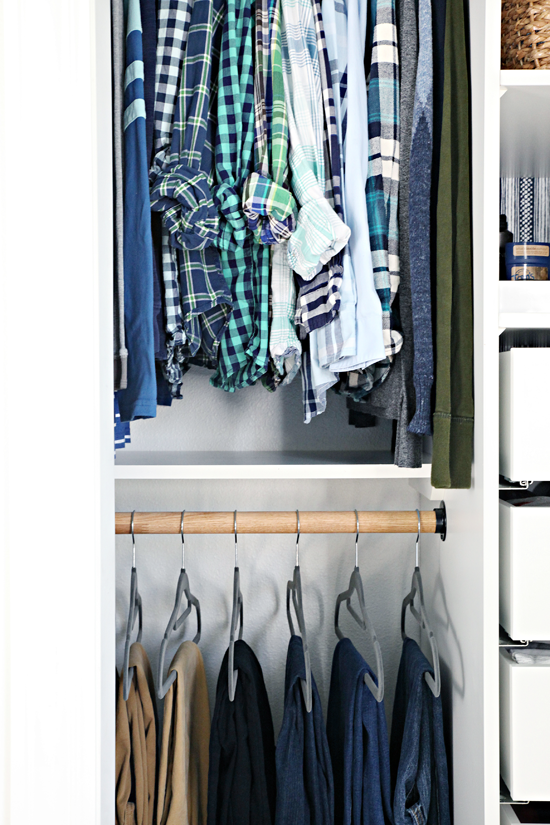
And used black closet rod sockets to compliment the other black hardware in the closet.
We also added two solid white shelves above each rod to offer a little extra storage if needed. We recessed them back a bit so that we could place the hand-me-down bins up top without any issue.
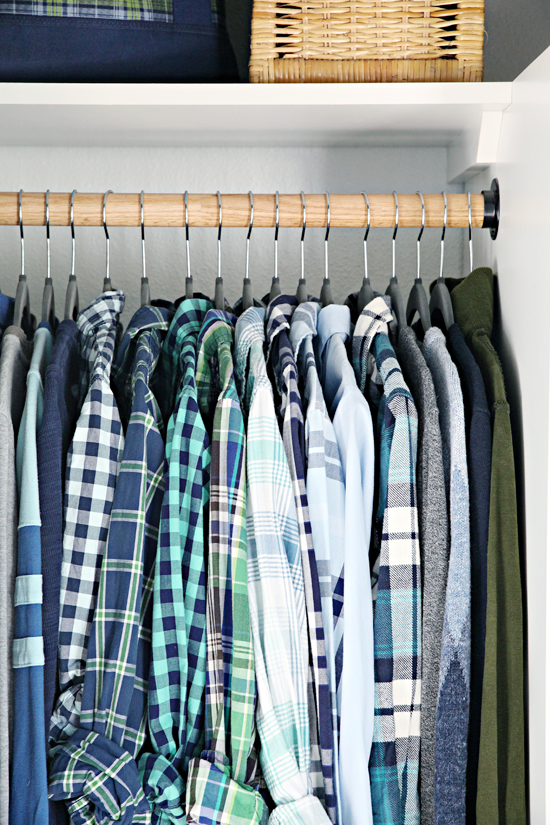
And these slim, no-slip hangers have been really great for the price.
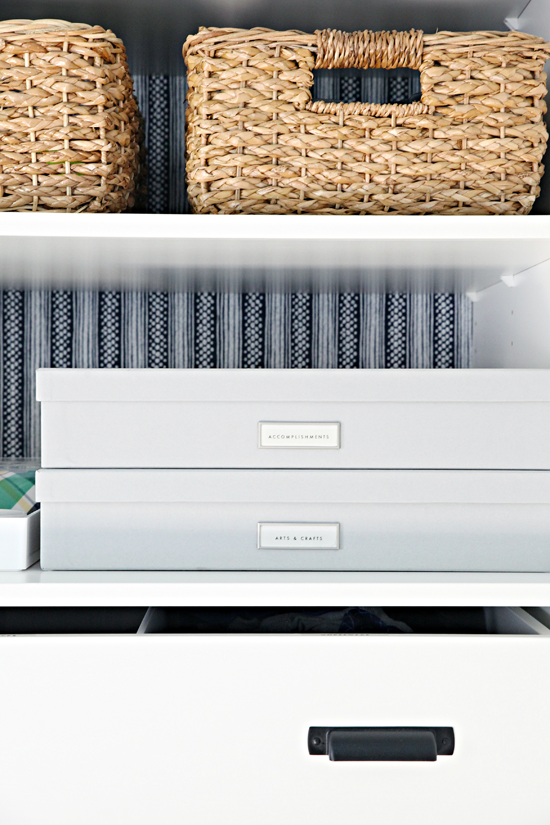
Both the drawers and the shelves in the tower are quite deep, almost two feet in fact. This is great for the drawers, he has plenty of spare space to continue to grow. The shelves, of course, prove to be a little more difficult to utilize. But, the top shelf holds some heavier throw blankets that we use for sleepovers/guests, the next shelf holds a couple of light-weight woven baskets to conceal his everyday clutter (nerf guns, tech gadgets, etc...), and the lower shelf has a few document boxes for memorabilia and arts & crafts.
I also added a small "valet" type tray to hold his daily items and act as a drop zone.
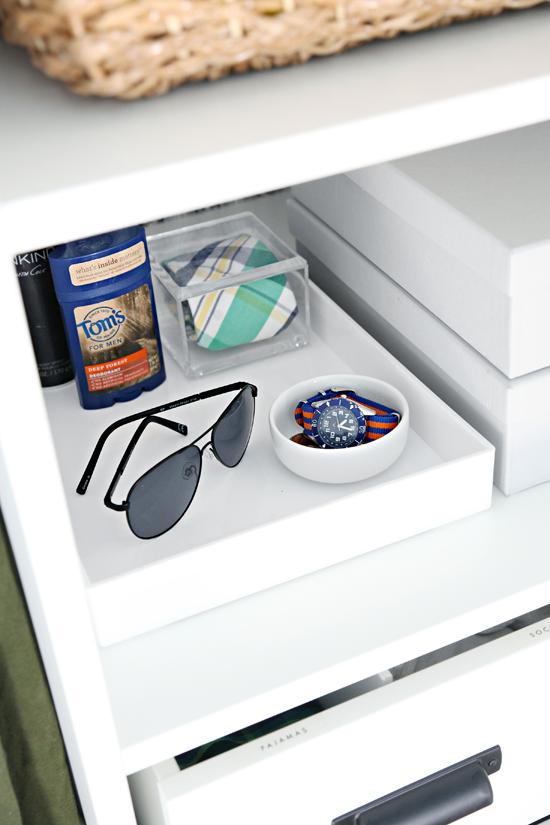
It's funny that this was one of his favorite details, I guess it made him feel a bit more "adult" to have a place for his wallet, change, watch, sunglasses, and deodorant.
And that completes the closet tour!
With our boy entering high-school this coming fall, this closet project came at the perfect time! The previous closet functioned so well for so long when the boys were much smaller, but this is definitely an upgrade fit for a teenager.
A few more notes:
- I love that the IKEA tower is versatile and customizable. We added the pull-out shoe tray, five large clothing drawers, and three shelves to put together this configuration.
- I added this hardware to the drawers, which I sprayed in a flat black finish.
- All of the drawers are soft close! So nice!
- This is the paper I used to line the back of the tower (I just adhered it to the back panel with double-sided carpet tape before tacking it to the back of the frame).
- Although we designed this closet for a teen boy, it is versatile enough to work for anyone of any age! Always a bonus.
- We plan to add a sliding door next to conceal everything, which almost makes me sad because I love how it turned out so much! But also, teenage boy.
- I considered adding a small step stool under his pants, but the boy is officially as tall as me and has no problem reaching his everyday items. Sigh....
This install has also sold us on updating our own closet with the PAX system down the road. It was so easy and versatile and the quality is really great. Not to mention, I love that there are so many ways to customize it to make it look unique, even though it is off-the-shelf at IKEA (they are not sponsoring me by the way, just my honest thoughts).

Let's end the post with a fun before and after to see how much was gained by removing the wing wall and installing a fully functional closet system.
For reference, I rounded up all of the closet sources below.


You can also catch up on all of the other room posts here:
Teen Boy Closet Planning
Patching the Walls and Carpet
Bedroom Progress: A Blank Slate
Quick & Easy DIY Drawer Organizers
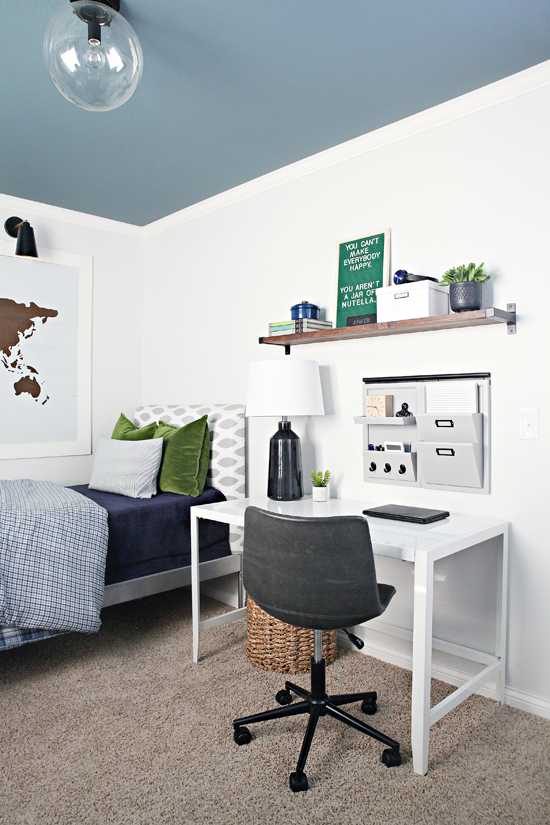
Teen Workspace with DIY Wall Shelf
It looks awesome! I think the pull-out shoe drawer is my favorite. My boys are 13 and 14&3/4. We've been doing the shift to tween/teen rooms. They are both taller than I am. Where did the time go?
ReplyDeleteTerrific ideas! I need help with shoe storage...I'd like boxes that will fit on a shelf and pull out drawer-style. They need to be clear and able to fit 2 pair of shoes if possible. Any suggestions?
ReplyDeleteI have seen clear shoe and sweater drawers at TCS:
Deletehttps://rstyle.me/~cz-av8UV
https://rstyle.me/~cz-av8W5
And something similar on Amazon: https://amzn.to/2JjhW43
Hope that those options are a close match for you. 💓
Thank you-- TCS are quite expensive considering how many I would need to buy and (I looked there first, before asking you) and those Amazon boxes would be perfect but they just a little big for my shelving! Thanks again!
DeleteMy mom is great at organizing, making the most of small spaces, and managing hand-me-downs for 3 stair-step sisters (OK, she doesn't have to do that very much any more). But I think one of her most brilliant tricks was for socks, underwear, tee-shirts -- anything that got handed down and might be disputed or annoying to remember the owner, she marked with:
ReplyDeleteOne dot on the toe, inside waistband, or tag for the oldest/biggest child
Two dots for the second
Three for the third
So when an item was handed down, you put a new dot on it, and voila. No more mystery or debate.
I think that is brilliant and I might try that here too! Thanks so much for sharing!
DeleteThank you! I have been waiting for the reveal!!! My boys share a room and we will take on their closet project this summer! So excited to use your tips.
ReplyDeleteThis is beautiful!! I mean, rugged and manly... but beautifully organized! Posts like these really are encouraging, love your blog so much! That valet tray really is special :)
ReplyDeleteI live in a really great 1BR apartment and am trying to figure out how to organize my big closet (though it's kind of my only storage space) and my Ikea Kallax 5x5 of crafts/office/papers, etc. Do you have any tips on how to just get off my tush and get started? I've actually helped other people with this kind of thing, but looking at my tornado just has me drawing a blank. I'm so tired of it being a wreck, the rest of the space looks great, but I'm frozen on that area.
Hi Sadie,
DeleteI will admit I have been in your shoes before. There are times where my own spaces and messes become discouraging and I would rather just go help someone else. ☺️ Lucky for me, I usually come home from client visits reinvigorated to take on something of ours. That said, a few things that might help get started would be to look at similar ways the Kallax has performed well for others as inspiration, or even just multipurpose closets that you can draw ideas from. Make a list and a plan in paper and clear it all out. Find ways to excite yourself about it by painting the interior of the closet or lining it with a decorative paper or even just making some cute labels. Maybe ask a friend to come help and make a wine and movie night out of it? Or finding a friend in a similar situation that is up for a challenge and hold one another accountable with photo updates and schedules? Or post the challenge on your social media so your friends and family can join in? Maybe give yourself a deadline on your calendar and if you hit it you can reward yourself.
Wishing you luck! I would love to see how it turns out, you can do it!! 💗
You are the best for replying with such amazing ideas!! Thank you so much. I'll do my darnedest and be sure to report back! 😊 Can't wait til your next post.
DeleteWhat an amazing closet for your son! Jen every picture you post just makes my heart sing. My closet is all set up how I like it but this makes me want to rip it all out and start again!
ReplyDeleteso Nice!
ReplyDeleteThank you!!!!!
ReplyDeleteOh my gosh I love this! His room is so grown up and his closet is both beautiful and functional. I'm definitely bookmarking this post so I can come back to it when my son is a little older. :)
ReplyDeleteLooks fantastic! We don't have built ins for my kids and it drives me a bit nuts. So good to hear from you. It's like getting an email from an old friend.
ReplyDeleteI love what you've done with your son's closet. I also love how you painted the walls of his room white and the ceiling blue! The clothing inventory sheet is genius! We get hand me downs from friends who are quite a bit older than my son and while they are stored away and organized I tend to forget what sizes they are.
ReplyDeleteDANG!!! Your amazing! Thanks for the inspo!
ReplyDeleteYou're such a talent Miss Jen!!!! ❤
ReplyDeleteI love how you saw the potential in the PAX system and didn't just take it for what it is. After getting a draw dropping quote for just one closet from a national closet company, we did something similar, using PAX throughout our house (5 closets!). Even though Pax was meant to be free standing, we used the shallower system inside standard closets and bolted them solidly to the walls so we could install the hanging rails near the front. Having one system throughout means that we can change parts around as our needs change. A couple of closets fit the deeper system but even in the shallow ones, I was able to modify a couple of the deep sliding trays to work. They now house my paper cutter and cutting mat - they pull out for use, providing a work surface, and push in when you're done. I use those tools so much more now! It's amazing how organization can change your life (but you already knew that!).
ReplyDeleteAll of this sounds so dreamy and amazing! I am considering doing something similar in my office and love hearing that it is working so well for you!
DeleteOh, just a quick note that you talked about needing 2 Pax shelves but I'm pretty sure you used three in order to close the uppermost drawer from the space above. Just wanted to point the discrepancy out in case someone else is trying to replicate this awesome project. I would absolutely recommend Ikea's Pax Planning tool if anyone is considering the system. It can't do the custom things like you've added but it is a great place to play with what they have available.
ReplyDeleteYou are 100% right, thank you so much for catching that. I have gone ahead and updated the post. ♥
DeleteI absolutely love this! I have three boys myself, and we recently moved so they all have their own rooms for the first time. I was wondering, the wall organizer above his desk, is that a painted Pottery Barn wall organizer? I have something that looks just like that but it's a creamy white and clashes with my new house. I was about to get rid of it, but if you painted it, I would love to know how you did it. Do you have a tutorial somewhere on your site for painting it? I would love to repurpose the organizer, I just don't know how. Thank you!!
ReplyDeleteHi Heather! Great eye! It is an old Pottery Barn system and I spray painted it to update it for our son (for the same reason as you mentioned).
DeleteI used the Rustoleum 2x Ultra Cover Paint + Primer in Stone Gray spray paint. First I taped things off and sprayed the hardware details with a flat black, let it cure, taped it off again and sprayed the remainder in the gray. I didn't sand it first, I did make sure to wipe it down so it was a clean finish. I find that when I use this particular spray in a satin or flat with the primer built it, that it sticks really well and doesn't drip. The higher the gloss, the more drip potential and that will determine if I need to rough up a piece with sandpaper first. The finish looks great and has been holding up well so far!
I hope that gives you a little encouragement to give it a try and save the organizer. :) It's a wonderful piece!
Thank you so much for replying! I appreciate it so much. I am going to give this a try.
DeleteLooks amazing, definitely considering upgrading to something similar for my sons room which needs tidying up and decluttering and this looks perfect, thanks!
ReplyDeleteWhere did you get the shelves for above the closet rods? They look like they match the Ikea wardrobe but I wasn't sure. Thanks!
ReplyDeleteI believe you could rip down IKEA shelves (or find some that might be close to your desired size), but we just used white melamine shelving from Home Depot that we cut to size. It was a pretty close match to the white PAX and less expensive.
DeleteHi Jen, wow I love your blog! I was just wondering how you take all your photos? I study architecture and I really struggle with taking pictures inside, particularly in winter (I'm from Australia), but all your photos are so light and bright! Any tips would be fabulous. Thanks!
ReplyDeleteThank you so much for the kind comment!
DeleteFor the majority of my blog photos, I take the pictures with my DSLR Canon 5D Mark II, and this lens: https://amzn.to/2lqEFRH. I will often bring in some artificial light to reduce harsh shadows or sun warmth: https://amzn.to/2tojO52. For full shots I try and shoot on a tripod, especially in lower light settings so I can reduce my shutter speed. I edit all of my photos in Photoshop, typically just adding a little extra sharpness and brightening (I like to shoot the image darker/sharper and brighten in editing vs. over exposing out of the camera).
Feel free to let me know if you are looking for any additional details!
Jen
This looks so great! What kind of doors will you put on the closet? We are looking to replace the bifold doors on my son's closet and we need some ideas!
ReplyDeleteThank you! We plan to build a sliding door to cover the closet. We are troubleshooting our plans but I will definitely share when we get it installed. :)
DeleteONE STEP CLOSER!! Turns out my vinyl was 8" not 12" so now I wait for amazon to deliver so we can wrap these babies and finish up!!
ReplyDeleteAny updates on how this closet door turned out? Dying to see the after pics! We have a similar situation and I think we're going to copy exactly what you've done. Thanks!!
ReplyDeleteDid you screw the closet rod straight into the Pax wardrobe? How do you get it to stay without ripping through the particle board? Also, same thing for the support under your shelves. Are they also attached to the outside of the PAX system? How did you make it work?
ReplyDeleteHi Marley,
DeleteWe did screw right into the side of the PAX wardrobe, as it was a solid panel of wood. For the shelf, the ledger was also screwed into studs to help hold the support of the shelves. We used standard 1/2" wood screws into the IKEA piece.
Jen
Do you mind sharing how much the closet built in cost you? Thank you!
ReplyDeleteWe are copying this plan for all of our closets and came into one issue. When screwing into the pax for the closet rod, 2 of the screws seemed to go into a hollow piece, and the other screw seemed to go into wood. Any idea what to do to make sure the closet rod is fully supported? A wood panel in front of pax? Help please!! :) would love your thoughts
ReplyDeleteThis is way after the original post. I am wondering if you can clarify the size of wardrobe you used vs the drawer size. I think I am missing something, they se different sizes, the drawers wider than the box. I am looking at ikea web site and don't see any drawers that match the storage you mentioned. I am sorry for the confusion. I am really liking this plan for my daughter who also has the smallest bdrm in the house. Thank you for your time!
ReplyDeleteHello! If you follow the link, you can actually select the drawer size specifically on the IKEA website from a drop-down menu. There are a variety of sizes to fit their variety of frames. I believe the ones we ended up with are the 29 1/2 x 22 7/8 " size.
DeleteBest of luck with your project! ♥
Hello, I can’t thank you enough for the closet inspiration! My son has almost the identical set up as your son’s room. My mom and I used your great advice and made a beautiful closet for his room, we even did the same in my daughters room! Super appreciate it! Thank you!
ReplyDelete