Showing posts with label Quick Tip. Show all posts

Thursday, June 21, 2018

34 Quick & Easy Tips to Organize Your Refrigerator!

The refrigerator is meant to keep things cold, but it is one of the "hottest" spots in the home! This is where much of the food is stored that nourishes our families, and it is accessed multiple times a day. Knowing that, I always recommend that folks invest a small amount of time creating a few easy systems that aid in streamlining the meal planning and food preparing process. And I am not talking anything fancy, just really obtainable and sanity-saving ideas that save time with fewer trips to the grocery store and provide quicker meal making over the course of a busy week.


GE Appliances recently invited me to Louisville, KY, to help a family of five organize their new high-capacity fridge. Just like us, this family has three growing boys in a variety of activities, and needed a larger fridge and some organizational tips to simplify their food storage just in time for the hectic summer months.

Now, we have all seen those organized fridges that go viral because they are perfectly styled with rows of bins filled with flowers, colorful fruits and pretty cans of fizzy water. I could look at pictures of fridges like that all day long, and I always appreciate a good bin, but I do have to wonder, where is all of the food? The meals for a large family, the leftovers, the snacks, the breakfasts and lunches that last for the entire week? I really wanted to offer up some of my favorite usable and practical tips to help this family, and you, take control of the fridge.

When I arrived at the family's home, I was welcomed with a new, large capacity fridge and a week's worth of groceries straight from the grocery store.
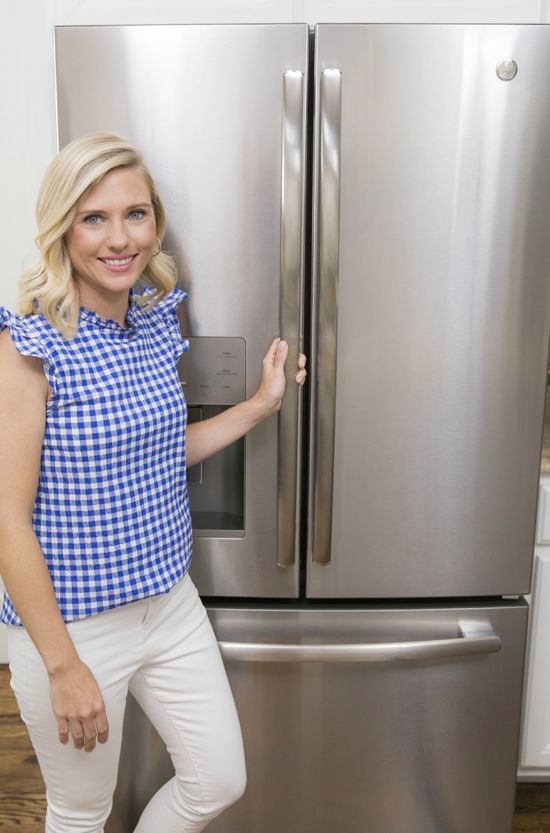

I showed up with a few of my tried and true organizers and got right to work assessing what a typical week's worth of groceries looks like for this family, and how I can best set up their fridge to accommodate both the food and their lifestyle. My number one goal was to put a fridge together that is easy to maintain, offers future versatility, and remains functional week after week.

The fantastic team at GE Appliances was there to see how it all went down, and they put together a quick video of my ten go-to, no fail refrigerator organizing tips. Check it out below!


Here is a quick recap of the video's talking points:


Although I generally encourage folks to empty a space first, when it comes to the fridge, I actually recommend the opposite. Fill your fridge just as you would on a typical week, or maybe even shop and plan for those times when you have more food than usual (think extra kids visiting or a party or eating home every night of the week, etc...). This is really helpful in setting up your fridge to work for you week after week and to consistently accommodate your routine and lifestyle. This is also the best way to plan for any organizational bins and storage you may wish to add.


Whether you are organizing an entire room, a cabinet, or the fridge, I always recommend keeping like items with like, and sorting things into general categories. By placing items back in specific locations, you create a bit of muscle memory and can quickly find things time after time. Keeping the fridge categorized is also quite helpful before heading to the grocery store. Just open the fridge and do a quick visual scan to see what foods and condiments need replenishing.
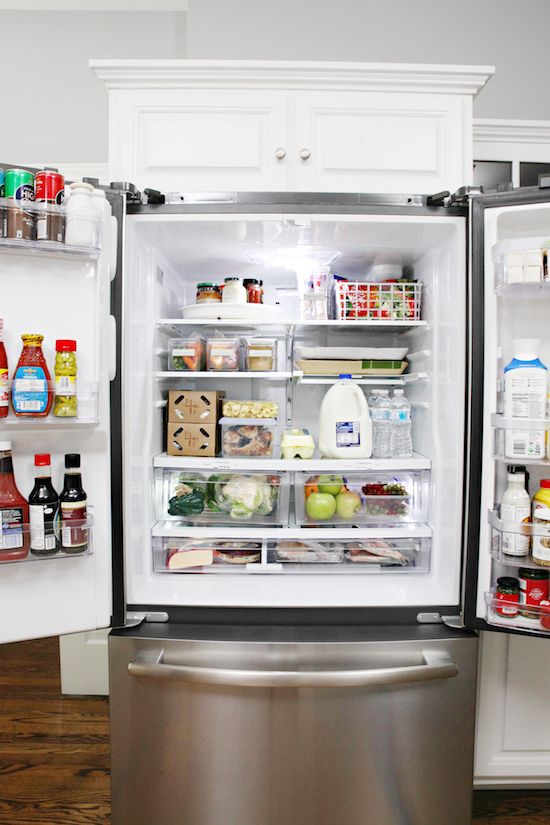

In this specific fridge, I did condiments in the door (even divided out spreads, juices/beverages, toppings & dressings, and garnishes), salsas and sauces on the top shelf, kits on the next couple of shelves, main dishes and leftovers alongside milk & eggs in the large middle area, followed by veggies, fruits and deli items in the drawers below.


These days refrigerators help you easily store the majority of your items in specific temperature controlled areas. That said, it is good to know the ideals temps and locations for storing your food, to be sure to get the most out of that food. Take advantage of the specific drawers for keeping your veggies crispier, your fruits fresher and your deli meats and cheeses ready for lunch making.
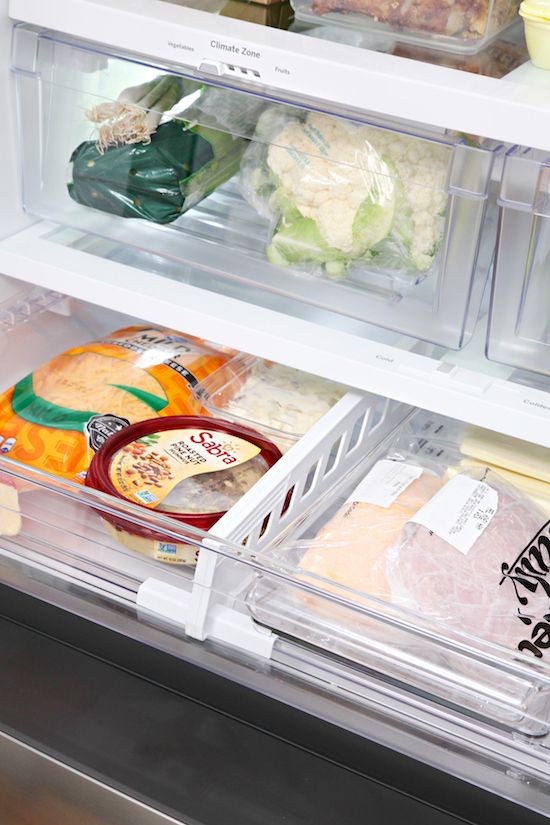

Beyond that, I have read a few different articles that also recommend keeping your milk, dairy, and meats at the center of the fridge where it is coldest. The door is not recommended for eggs or milk because that is generally the warmest location and can cause early spoiling, but this location works great for juices and dressings. Also, there are a lot of fruits and veggies that actually do better stored outside of the fridge, and knowing which ones with help to free up even more space for the items intended to stay nice and cold inside.


I have been a long time kit maker and kit cheerleader! And for this fridge, I spent no more than ten minutes putting together five fuss-free kits.
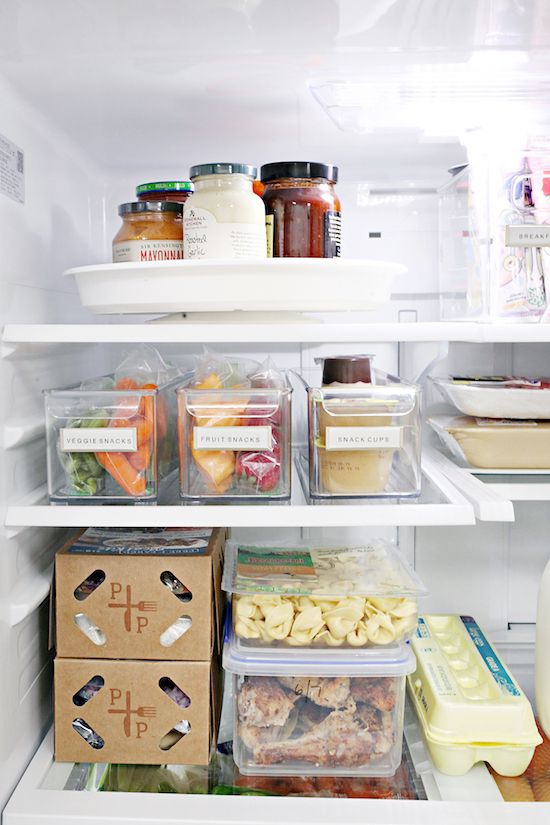

Kit number one was a breakfast bin to hold yogurts and rolls. It can also be a place to store some berries, spreads, toppings, etc... whatever you relate to breakfast specific meals. Kits 2 - 4 were snack kits; one filled with finger veggies portioned into snack bags (snap peas, carrots, sliced peppers, celery, etc...), one filled with finger fruits portioned into snack bags (berries, melon, orange slices, etc...), and the last with some grab-no-go snack cups. Finally, a tray to hold deli meats and cheeses that can quickly transfer to the counter for sandwich making (I also like to add some other sandwich toppings to the tray such as sliced tomato, onion, and avocado).
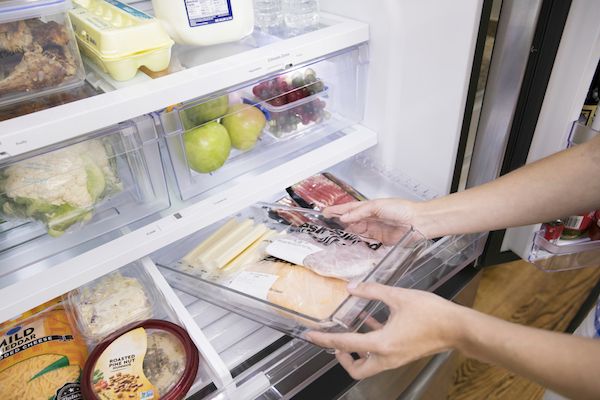

Investing a few minutes after grocery shopping to put together these really quick solutions saves so much time for the entire crew over the course of a week.


You may have noticed, but the majority of the bins used throughout the fridge are clear! That's because clear storage gives you that quick visual and reduces time spent looking through and for things. Before heading to the grocery store, just open the fridge and you can see which bins are running low without pulling everything out.
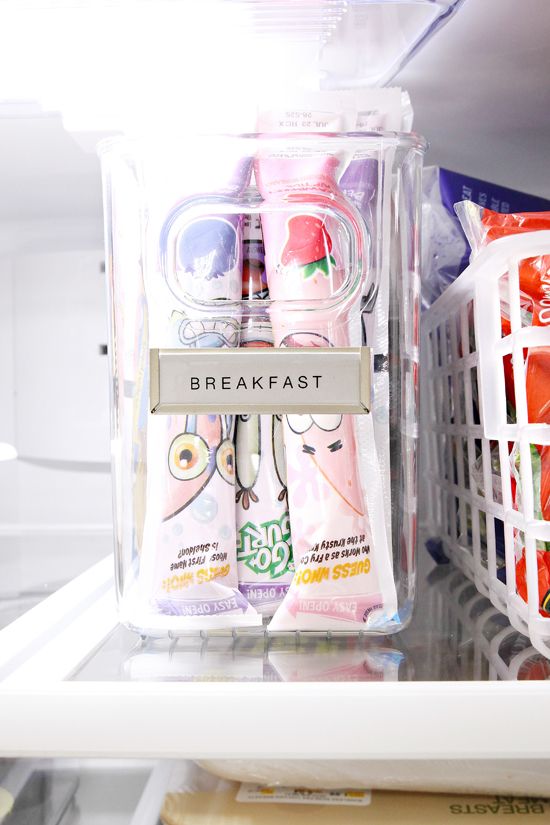

Another bonus for using bins for corralling the majority of the fridge contents is that they can be individually removed and cleaned at the sink, which is much quicker and easier than trying to scrub down the entire interior of your fridge when things spill and leak.


Not only do bins help to categorize your fridge contents, they also act as additional drawers!
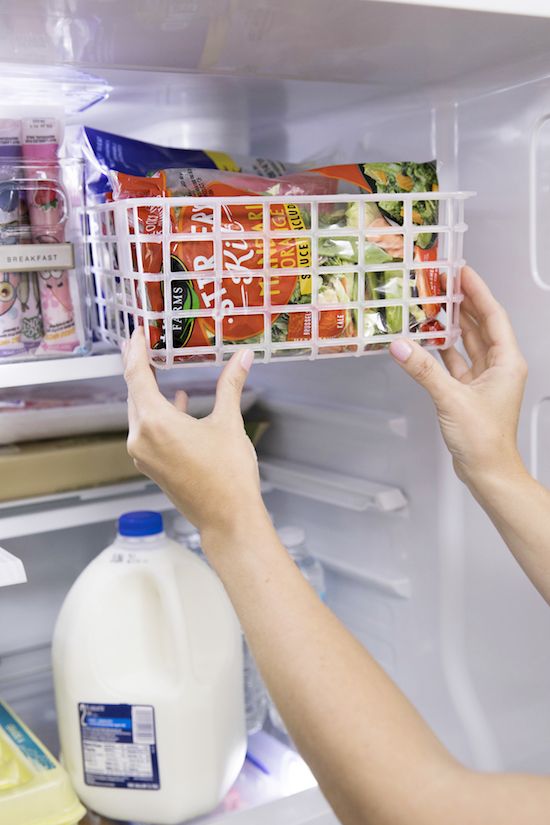

To make the most of a fridge, it is best to adjust the shelves throughout, but that may limit your ease of accessing the items near the back. Extra long bins help to bring those foods to the front in one quick motion. I also recommend selecting bins that have handles or are lightweight for portability.


Why label? Because it keeps everyone on the same page and allows the entire family to quickly identify and locate where things are. Even if you put a variety of breakfast items into a clear bin, your little one may not know what everything in that particular bin has in common without the help of a simple label. Labeling also helps everyone put things back in the right "zones" and to keep general order.
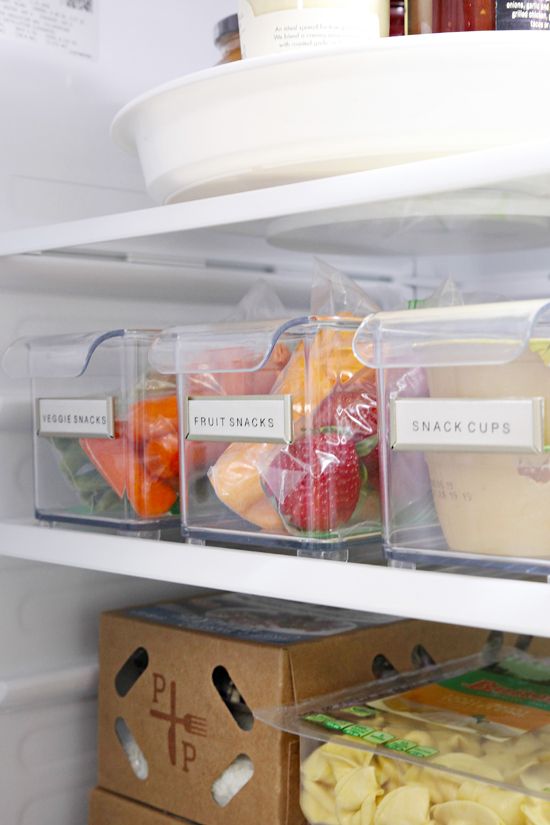

As much as I love a good label, try not to over-label. The goal is to keep the fridge flexible yet simple from week to week, so general categories are best.


Just like deep bins, turntables are another really wonderful solution for preventing items from getting lost near the back. They are especially great for heavier jars or bulkier containers.
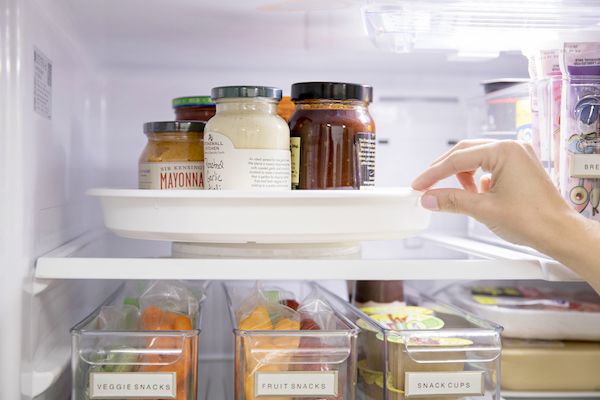

We have used a turntable in our fridge for quite some time now, and I absolutely love it. But this larger version with a lip really stole my heart and I will be upgrading immediately. It makes better use of an entire shelf and also reduces the risk of items falling off and breaking or spilling. So many wins.


I divide my utensil drawers, my junk drawer, my dresser drawer, so why wouldn't I divide the drawers inside of the fridge?
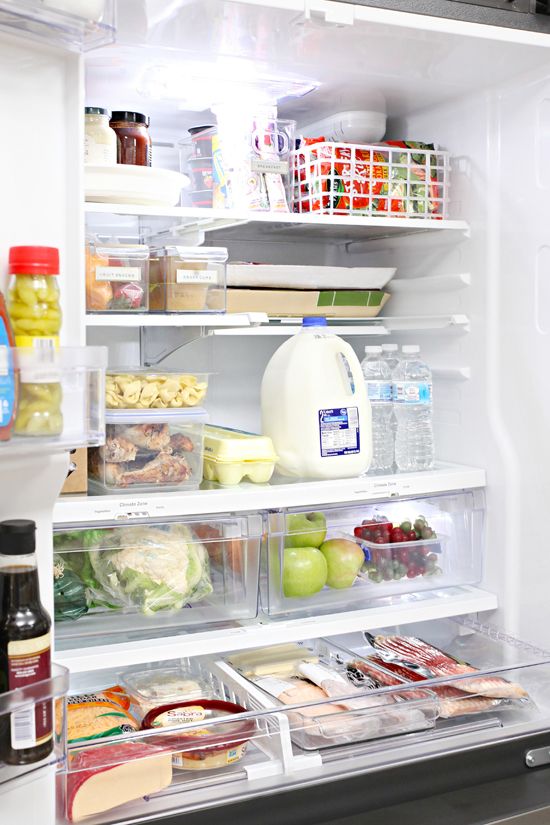

Smaller open-top bins and baskets are a great way to prevent fruits and veggies from rolling around. They also work well for separating out the contents of the deli drawer.


Did you know that you can write on most glass and plastic storage containers with a chalk or dry erase marker, and then just erase it away when it is time for a change? I love this so much, it is so easy to label our food storage containers with the meal contents, prep instructions and the dates that they were prepared or purchased. (Be sure to test your marker/bin combo in an inconspicuous spot a few times just to be sure they are compatible.)
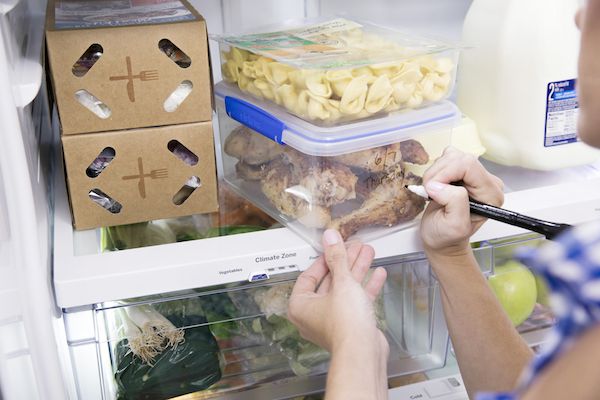

No more questioning if the food in the container is yesterday's dinner leftovers or last week's science project.  #beenthere


So there you have it! I was so thrilled that GE Appliances asked me to help this family setup and organize their new fridge. As you may have noticed, this specific fridge had more space than I was even able to fill, which was a first for me with the many different refrigerators I have organized over the years (this particular model has almost an entire cubic foot more space than most refrigerators in this class). I am obsessed with how many main dishes, leftovers, and sides were stored throughout, and the flexibility there is for adding additional items for cookouts, birthday parties, entertaining, etc... But what tickled me most about this whole experience was watching the homeowner open her fridge and point out all of the details, and getting excited about the solutions I whipped up for their clan. There was a bit of relief, and she also expressed how easy it was to find things and transfer items to the nearby counters. That is the best feeling ever.

There are a few products that continue to be superstar workhorses for me each and every time I organize a fridge, and I have sourced them for you below.


** This post was created in collaboration with GE Appliances to share my favorite fridge organizing tips. All of the ideas and opinions shared are my own. I sincerely appreciate brands supporting my content and work! **


Thursday, May 17, 2018

15 Quick Tip! Get a Grip on your Drawer Dividers

Drawer dividers are generally intended to provide some order and calmness. They prevent our belongings from becoming jumbled messes and are also ideal for creating organized categories. I have always been a huge proponent of dividers because they have made our lives easier and better in every room in our home.

However, finding dividers that fit inside of drawers just right is a rarity. No matter how much you search and create grids and measure and plan, there will always be that last sliver of space. Or what about those times when you only want to divide a portion of the drawer? And because those drawer dividers are not always perfectly fit, they end up sliding from side to side and front to back. #thehorror


I have worked with a few folks lately that have had that very problem and asked how to prevent the obnoxious shifting of everything each time a drawer is opened and closed. Dividers are supposed to make things better, but something so small can quickly become a daily annoyance.

There are three really easy (and non-permanent) ways that I like to prevent shifting, wiggling, and sliding inside of drawers.


1 |  C O M M A N D  S T R I P S

Because I usually spring for clear/acrylic drawer dividers, I also prefer the clear Command Strips. You can purchase replacement strips solo (no need to purchase with the hooks), and they are great to use for a variety of discreet projects around the house. Of course, any type of Command Strip could pair well with any drawer divider of your choosing. I place one or two of the strips on the bottom and stick it directly to the drawer/liner.


With this method and the next, I am selective about what divider I adhere the strip to as I don't want to incur the expense of doing this to the bottom of every divider in the drawer. I typically select the divider that is able to support/hold all of the other dividers in place as well.


No one would be the wiser, and there is absolutely zero shifting of the dividers when the drawer is opened and closed.


2 |  C L E A R  B U M P E R S

Another little household hack is to use cabinet/drawer bumpers!


These can be found at just about any home or hardware store, and are very grippy! They are generally used to protect your cabinets and drawers, but have also been known to protect glass surfaces, the walls behind frames, added to the bottom of home decor and accessories and electronics. And now they can also be found in some of the drawers in our home!


In the drawer above you can see I left a large amount of space for longer items to be stored and wanted to prevent the entire row of dividers from sliding forward. Adding a few bumpers to the front of the dividers in the front rows did just that!


This is a really great option when you only want to add a couple of dividers to a large drawer and have a lot of additional space to fill with other items.


3 |  G R I P P Y  S H E L F  L I N E R

For heavier duty projects, my "go to" is a grippy liner. And sometimes grippy dividers too!


A few years ago I gifted my husband two Elfa towers (these frames and these bins) to store all of our project materials and tools, and I am just now beginning to tackle the huge project of organizing them!

I have been on the hunt for both a good liner and also good dividers to use inside of the drawers; nothing cute or fancy but 100% durable. I landed on some black grip liner that can be cut to size, along with these interlocking organizers that also have some inside grip to them.


No matter the weight, tool or piece of hardware, they should stay put as the drawer is opened and closed or even removed completely to be toted around the house and garage. The grippy shelf liner not only holds the dividers in place but also the objects sitting on top. And the interlocking lined dividers will be good for the more heavy duty items, while everyday dividers will work for smaller pieces and still stay in place with the help of the liner.

Again, this option allows for the dividers to be split and only be used in certain areas of the drawer, which also means that I am able to better maximize how each drawer is divided and categorized. Hooray for added flexibility!


BONUS TIP: Grip liner can be found just about everywhere in a variety of colors and price points, and can easily be cut down to size. If you only want to add some smaller pieces of the liner below the drawer dividers to stretch your investment, that works too! Also, get creative with what you use, rug pads and silicone caulk can serve the same purpose!


I always try out my tips before sharing them and recommending them, but you can't 100% tell from the photos just how well these methods work, so I compiled a couple of quick boomerangs I took with my phone to drive the point home.


No-Slip Drawer Dividers from Jen Jones on Vimeo.


And because I am often asked about where to purchase the items found in this post, or my favorite dividers in general, I have rounded up everything for you below.


It's time to put those dividers in their place once and for all!

Tuesday, May 23, 2017

31 Quick Tip Tuesday: The Difference a Dollar Makes

I have been spending some time helping a friend clean out every last drawer and cabinet of her kitchen, and it has been a really fun and rewarding process. We are working on the project in phases to be sure we are addressing all of the family's needs. Step one was to take before photos and come up with a plan. Step two was to remove all of the cabinet contents and purge. Step three was to put things back where they made the most sense, based entirely on how the family utilizes their kitchen. And step four was to have them live with the first round of changes prior to adding any specific storage items. We are currently in the step four stage, no storage added, just cleaning out, purging and putting things where they make sense.


We have some more big projects planned for the space, as well as some additional re-arranging, and then I plan to share the entire process and after photos. In the meantime, we decided to do something that made an instant impact on a budget and I thought it would be a perfect quick tip to share.

Here is the cupboard before. This is in the process of moving items and cleaning things out and determining proper placement for the contents.


The contents were removed entirely and everything was wiped down. Then we added black poster board behind the shelves with very small pieces of double-stick tape to hold it in place (small amounts of mounting putting or glue dots would also work). A single piece of black poster board should cost no more than a dollar from any dollar or craft store. But this ridiculously simple act (no painting required), really makes the dishes stand out and heightened the overall feeling of the cupboard!


I have taken the time to paint foam core boards for a similar result, but that can be much more time consuming and the result in the black poster board was just as effective. Plus, the poster board is easier to work with; both cutting to size and layering if multiple sheets are required.

The Mr. of the house was also impressed and instantly mentioned how much he preferred the end result of such an easy change. He opened the cupboard and let out a "Woah!" which I always consider a major high-five moment.

Aside from the poster board, we didn't add any fancy organizers. Much of the difference really came down to storing items that belonged together in a single cabinet. 

As you can also see, there was a little debate about storing cups up or down. I once learned that glassware should be stored up so no moisture is trapped after washing, but was always raised with glasses stored down. Which do you prefer?


Next time you are at the dollar store, grab a sheet or two of black poster board and pop it in the back of one of your cabinets. There is sure to be instant gratification from such a simple step, and that gratification will continue to surprise you every time you open the cabinet door. The absolute best part is this project doesn't discriminate, it really works just about everywhere in any setting (think rentals, bookcases, nooks and medicine cabinets...).

Have I convinced you to give this quick update a try? What is your favorite dollar store purchase?

Tuesday, February 7, 2017

19 Quick Tip Tuesday - Easy Sticker Removal

By now you all know I am easily amused and the little things always excite me. Today's tip may be one that is as old as time, but it completely "blew" my mind.


Stickers are one of my phobias. Not to a medically diagnosed state, but I truly can't handle sticky. And I really can't stand sticky paper. I don't know where this long time fear and avoidance has come from, but it is strong with me.

My boys are past the sticker stage for the most part, but I still deal with them frequently in terms of packaging and merchandise. Go to a thrift store and you get stickers. Purchase items for the home and you get stickers. Ikea, stickers. In fact, almost every piece of our IKEA kitchen cabinetry was adorned with a sticker and I am still finding ones that I missed during install. And so many of them were awful to remove. You start to pick at them and the paper pulls thin, crumbles, tears... sticky residue remains on the cabinet to scrub. Before you know it, little white sticky paper crumbs are all over your shirt and in your hair and under your chipped nails and you feel that heavy feeling in your stomach... OK, maybe that last part is just me.

I have tried a number of ways to remove the stickers cleanly; including Windex, vinegar, Goo Gone, coconut oil, and soaking the item in hot water. But the method I have found to be the cleanest and easiest is my hair dryer!

An example of my initial attempt to peel a cabinet sticker...


The process is ridiculously easy... Heat up the sticker with a hair dryer and slowly pull away from the product.


Caution! The sticker and the product can get hot quickly so BE CAREFUL! 

The heat loosens the glue on the back of the sticker and generally creates a quick and clean removal. No messy dripping liquid or oily residue aftermath.


Quick funny story - My son was invited to a last minute birthday party and as I was bagging up the boy's gift in the car (as a passenger of course), and I couldn't get the price stickers off of the boxes. I remembered the heat trick, turned up the heat in the car and held the boxes near the vent for a minute or two. The stickers were cleanly removed in seconds and my kids thought I was a scientific magician. #magicmom

Here is another video, this time with the hair dryer and the easy-peasy-super-clean sticker removal.


Because of the heat put off by the hair dryer, this method is best for hard plastics, some woods, glass, and metals (surfaces that are not too sensitive to heat). And if any glue/sticky residue does remain after the removal, a little vinegar on a microfiber cloth generally does the trick for that.

Was I the last to know? Maybe! But truthfully, I love learning these quick little tips and relaying them to you all, so cheers to celebrating the small things!

Tuesday, September 20, 2016

17 Quick Tip Tuesday: Freezing Herbs

A few weeks ago when I was organizing our fridge and freezer, I was trying to finally come up with a good way to maintain the freshness of our herbs. I find that we prefer to purchase a few specific types of fresh herbs from our local grocery store, but then only use a small amount before the remainder of the bunch goes bad. Not wanting to waste, especially with the cost of some herbs being a fairly expensive, I decided to give the freezing method a try.


I had never heard of freezing herbs before, but then I saw these little packaged herb cubes in our grocery store freezer and thought it would be a great way to make the most of our leftover stems. Turns out this is a thing, and can be done right at home! And it is easy!


The herbs we tend to purchase the most frequently are basil, cilantro and mint. If we think we will be able to utilize all of the herbs within a week, I will just wrap a wet paper towel around the stems and store them in a zipper bag in the fridge. Or I place them in a glass of water with a plastic bag over the top, also storing them in the fridge. Both of these methods have allowed our herbs to gain a few days of freshness, however, nothing much more than that.

There isn't much needed to make this happen, but I thought I would share a few products and tips that worked for us. Like a good ice cube tray! I wanted to be able to use the tray to not only freeze the herbs, but to store them long term in the freezer as well. So a tray with a lid was ideal, and a silicone finish was a perk because the cubes simply pop out once frozen. I also love that these trays are compact for our small freezer drawer, and seem to be the perfect size for freezing the leftovers of a bundle of herbs.


Herbs can be frozen in water, but there is a risk that some of the flavor will be removed during the process. But because both the cilantro and basil are generally cooked right into our dishes, I opted to freeze them in oil instead (which helps with long term flavor retention).

I began with the cilantro, and used an herb stripper to quickly remove all of the leaves from the stems.


I added the cilantro leaves and avocado oil to our mini food processor and just a few seconds later they were ready for the ice cube tray.


A mini spatula was helpful in quickly transferring over the herbs to the tray.


An entire bunch of cilantro processed down to just 12 mini cubes, which was perfect because the second half of the tray was going to be dedicated to the basil.

I repeated the same steps with the basil, however, didn't process the leaves down quite as much as I wanted them to remain a little larger in size. And this time I just used a light olive oil.


If you look closely, you will notice a difference in the leaves, but just to be sure there was no confusion, I also added labels to each side of the tray (made with my label maker).


The final tray was dedicated to mint leaves. I like to add a bit of mint to lemon water and tea and rum and wine and...

Because I use mint for beverages, and more often than for say, a random pasta night, I dedicated an entire tray to the mint.


A quick chop to keep the leaves fairly good sized, I then scattered the mint throughout the empty cubed slots. (Mezzaluna originally purchased here but here is a similar style. I really love using it for chopped salads as well.)


Obviously oil is not a good choice when adding the herbs to beverages, so I just went with straight water for freezing, pouring it over the leaves until all of the cubes were full.

Into the freezer they went and within a few hours I had myself some preserved herbs ready for next week's meal, next month's meal and my weekday glass of lemon water.


If you don't have an ice cube tray that has a cover, another option is to remove the frozen cubes from the tray and keep them in an airtight freezer bag.

I was pleasantly surprised how quick and painless this process was, so I felt really excited to share! In fact, the part that took the longest was the clean up... #ofcourse