Showing posts with label Aniko. Show all posts

Monday, December 5, 2016

6 UHeart Organizing: Small Bathroom Storage Solutions

I am still making my way through all of the amazing One Room Challenge spaces that were revealed last month, and there were quite a few amazing spaces that definitely caught my eye. One of those spaces belongs to a dear friend and iHeart Organizing contributor, Aniko! She tackled a guest bathroom makeover in six short weeks and the results were absolutely lovely!

I asked Aniko to share some details behind her bathroom storage solutions with us today. Although the space looks expensive all around, there are quite a few DIY and budget friendly organizers that were incorporated throughout. Aniko sure is a creative genius!


About a month ago I revealed my guest bathroom makeover, and I was overwhelmed with the wonderful response I received from readers and the features on social media. I love to participate in the One room Challenge each year, and this time I was invited to participate as a featured designer. Well, the pressure was about five times more intense to make something outstanding and amazing as opposed to when I was only a linking participant. We started with a builder's grade bathroom that needed some love. At the beginning of the process, and at the time of demolition, I knew that I would like to create something that not only my guests would enjoy, but a space that we can enjoy as well. I had envisioned a spa-like bathroom while I was dreaming about our bathroom makeover, so we created a fantastic spa-like bathroom that we now are able to enjoy each and every day.

Today I am going to share some of my favorite bathroom storage ideas that I used in this fun, warm, modern guest bathroom. These storage ideas not only look fantastic, but they are functional as well. Our bathroom is pretty small, and when I started planning I wanted to make sure that I utilized every inch of the room. Adding some DIY storage solutions helped to maximize the space.

So let's see these ideas one by one.


HEXAGON SHELVES


As you walk into the bathroom, the first thing that would draw your attention probably would be the hexagon shelves. The day before revealing my bathroom (yup, you read that right), I was looking for something that would be great to hold candles and small decor pieces and would also add some interest to the white walls. I ran to Target and found some neutral color hexagon shelves in their craft section.

I stained them with wood stain (Minwax Red Chestnut) that I used throughout the bathroom makeover for our DIY recessed lights and DIY chunky closet shelves as well. Then I attached them together using an brad nailer. Initially, I was going to use four of these cute hexagon boxes above the toilet, but last minute I changed plans and hung only two of them.


DIY TOWEL RACK


This easy five minute project was also a very last minute addition. When everything was in place, I realized that I only had the towel ring right beside the vanity, and I wanted to add other solution to hang additional towels.


Putting this piece together didn't take more than 10-15 minutes. I used a treated wood panel that I stained with the same stain I used for the other projects in the bathroom. After drilling three holes on the wood panel, I added simple black knobs (from The Home Depot). Again with the brad nailer, we secured it below the window. Pretty simple DIY and looks great, don't you think?


LARGE BASKETS


I am totally a basket girl. When it comes to organizing things around the house, I almost always choose large baskets to store cleaning products, everyday clutter, and items that are better if hidden. I just love baskets. I especially enjoy the wicker versions. I have a few of them in my entryway, and they are seriously life savers. I added this large round basket to my bathroom so my guests can drop in used towels and their laundry as well.


We took the door off of our closet, as well as the door of the bathroom, and we added a barn door (see more on that here), and we built some chunky looking wooden shelves in our closet. I used huge baskets to hide all the cleaning products and bathroom supplies.


BATH SHELF


I decided to add a bath shelf for several reasons. Number one; I love to soak in a tub with a cup of tea, and a bath shelf is the perfect place for my mug. Number two; I think it looks fabulous and the bath shelf can hold items that are beautiful to display. I used treated wood from The Home Depot, and of course, I stained the wood just like I did for the other pieces in the bathroom. If you wonder about those cute little plant holders, they are also from Target. They, come in a neutral color.


BAMBOO BATHROOM SET

When I spotted this bamboo bathroom set, I almost fainted. I adore it! It's a simple, minimalist design and it was made to be in my bathroom. It's a six piece set, and it has everything you need. A soap dish, lotion dispenser, a jar with a lid that can hold cotton balls and such, plus a tray and a toothbrush holder. Stylish storage strikes again!


What do you think? I am genuinely pleased with all of the organizing solutions I found for this guest bathroom. You can see more images, before and afters, and sources for all products and pieces for this room in my bathroom reveal post. You can also check out some of my previous One Room Challenge makeovers here. And if you are gearing up for the holiday season, please come on over and see this year's Christmas decor ideas.

Wishing you the happiest Holiday season!

Cheers,
Aniko

_______________


Hello! My name is Aniko and I blog over at Place of my Taste. I am a wife, mother and business owner by day, and a DIY-er by night. I love all things design, decor and photography, but I also have a passion for cooking, wine tasting, dancing and creating all things beautiful. I am so happy that I am able to share all of my joys over on my blog. I also run an online shop and recently published a photography e-book filled with tips to achieve beautiful photography and styling. I hope that you all come visit me there. Xo!

Thursday, August 25, 2016

8 UHeart Organizing: Adding Storage Punch to the Pantry

If you are at all like me, one organizing project either leads to, or inspires another. So naturally when I cleaned out my fridge/freezer earlier this week, my pantry received a little attention as well. It is such a great time to tackle these high-traffic kitchen cabinets, especially with so many kids heading back-to-school.

Not only do I love to look at organized pantries, but I also love good before and after stories! I mean, isn't that why so many of us are here? For those inspiring "go get 'em" projects that show a before that many of us can relate to, celebrate a much more streamlined after, all while learning a few tips and ideas along the way? Yes, yes and yes!

I am so happy and honored to welcome Aniko back today, and she is happy and honored to share her recent pantry before and after story. I will let her take it from here. Enjoy!


Today I am sharing some tips on how to make your pantry organized and beautiful in less than a few hours. If you are like me, your pantry can become cluttered and messy in no time. I am trying so hard to get everything around me organized before the new school year starts in about two weeks. This year I will have two little kiddos riding the bus every morning, and I shared here how we are aiming to stay organized during this busy season. One child brought so much clutter and school paper home last year, I had to better prepare myself for two kids now! Luckily, we made some changes to our entryway last year that helped us immensely for storing school papers, backpacks, and for keeping our everyday clutter organized. I am not known to be the most organized person on the planet, but when I start organizing drawers, closets, cabinets and spaces, I seem to do alright. The hardest thing for me is being able to keep my spaces organized. As soon as school starts I would like to have meal plans made for each week and having an organized pantry is a must for planning ahead. I have to see what I am low on and what I need to refill when I go grocery shopping, right? I searched my favorite resource, Pinterest, one day for pantry organizing ideas and was so inspired that I started tackling mine while the kiddos were at the pool with dad.

I am almost uncomfortable to show you guys the before but just because we all know that our lives aren't always picture perfect, I will show you what I started with so you can appreciate the after pictures even more.


Ugh! That was a disaster! It took me at least 2 minutes to find anything in that pantry. But that mess is over now. My pantry is pretty small; I have about five shelves to fit everything I have.

As a first step, I took everything out of my pantry and purged things that had an expired date then I grouped things together; pasta, sauces, cereals, snacks, seeds, etc. to better organize them.

I used a roll of adhesive paper from Target to make my walls look beautiful and clean. Target has different designs, but I chose the modern black and white. This step is entirely optional; you can also use wallpaper if you have that handy, or you can just leave your walls paper free. I measured my walls and applied the paper.


I also used some empty containers that had on hand, and I prettied them up with the same leftover adhesive paper.


These containers are free and perfect to store straws, bamboo sticks, and other kitchen items.


I used canisters and containers to store pasta, rice, sugar, etc. I found great plastic and glass containers at Walmart, and I had some old ones from IKEA that I reused (the tall and skinny ones are from IKEA). And I stored open bags inside of baskets.


I labeled all of my containers which I find super helpful. I created my labels in Word using a free handwritten font, BROMELLO. You can download this free font and create your printable labels. I purchased clear shipping labels ( AVERY 15663) from Office Max, and I used the Avery templates 5163 to print them. You get the best result with clear labels if you use a laser printer (you can watch a short video of how to create your labels HERE).


I poured all the cereal into plastic bins, and I placed them low enough in my pantry that my children are able to reach. My kiddos are old enough to get up in the morning, walk downstairs and prepare their own cereals.


I found these metal baskets at Target's dollar section for $3 and I put all my sauces and canned food in there.


And of course I had some items that I could not hide, but I was able to sort them out and arrange them on my rack that I had on the inside of my door.


And because we all love to see before and afters, here you go! Now comes the fun of keeping it clean and organized!

BEFORE


AFTER


I am delighted to see how clean, organized and attractive my pantry is now. I created some fabulous watercolor Printable Recipe Cards that you can grab from my blog, and print them if you like to collect your recipes the old-fashioned way. And if you like to print out recipes from the web you can download my printable recipe binder pages I shared here last time.


As always, it's an honor to share my work with the IHeart readers. I will be back again at the end of the year.

Cheers for a great day!

Aniko

_______________


Hello! My name is Aniko and I blog over at Place of my Taste. I am a wife, mother and business owner by day, and a DIY-er by night.  I love all things design, decor and photography, but I also have a passion for cooking, wine tasting, dancing and creating all things beautiful. I am so happy that I am able to share all of my joys over on my blog.  I also run an online shop and recently published a photography e-book filled with tips to achieve beautiful photography and styling.  I hope that you all come visit me there. Xo!

Thursday, May 19, 2016

19 UHeart Organizing: Free Recipe Binder Printables

We have been huge recipe binder fans for years now (check out this super old post here); especially since Pinterest came about and I became a recipe pinning fanatic.  I like keeping my favorite clippings and printed pages right at my fingertips, and an organized binder is such an easy way to do so.  I was thrilled to see that my good friend, Aniko, has similar feelings on the topic.  She was kind enough to join us today with some free recipe binder printables, that she created by hand!  I am so in love with her beautiful work, I couldn't print these off fast enough.


Hello, iHeart readers! It's Aniko from Place of My Taste, and I am so grateful to be here again this year! I was delighted to be part of the team last year, and I am so over the moon excited that Jen kept our contributorship going. As my first contribution to the iHeart blog in 2016, I brought some lovely Mini recipe binder printable pages. How cool is that? I am now taking life a little slower, after our fun Family Room Makeover that we revealed just last week. It was a long 5-week progress, but the result is so fantastic that I want to do nothing but sit in that room and relax.

I know that these days you can save and bookmark your favorite recipes on your smartphone, which allows you to access it later if you wish. But I am also positive that we all have those recipes that we keep forever, and they perhaps are the ones that were handwritten by your mom or grandma, and you just don't want to throw them away.

Well, I have a few different piles of those recipes and I have been meaning to get them organized.


Over the years I collected many recipes that I had printed, and I keep coming back to those "family favorite" recipes on a daily basis. I had them thrown into a little notebook, and of course, it always took forever to find the one I was looking for. A simple idea crossed my mind the other day when I was in the middle of flipping through these printed papers.

I thought, why not to organize these printed recipes into a lovely binder? Like a fabulous, stylish one that I can leave out on my kitchen island if I want to. So I went to Target, and I bought a mini binder as well as some sheet protectors. Once I returned home, I sat down to paint. If you don't know me, I am an artist...  I love to create art, and I love to paint. I am experimenting a lot with watercolor, but I enjoy all mediums. I just recently began selling watercolor wedding invites in my shop.


So are you ready to organize your recipes?

To make your cozy little recipe binder you will need:

I designed a front page and additional pages that you can put into sections/categories.  This way you can have your recipe collection organized into one darling binder where you can easily find everything you are looking for in a matter of seconds.


DOWNLOAD YOUR FREE MINI RECIPE BINDER PRINTABLES HERE

In the shared folder you will find ALL pages in original size so if you wish to make a large binder you can do so! There are also pages that are already put together if you are printing them for a MINI binder!

I hope you enjoy these!


I am TOTALLY smitten with my organizer, you guys!

It looks marvelous in my kitchen, and it's excellent because the papers are now protected, and they won't get messy on my kitchen island anymore. Woo-hoo!


So what do you say?

I also offer a different design, which is available for my new e-mail subscribers.  So if you are not a pink "flowery" kind of person, go ahead and grab this green goodness HERE.


It's always a pleasure to share my creativity with you all! I am looking forward to bringing something fabulous again in a few months! Until then, hop over to my blog and check out some of my fun DIY projects, watercolor FREEBIES and follow me on Instagram to see some behind the scenes photos and videos.

CHEERS!

_______________


Hello! My name is Aniko and I blog over at Place of my Taste. I am a wife, mother and business owner by day, and a DIY-er by night.  I love all things design, decor and photography, but I also have a passion for cooking, wine tasting, dancing and creating all things beautiful. I am so happy that I am able to share all of my joys over on my blog.  I also run an online shop and recently published a photography e-book filled with tips to achieve beautiful photography and styling.  I hope that you all come visit me there. Xo!


Thursday, November 5, 2015

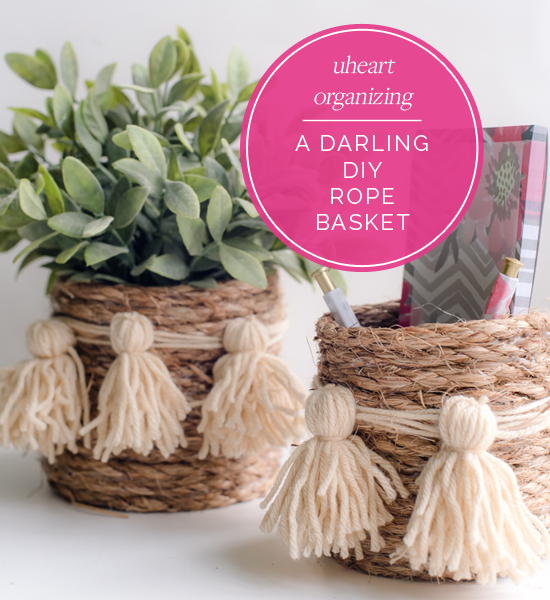
6 UHeart Organizing: A Darling DIY Rope Basket

There are  only a few days left to link up and share your DIY With a New Supply Monthly Challenge projects, and today we have one that you still have plenty of time to try!  These types of projects are simply the best because you only need some basic materials, a small amount of time, very little patience and you can be an entry level crafter or DIY'er.  Oh!  And they are budget friendly while also creating a true storage solution.  So who is ready to get "roped" in to a really great project?!

Aniko, the endlessly talented voice behind Place of My Taste blog, is here with her step-by-step tutorial for creating a darling little rope basket.  And don't forget to check out her fab video at the end of the post as it will surely convince you to try this project out for yourself.  Take it away Aniko!


Little things can make me happy. Cute little things like these incredibly sweet rope baskets that I made the other day to keep my remote controls in one place.

I am currently working on a new living room design, and I envisioned our new room with a lot of layers, textures, and a little bohemian infusion. I bought a new jute rug, and I layered it with a shag rug in the room.  With that pairing in mind, I thought a rope basket would make a perfect home for my remote controls. After the first basket was done, I soon realized that I needed more of these baskets as I can use them to organize many other things around the house.

Another bonus is that it's a very simple and quick DIY that you can tackle literally in minutes on a rainy afternoon.

SUPPLIES:
  • Thick rope from the home improvement store
  • Hot glue gun and glue sticks
  • Scissors
  • Yarn


    STEPS:
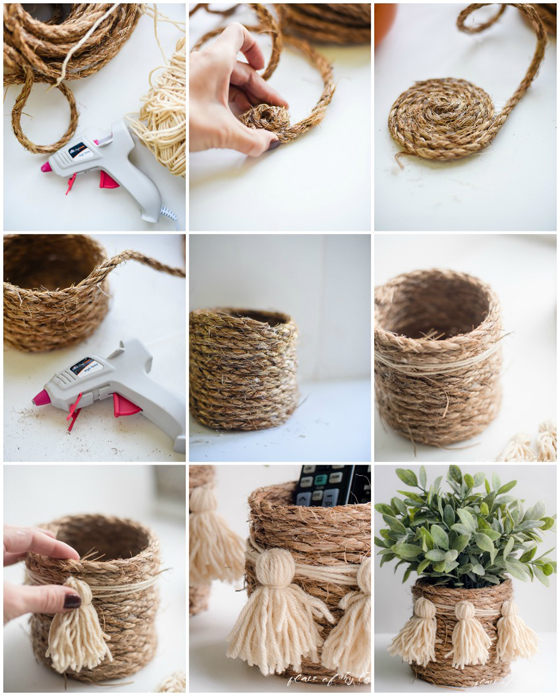
    1. Add glue to one end of the rope and start wrapping the rope in a circle
    2. Keep wrapping the rope until you have made the size that you would like the base to be
    3. Once the base is created, start wrapping the rope upright
    4. Wrap until the desired size, then cut the rope and glue the finishing end to the basket
    5. Bonus step: affix some charming DIY tassels with string or glue


      Here are just a few examples of how you can utilize this type of basket in your home:
      • use it for holding stationery items at your desk, on your counter or near your entryway
      • use it as a planter
      • corral your remote controls near a chair or sofa
      • display it on your kitchen countertop for utensils or wooden spoons


        The list can go on and on. There are many everyday items that we can keep in these darling handmade baskets.

        Here is a peek of the basket in my living room. Today I am sharing this stylish Danish modern chair makeover on the blog, so hop over and see how the room is coming together.


        I also created a quick video tutorial of how I made my basket. I hope it will encourage you to make one for your home as well!


        Thanks for reading! Cheers


        "Hey there. My name is Aniko and I blog over at Place Of My Taste. I am a wife, mother, business owner by day, DIY-er by night, design, decor and photography lover by heart who loves to cook, taste wine, dance for therapy and create all things beautiful. I share all this love over at my blog - at my happy place. Come see me there. xo"


        Thursday, August 13, 2015

        24 UHeart Organizing: The Ultimate Homework Zone for Kids

        My contributors have been bringing it in the Back-To-School department this year!  And good thing, because that is something I haven't even begun to focus on yet.  Time for this mama to get out of her summer coma and get back into the school swing of things.  I am so grateful for the recent inspiration and ideas from Jen, Karen and now Aniko.

        Aniko blogs at Place of My Taste, and I admit to stalking her Instagram feed on a daily basis because everything she touches is colorful, fun and fabulous.  So it is no surprise to me that she created one of the most incredible homework stations around.  My little guys are uber jealous of this area that is designed with homework in mind, yet happy enough to want to spend time at.  I have placed a lot of focus here over the years around creating a work environment you love, and that is no different for kiddos.  It's time to get #homeworkhappy!


        School will be back with full speed before we know it. I know in some states school has already started, but we still have 3 more weeks to enjoy summer (sigh).  I can't even believe how fast these past 2 months went. It feels like we are always on the go with my boys and with that said the days and weeks seem to fly by crazy fast. I started working on my boys room last year. Wait. Last year? Yeah, it is typical Aniko style to start a new project and getting quickly lost in another project without even finishing the first one. I can't help it, when I have new ideas I have to jump right on that wagon while my creative idea is fresh.  Last year I stenciled an accent wall and did a few smaller projects in this room, but I never got to finish one little corner in here - the homework station. I am sending my eldest son to First Grade this September and he needs his private space to do his homework after school.


        I wanted this corner to be fun, colorful and functional where he would happily want to sit down to do homework and practice art. I chose a bright orange and blue combo for the walls when I started working on this room last year. I love these two bold colors together, I think they are playful and fun for kids room. I knew IKEA had great shelving systems and I was confident that I wanted to create this little corner from IKEA. By the way, it's one of my favorite stores. It's about an hour drive for me but I am always delighted to go there shopping. Have you seen their new catalog yet? I am smitten with so many amazing design ideas this season.


        I did not have much space to work with in the boy's room as we already had two beds and toy storage, so the corner that I had left was pretty small. I found the incredible shelving system at IKEA which was the perfect solution for my teeny- tiny corner. The shelving system is called ALGOT and let me tell ya, it is pretty awesome. You can build your system as big or as little as you want.

        For the desk, I chose the largest and widest shelf that they had available and I added two smaller shelves to hold his file folders and small bins which are great to organize markers and pencils.


        I really like the idea of hanging that big roll of paper right above his desk.  I use it for reminders but it is also perfect for my son to draw and write on whenever he would like.  It even works great to list his sight words to memorize.  In fact, I even use this paper to cover my kitchen table during Play-Doh time, when the boys draw their art and even for my own art work which I then display in large DIY Wooden Frames.


        Do you assign daily to-do chores for your kids? I just recently started having my boys to do daily chores and it helps tremendously. I like to have my son's daily to-do items visible right in front of him, as I am hoping that looking at those clip-art pictures will help him remember to pick up his toys and get those books in hand. I cut out images of each item and I attached each of them to the paper with some little chalkboard clips from Target.


        IKEA has so many great and functional items. This "BYGEL" rail can hold cute plastic organizer bins that are ideal for crayons.  It also works well for hanging his scissors or other office accessories.


        That small plastic container that holds erasers and glue sticks was also found in Target's dollar section.


        While I was taking pictures of this corner I asked him to write "back to school" for me... he tried very hard.  #cute

        I did not purchase a desk chair but I updated an IKEA Stool this past weekend and placed it next to his desk.  I really love how it turned out.


        My son was very happy about his new, awesome homework station. He sat down immediately and started coloring.


        As you see I am not afraid to mix and match bright colors as color simply makes me happy. Next to this homework station there is also a reading corner that I created last year.


        ADDITIONAL ROOM PROJECTS:


        I think I created a fun, cheerful, happy place for my love to do his homework and I hope I inspired some of you to create something special for your kiddos as well. If you like these ideas or perhaps you would like to replicate it, I listed all the source links for you below. Some of the items, like the blue lamp shade and the green wall light, are no longer available at IKEA but I included alternative options that work just as well.

        leg, algot shelf and shelf, algot wall rail, lamp shade, shelf bracket, cord kit, rail, cups, bracket, stool, paper rail, paper


        It is always a pleasure to be here, thank you Jen for sharing your space with me today!


        "Hey there. My name is Aniko and I blog over at Place Of My Taste. I am a wife, mother, business owner by day, DIY-er by night, design, decor and photography lover by heart who loves to cook, taste wine, dance for therapy and create all things beautiful. I share all this love over at my blog - at my happy place. Come see me there. xo"