Showing posts with label Paper Clutter. Show all posts

Wednesday, January 10, 2018

79 My Five Favorite Ways to Organize Room-by-Room

Well, you guys! You did it! You made me cry the happiest tears I have cried in a very long time. I am so overwhelmed by the outpouring of support you all showed me after my last post. I am still making my way through all of the emails and comments and letting every word soak in. So. Much. Good. And so many new ideas and thoughts that spurred from our conversations in the comment section! I looooved it! Thank you, thank you, thank you!


Today I was invited to host a blog hop surrounding my favorite subject of all time: ORGANIZING! I mentioned I wanted to do more connecting and sharing this year, and this was the perfect way to dive right in!


I am joining a group of lovely ladies, and each of us was asked to share our favorite organizing tip for five different rooms in our homes. I absolutely can't wait to check out all of the other blogs and pick up a few new ideas for myself! You all can follow along with my fellow friends below:


I will admit, I had a hard time narrowing each room down to one tip, but this was a really good exercise for me and really got me thinking. So, I picked what I thought were ideas that made a big impact on my day-to-day life, were easy enough that most anyone could implement and were budget friendly. Some of these might look familiar, or seem obvious, but sometimes the obvious needs to be spoken.


This was the hardest room for me to narrow down. I could have talked about how to date pantry items and leftovers or how to best layout your kitchen or why I think lazy susans are amazing or what to store under your kitchen sink or how I meal plan. I had so many ideas it inspired another post or two for the near future. That said, I decided to focus on a product I use in almost every area of my kitchen (and home). My number one tip for organizing in the kitchen is to use my absolute all-time favorite bins, the multi-purpose bin, to organize everything.


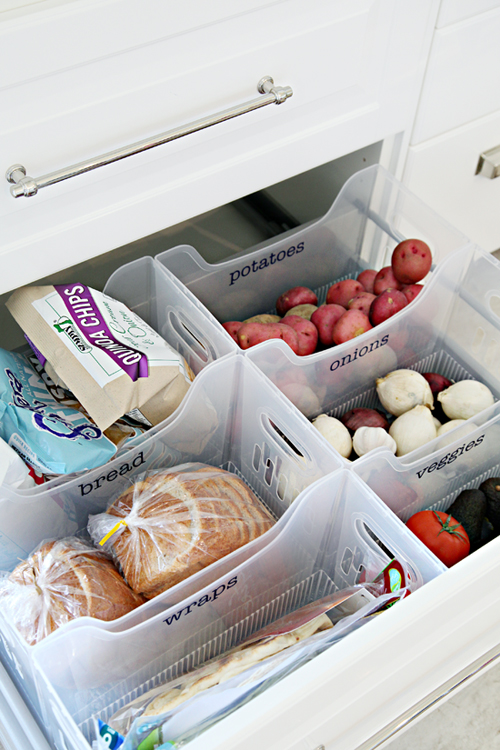
I have bragged about these bins to the moon and back and I still pick up a couple more every time I visit The Container Store. I love their price, but more importantly, their versatility, especially in the kitchen. These bins come in a variety of widths, are easy to clean, are translucent, are lightweight and have handles. Here are a few ways you can use these bins to whip your kitchen into organized shape:

  • In the fridge to create zones and kits. Think breakfast items and yogurts, lunch making supplies, produce, snacks, baggies containing treats and leftovers. 
  • In the pantry for dividing out produce, breads, spreads, chips, wraps...
  • In a cabinet to hold paper products.
  • Under the kitchen sink to corral cleaning supplies.
  • In a cabinet to hold clean rags and dish towels.
  • In a cabinet to store medications and vitamins. 
  • In deep drawers to file and divide specific gadgets, utensils, and lids.
  • On a nearby counter or shelf to corral daily mail and papers.


This is one that may seem obvious to most when I say, "create an inbox!". But friends, you really need an inbox!


Not all inboxes are created equal and it also helps to have a plan that correlates with your bin. The plan is just as important as the inbox itself.

I placed an oversized paper tray on my desk. I love this particular option because it is a little longer and wider than traditional letter trays. It also has stacking components as you can see above, so I can keep a few other desk goodies nearby without taking up all of my usable workspace. Lastly, I keep it in the most accessible location in my office, so I can easily add things to it throughout the week and also quickly work on it when the time comes.

As the week goes on, anything that enters the house that requires my attention or an action goes into my inbox. That might include a catalog I want to look at, a form I need to sign, scan and email, an address I need to log into my address book, Christmas cards I need to file away, receipts I need to expense, return labels I have printed, dates I need to add to my planner, etc... A lot of times these things are thrown at me and I can't give them my immediate attention, but I want them in a single place so if I need them at any point during the week, I know where to look.


The reason why the width of the tray is important is that it also fits a standard file folder. That allows me to add a specific place to put any bills or invoices that need to be paid. I like to keep those items separate as Bryan and I do our budget together and I never want to misplace any of our financial documents.

So, part one is to have a single drop zone place for all of the things to do. Part two is to actually do those things! I block 30 minutes on my calendar each week to go through my inbox and clear it out. It is a reminder that chimes on my phone and also a reoccurring task on my weekly list. I don't typically need that much time but I like to have it blocked just in case.


This one is easy peasy. Do you ever go to grab a set of sheets and part of the set is missing? Do you struggle with nicely folding those awful fitted sheets? Or have piles of sheets toppling over in your linen closet?


You know those inexpensive mesh laundry sacks generally intended for washing delicate clothes? Well, they also work great for corralling your individual sets of sheets. Just fold the sheets the best you can, tuck them inside a zippered sack and add a lavender dryer or sachet sheet for good measure. It keeps all of the set pieces together and smelling nice.

Also, people ask me all of the time why our "linen" or hallways closet doesn't actually have many linens stored in it. The answer is because I store most of our linens in the actual room they belong in. Each bedroom has two sets of sheets, one on the bed and a backup set. Same for bathrooms, one clean towel on the hook, one back-up. The mesh sacks store nicely in a bedroom drawer, in a bin or up on a closet shelf.


No surprise, my favorite bin is making another appearance!
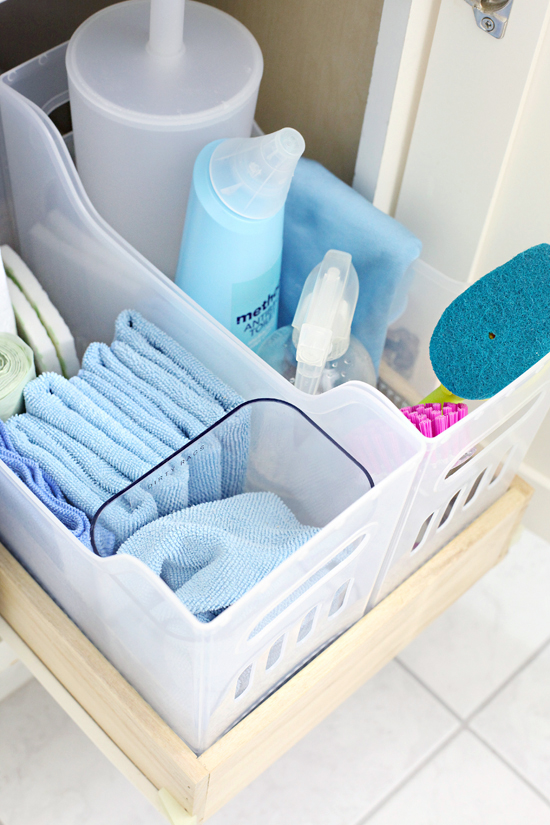

In the bathroom, I always recommend adding a cleaning kit under the sink. Bathrooms are gross, germy, grimy places, and no one wants to run all the way to the kitchen for cleaners on a frequent basis; keeping some essentials in each bathroom encourages frequent wipe downs.


Under each of our bathroom sinks I have added a couple of bins to hold the following:

  • Lidded toilet brush
  • Toilet bowl cleaner
  • Multi-surface cleaning spray (homemade recipe found here)
  • Shower scrub brush with cleaner added to the handle (homemade recipe found here)
  • Sink & grout brush
  • Trash can bags
  • Magic erasers
  • Cleaning rags

I try my best to quickly wipe down each bathroom each day. A quick pass over the mirror, down to the faucet and then around the counter (all with the same spray). The scrub brush quickly removes any makeup or toothpaste from the sink. I also try to use the shower scrubber on the walls of the shower every day or two to prevent soap build-up.


I add enough clean rags to the bin each week to get me through seven days of wipe downs, and after each cleaning, the dirty rag is tossed into a separate bin until wash day. I purchased the rags in bulk so I can do this for each bathroom, and at the end of the week they are all washed together in their own load. 


Speaking of washing laundry, let's chat about that next! I made a rule for the family awhile back that I wouldn't allow any dirty clothes to be left in the laundry room, with the exception of special wash items. Each bedroom has a hamper and each person has a specific day of the week to do their own wash. Sundays are for rags, delicate items and linens. 


On their specific day, a family member will take their hamper of dirty clothes and any empty hangers to the laundry room and do their laundry. Clothes are folded and put on hangers directly from the washer or dryer and brought right back to their rooms.

Taking away community hampers was an instant win for us! No more mixed socks or arguments over who should do laundry and when. Or what clothes belong to which kid. No more finger pointing at one another over shrinking sweaters and mixing colors. I will never say that I love doing laundry, but these quick tips have really helped us all with sanity and accountability! 

_______________


Thanks again everyone! I hope one or some of these tips are helpful and easy enough for you to give a whirl. Don't forget to check out the other posts below for even more around-the-house organizational tips:


Wednesday, September 20, 2017

27 School Paperwork Organization & Printables!

School has been back in session for a few days, weeks, even a month or two for some, and it is always a bittersweet thing. It is a sign that warm summer days are numbered but daily routines are back and welcomed.

My boys have all been attending school full time for quite a few years now; my oldest is a junior (I can't even) and my youngest just started fifth grade. We have done the back-to-school organizing thing enough now that it has become easier and smoother and we all stress less and less. So instead of throwing everything at you in a single post, I thought that over the next few weeks I would focus on a few different "organizing with kids" tricks, and cover what has worked and what we are still working on.

To get started, I am revisiting one of my very first posts which is also the most popular in all of my eight years of blogging. Organizing school paperwork!


That's right! As of today, the original post has been pinned over 697,000 times! Clearly, school paperwork is a topic that so many of us have to deal with on a daily basis, and any help we can get is always appreciated.

However, since I originally created the printables and wrote the post, a couple of things have changed. Our process has been streamlined, I have learned better labeling methods and my printable style has evolved. In fact, those oldie printables didn't even print correctly for all of my readers (which is the worst) and the labels were designed for address labels instead of file folder labels (what was I thinking!?).

So I finally did something about it for you all! New printables and a few new tips to go with them.


Our school district has been making a lot of progress in their attempts to go paperless. Over the years I have noticed fewer papers coming home and more communications happening via online newsletters and websites. So good! And since my original post, I have also discovered document scanners, so there is that.

But we still need to have a process and flow for the papers and homework that do make it home.


T I P   O N E


Create a workflow for the paper, and keep it as easy as you possibly can. When the boys bring home something that requires my attention, I ask they create a pile for me right on the kitchen table. This ensures I will see it and that I will touch it before serving dinner. If I don't give the papers back directly to the boys right away, I have gotten myself into the habit of leaving forms at their breakfast spot so they see them first thing in the morning.

Think about your routine and how you can be sure to always see the papers and return the papers. I stopped using an inbox for immediate action items because I found they would instantly get lost in a stack. If they are sitting out where we need to eat, I am sure to touch them and take action at some point before the kids go back to school the following day (and because I don't like any table/counter clutter I know the pile will be taken care of quickly). If a form comes home with important dates, I either stick the form into my planner or write down the details and recycle/file it away.


T I P   T W O


Create a spot for charts and study guides. Each of our boys has a personal workspace with a bulletin board or wall pocket. This is where they store their weekly reading logs and study guides because this is where they do their homework. When a new form comes home, they know to either turn in or recycle the previous documents.


T I P   T H R E E


Assign a holding zone. Each boy has a slot in a cabinet in our dining area, and it holds everything that needs to be referenced or dealt with until a certain time frame expires or until I have the time to deal with it for good. Examples may be forms with sports details or hard copies of long-term activity notes and schedules or those extra special assignments and works of art that I just can't let myself part with. Anything that requires some thought or that may need to be referenced again at a later date.

(We have a similar method for our bills/personal paperwork. When the mail comes in, it is promptly sorted into two piles; to-do/to-pay and recycle. We have an inbox that any actionable items go into and then we manage those items once per week).


T I P   F O U R


File away the memories.

Let me preface this tip with the understanding that what you decide is important to keep is most likely different than what I find important. I am a sentimentalist, and I have learned that time is short, milestones are valued and my memory isn't the best. I love to look back at things my kids wrote at certain ages or documents showing their test results and grades for certain periods of their lives. This is important to me, but I understand it isn't important to everyone. There is no right or wrong answer as to what you should keep and what you should toss. My general rules for the items I chose to keep and store are:

  • A reflection of a milestone (handwriting, new math skill, growth, etc...)
  • A story or piece of writing that wows me/takes me by surprise
  • Important tests/test results
  • Report cards
  • Awards/certificates
  • Letters home from teachers/staff (both the good and the bad)
  • Pieces of art that took time and effort

When it comes to art, only the very best/favorites are kept in their original form. Most are displayed on our walls, sitting on shelves or stored away inside of art boxes. Everything is photographed and stored virtually with the Artkive app. I love this app because it allows me to photograph the art, assign it to a specific kid, and stores the photo and the details (child, date, grade, etc...) to my account. I have been doing this for years now and I can still pull up art from when my boys were in Kindergarten. The best part is that it isn't taking up any extra space in our home. Artkive also has an online store that allows you to turn the artwork into memory books or canvases or calendars... This has been my chosen way to manage artwork, but there may be a variety of new and different apps available on the market that function in similar ways.

The rest of those documents are filed away into file folders by year.


And that is where the printables come in handy!


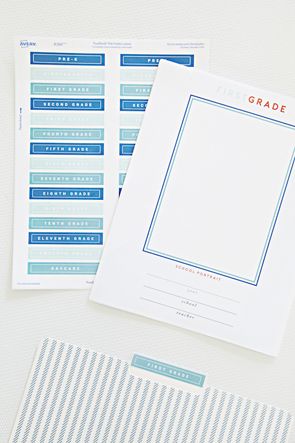
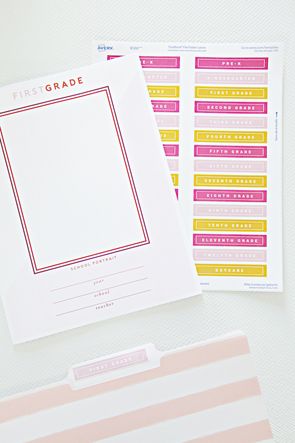
First, I created new templates for file folder labels that can be accessed and downloaded for anyone on a Windows machine or a Mac! They were designed to be downloaded and opened with Adobe Reader and printed on Avery File Folder Labels (8366).

CLICK HERE TO DOWNLOAD FREE MULTI-COLOR SCHOOL FILE FOLDER LABELS FOR AVERY 8366

CLICK HERE TO DOWNLOAD FREE PINK THEMED SCHOOL FILE FOLDER LABELS FOR AVERY 8366

CLICK HERE TO DOWNLOAD FREE BLUE THEMED SCHOOL FILE FOLDER LABELS FOR AVERY 8366

You can also label the file folders with any standard label maker, I have been using this one and I really love the variety of options that it offers.

As you can see above, I created a few different color schemes for the labels to offer some added variety.


Once all of the file folders are labeled, I like to add a coversheet to each folder with a place for the child's school portrait and details about each year.

CLICK HERE TO DOWNLOAD FREE PINK-THEMED PRE-K thru 12TH GRADE COVERSHEETS

CLICK HERE TO DOWNLOAD FREE BLUE-THEMED PRE-K thru 12TH GRADE COVERSHEETS

The coversheets simply tuck inside the front of each folder.


Quick Tip: I originally filed all of these folders inside of three very large document boxes, but quickly found they were too bulky and heavy to easily access and maintain. I recommend sticking to a standard desktop file box size or even a space-saving expandable 13-pocket folder.


The new coversheets were designed to fit a 5x7 portrait size or smaller.


S T E P   F I V E 


Backup everything digitally. The entire reason I fell in love with the idea of doing this for myself and my kids is that my parents held onto things from my childhood, as did my husband's parents from his. During many visits, these papers come out and we laugh, cry and share stories from our childhoods. I love looking back at my highs and lows and revisiting both the great accomplishments and not-so-proud moments that made me who I am today. And I have learned so much about Bryan as a kid, and especially enjoy finding similarities between him and our boys.

The thought of all of those memories and milestones and documents being lost or destroyed makes my heart crumble. And we all know that it can happen all too fast and completely unexpectedly. A number of years ago we added a document scanner to our office and it has made scanning in a stack of papers a breeze. The PDF's are then uploaded and stored online. We are big Dropbox users but Google Drive and Amazon Prime (free storage for Prime members) are also great options.


Once the systems are initially set up, they are pretty easy to maintain (and update) year after year. And I am so happy that someday my boys will have the opportunity to come back home with their families and look back at their folders and share their stories.


Tuesday, June 20, 2017

21 Mini Binder Coupon & Receipt Organization

Last week I mentioned that I spotted the prettiest blush mini-binder at The Container Store. I also mentioned that I love those fantastic mini-binders for organizing my coupons and receipts. And then I realized that I have been using the mini-binder organization for awhile now and I have yet to show you!


Between feeding a family of five and working on home organization and DIY projects around the clock, I run a lot of errands. Given my location, I try to consolidate my trips whenever possible. I live 20-60 minutes from the majority of my favorite shopping sources so I will typically hit up HomeGoods, Home Depot and a couple grocery stores all in a single outing.

Over the years I have attempted to organize my trips and handbag with a variety of checklists and pouches. Expandable files for coupons, envelopes for receipts, a small card holder for store cards and folded stacks of ideas and lists. Each individual attempt has been OK, but when combined it just created a jumbled mess inside of my purse. Or things would get misplaced, and transferring the items between totes would cause some to become separated from others. And sometimes the pouches and lists would get left in the car and then I would end up in our other vehicle. Not the end of the world, but I really wanted to find a way to keep everything together in one harder-to-lose organizer.

Maybe my situation is unique and not everyone will have the same needs as I do, I know many of you rely upon on your device when out and about, I am just not 100% there yet. That said, I did want to share because I sure do love my current setup and it really has helped to make my outings much easier to manage.

To assemble my shopping assistant, I began with a standard mini-binder from Container Store, which can also be found at Amazon, Target or any office supply store. Back when Staples offered a plethora of amazing Martha Stewart for Avery items, I picked up some secure-top page protectors and divider tabs. Although their offerings have since dwindled, Avery continues to offer a lot of similar options (again at Amazon, Target and office supply stores). I use page protectors/pockets to hold coupons and receipts, business card pages for store cards/gift cards, and added pages in the back for keeping track of my shopping lists. Let's take a closer look.

I continue to utilize my meal planning printables every week for coming up with our weekly meals and grocery shopping list. It typically lives inside of my pantry door throughout the week for the family to easily reference (in one of these clear sign holders), but when I leave for my shopping trip I use a clip to attach the list to the inside cover of the binder.


Although I use my phone for coupons every trip, I also receive a number of offers in the mail or print some from emails and websites or clip coupons from the newspaper and even the backs of receipts. I use one pouch to hold coupons for groceries and another for everything else (like haircuts, clothing, oil changes/auto maintenance, etc...).


Each pouch was labeled with my label maker and my favorite clear/gold tape.


When it comes to receipts, I generally only hold on to any that relate to my business and possible return items. I also like to keep my grocery receipts to check against our budget each month (and then they are recycled). I log my business expenses weekly and then permanently file away those specific receipts. Due to our location, I generally find myself over-purchasing for projects to be sure I have options and to prevent any last minute delays and trips. That also means I may have to manage quite a few returns and need to keep track of those receipts.


Business card sheet protectors were the ideal solution for all of my store loyalty cards and gift cards.


Because I may shop for project and home good materials at different times and locations than I will for our groceries, I keep those items on a separate list from our weekly meal planner. It is easier to utilize a separate printable to list the item and any specific details as a project progresses, or when multiple projects are taking place at once. And I love mini-tape measures because they are ridiculously helpful out on shopping trips to the hardware store or when measuring for bins and baskets (I find the small tape measures at craft stores, here is a similar one).


I have two free versions of this Shopping List printable for you, both designed to fit a mini binder! One to account for the center binder rings, and another that just allows the list to be centered on each page. The printable is designed to print on 5.5" x 8.5" paper, duplexed.


On occasion, I am out looking for an item that works with a specific paint color or I have inspiration pics clipped from catalogs/magazines. A small pocket on the back cover was added to organize those smaller items.


I also use a spare pocket to hold a calculator and pen as both come in handy at times.


All of these items tuck away nice and neat and the binder is still able to close flat without trouble. And best of all, I am able to carry this mini-binder in the majority of my handbags and totes. And if not, it is still portable on its own.